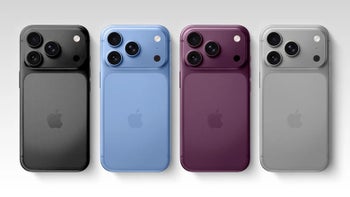
The Galaxy S26 Ultra arrives with one of the most versatile camera systems on the market, impressing with its quad-camera setup.
But to fully utilize this capable camera system, you must first master its features and learn the camera layout.
In this article, we’ll explore the ins and outs of the Samsung Galaxy S26 Ultra camera app and walk you through every feature and functionality.
Galaxy S26 Ultra 12/512GB: Get it now over at Samsung!
$1299
$1499
$200 off (13%)
Samsung is letting you save up on the Galaxy S26 Ultra with an eligible trade-in. Get up to $720 instant trade-in credit or $200 off without trade-in. This is Samsung's latest and greatest phone, and the first phone in the world with Privacy Display, so don't miss out!
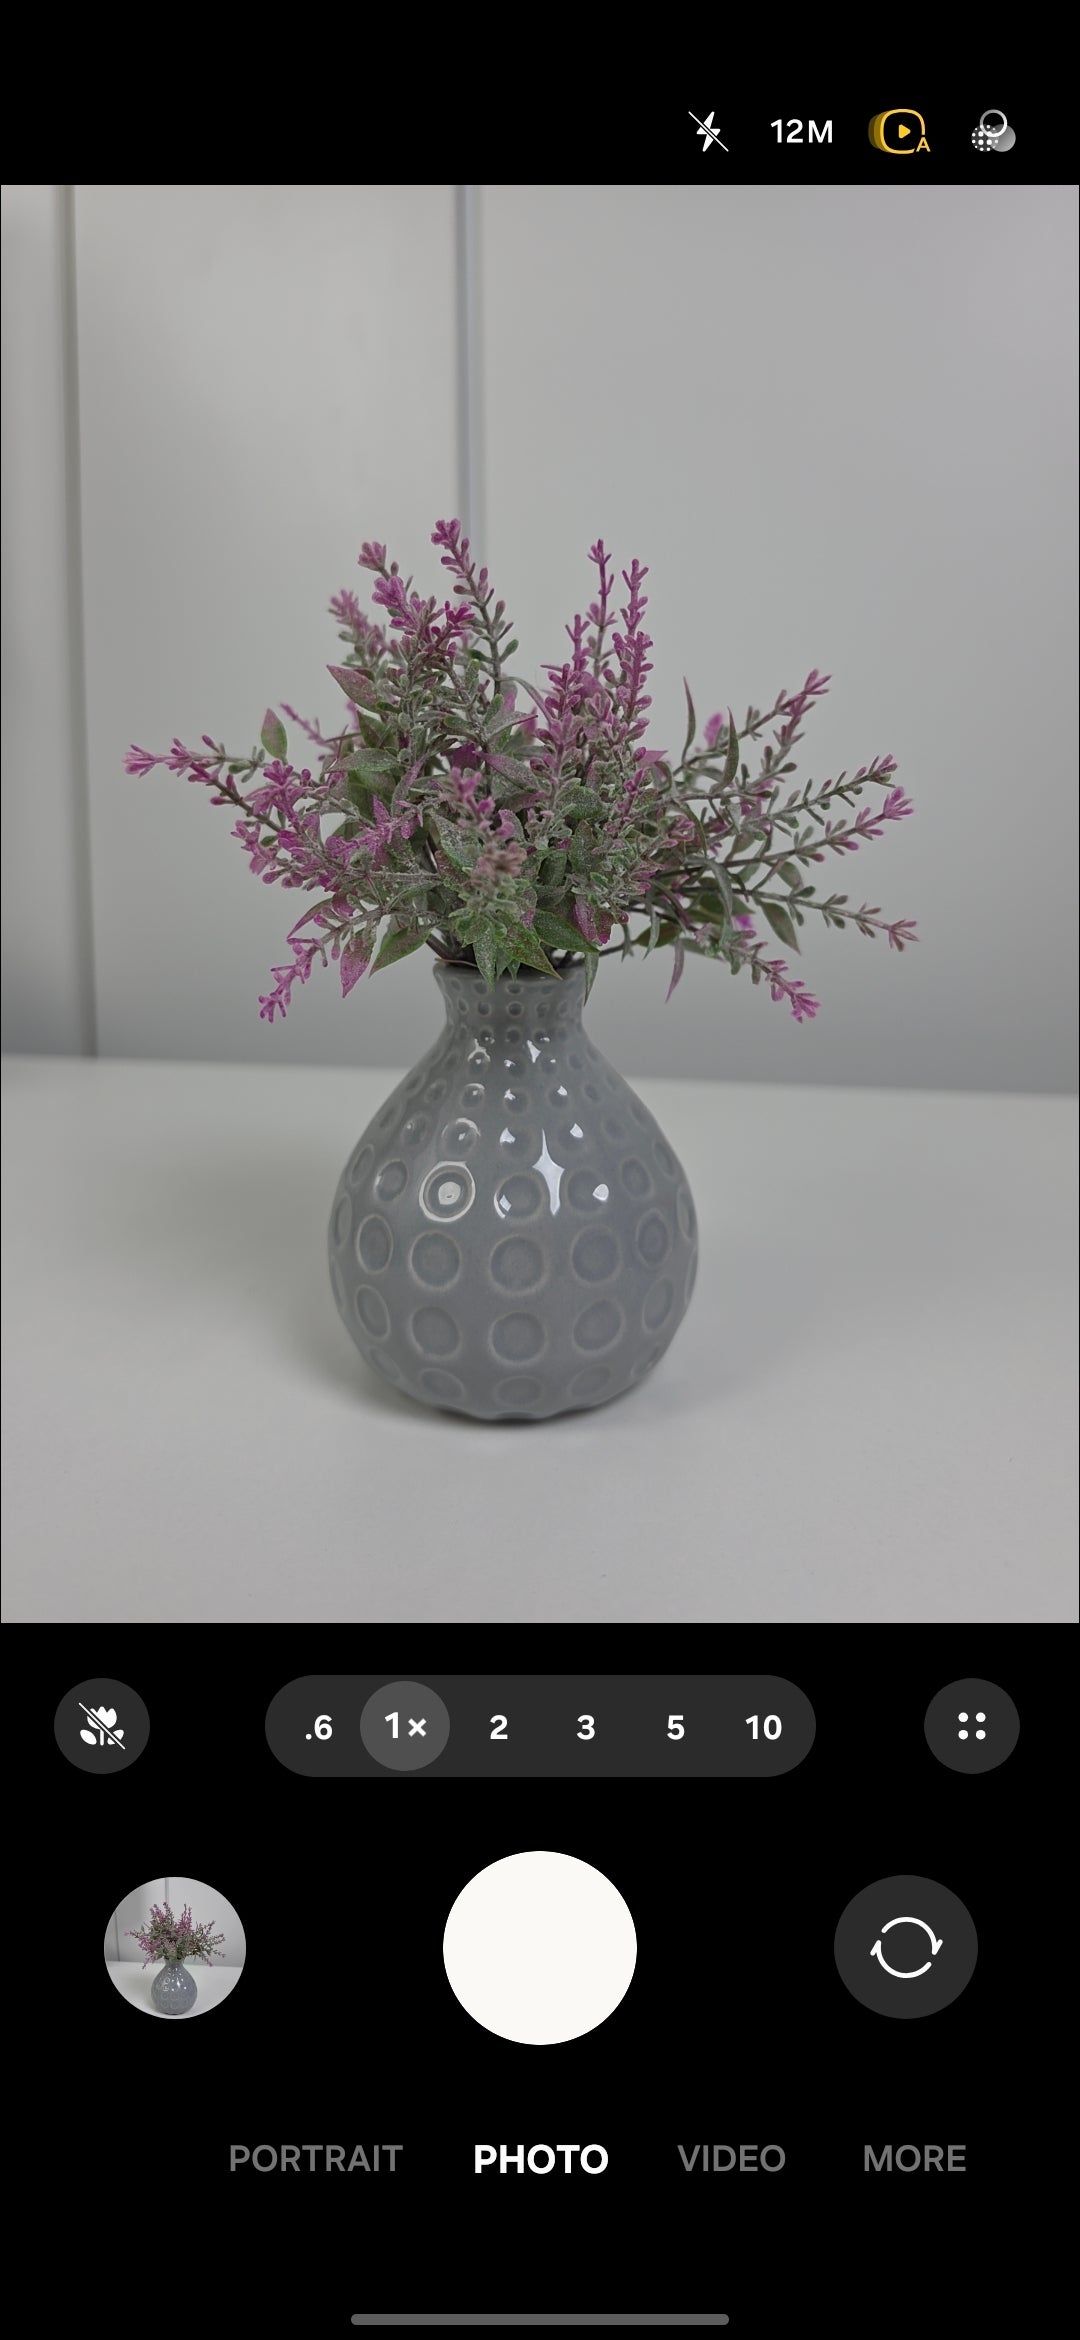
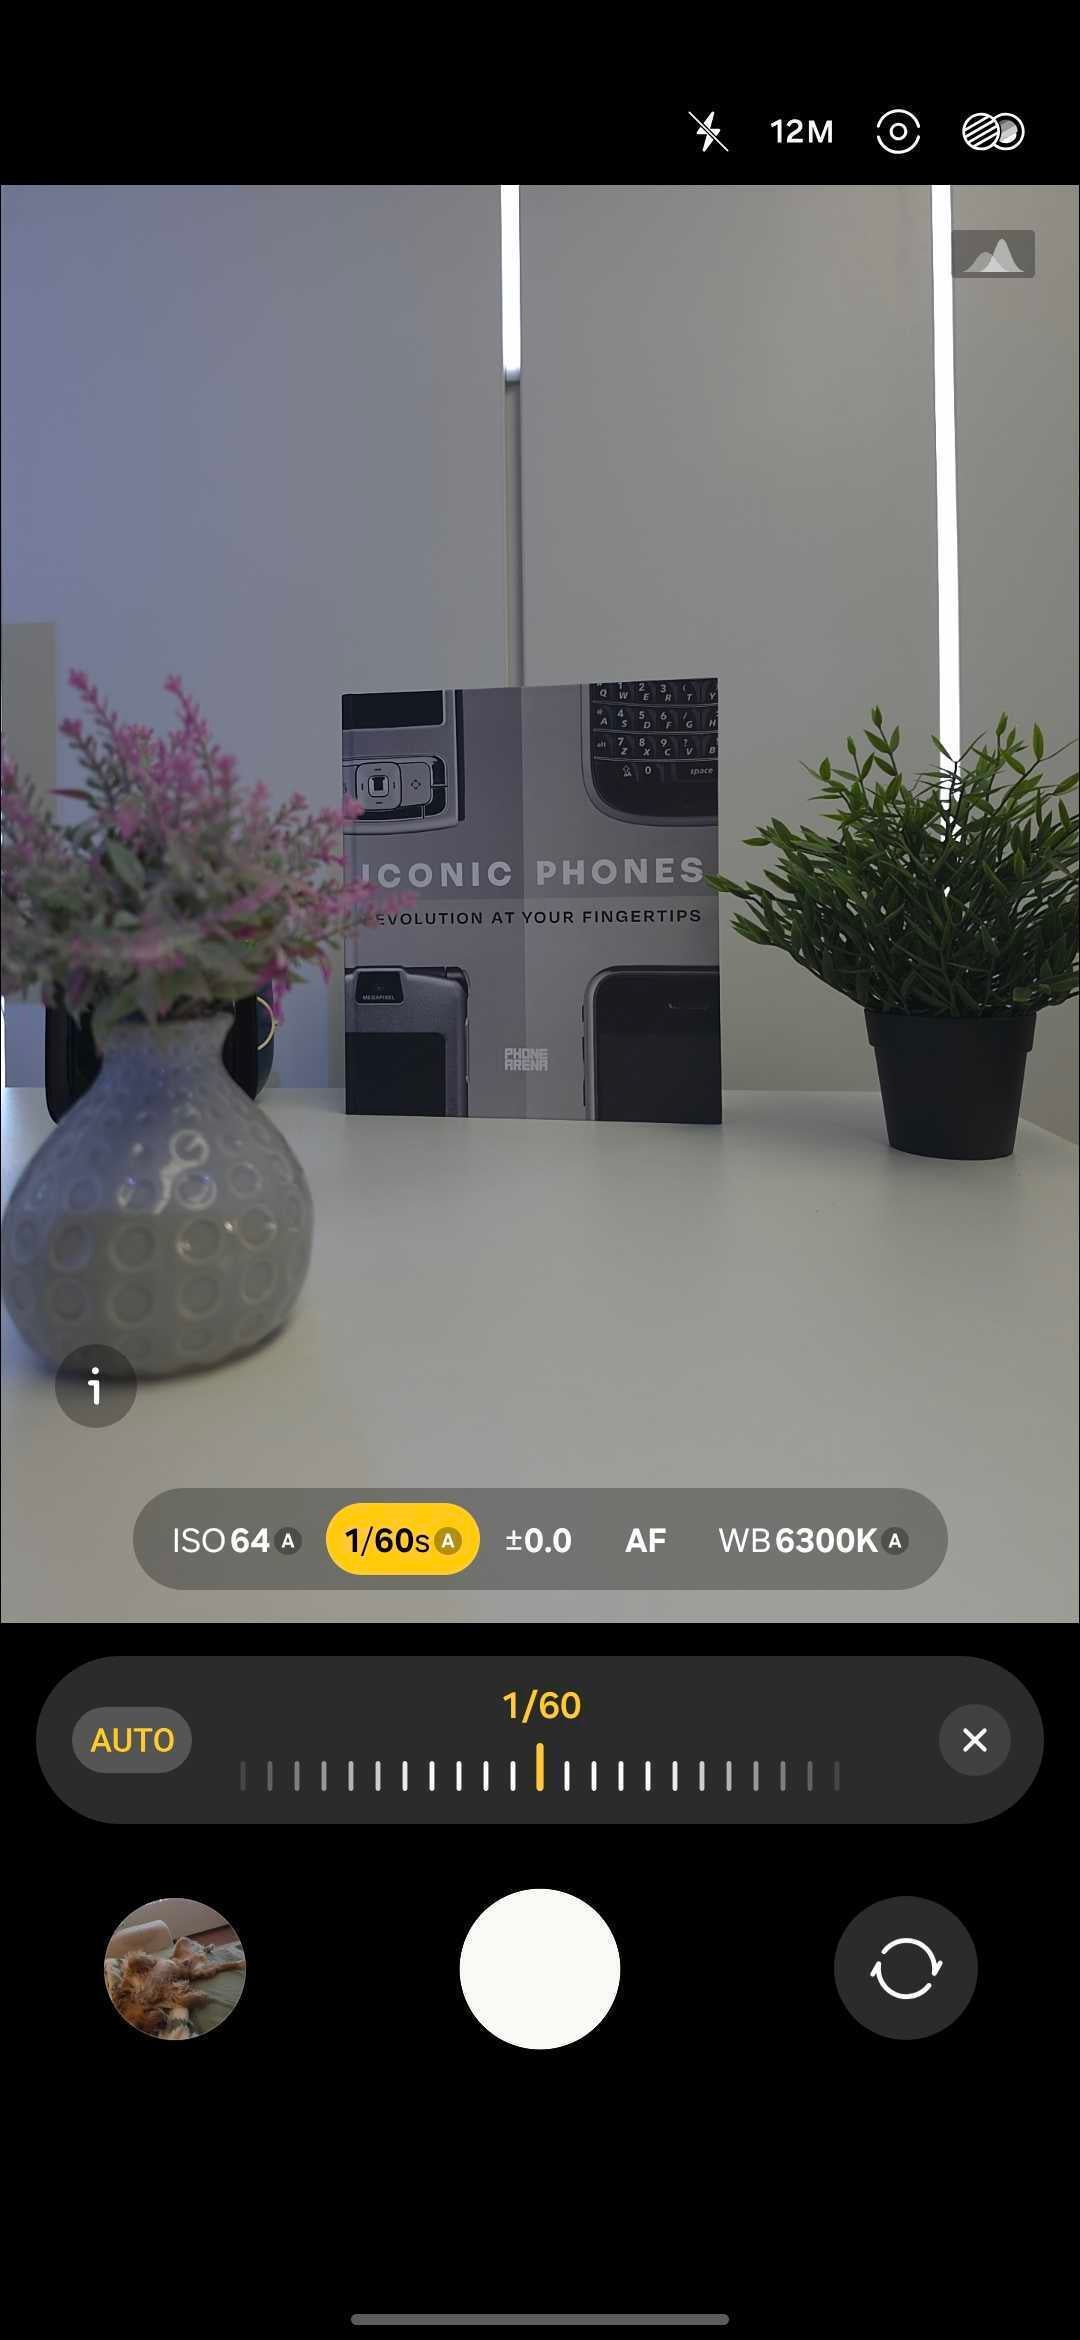
What it is: This is the default mode that will greet you as soon as you open the camera app on the Galaxy S26 Ultra, and it’s a very familiar sight that Galaxy users will feel right at home with.
Here, you have the prominent zoom selector front and center, while all settings and modes are neatly tucked away in the quad-dot button immediately to the right of it.
In this flyout menu, you can easily access the full settings page for the camera app, followed by the following:
The default camera mode offers an intuitive experience.
Positioned in the top right corner is the quick menu, where the shortcuts for some of the most often-used features reside. Here, we have flash, the resolution selector, motion photos, and filters.
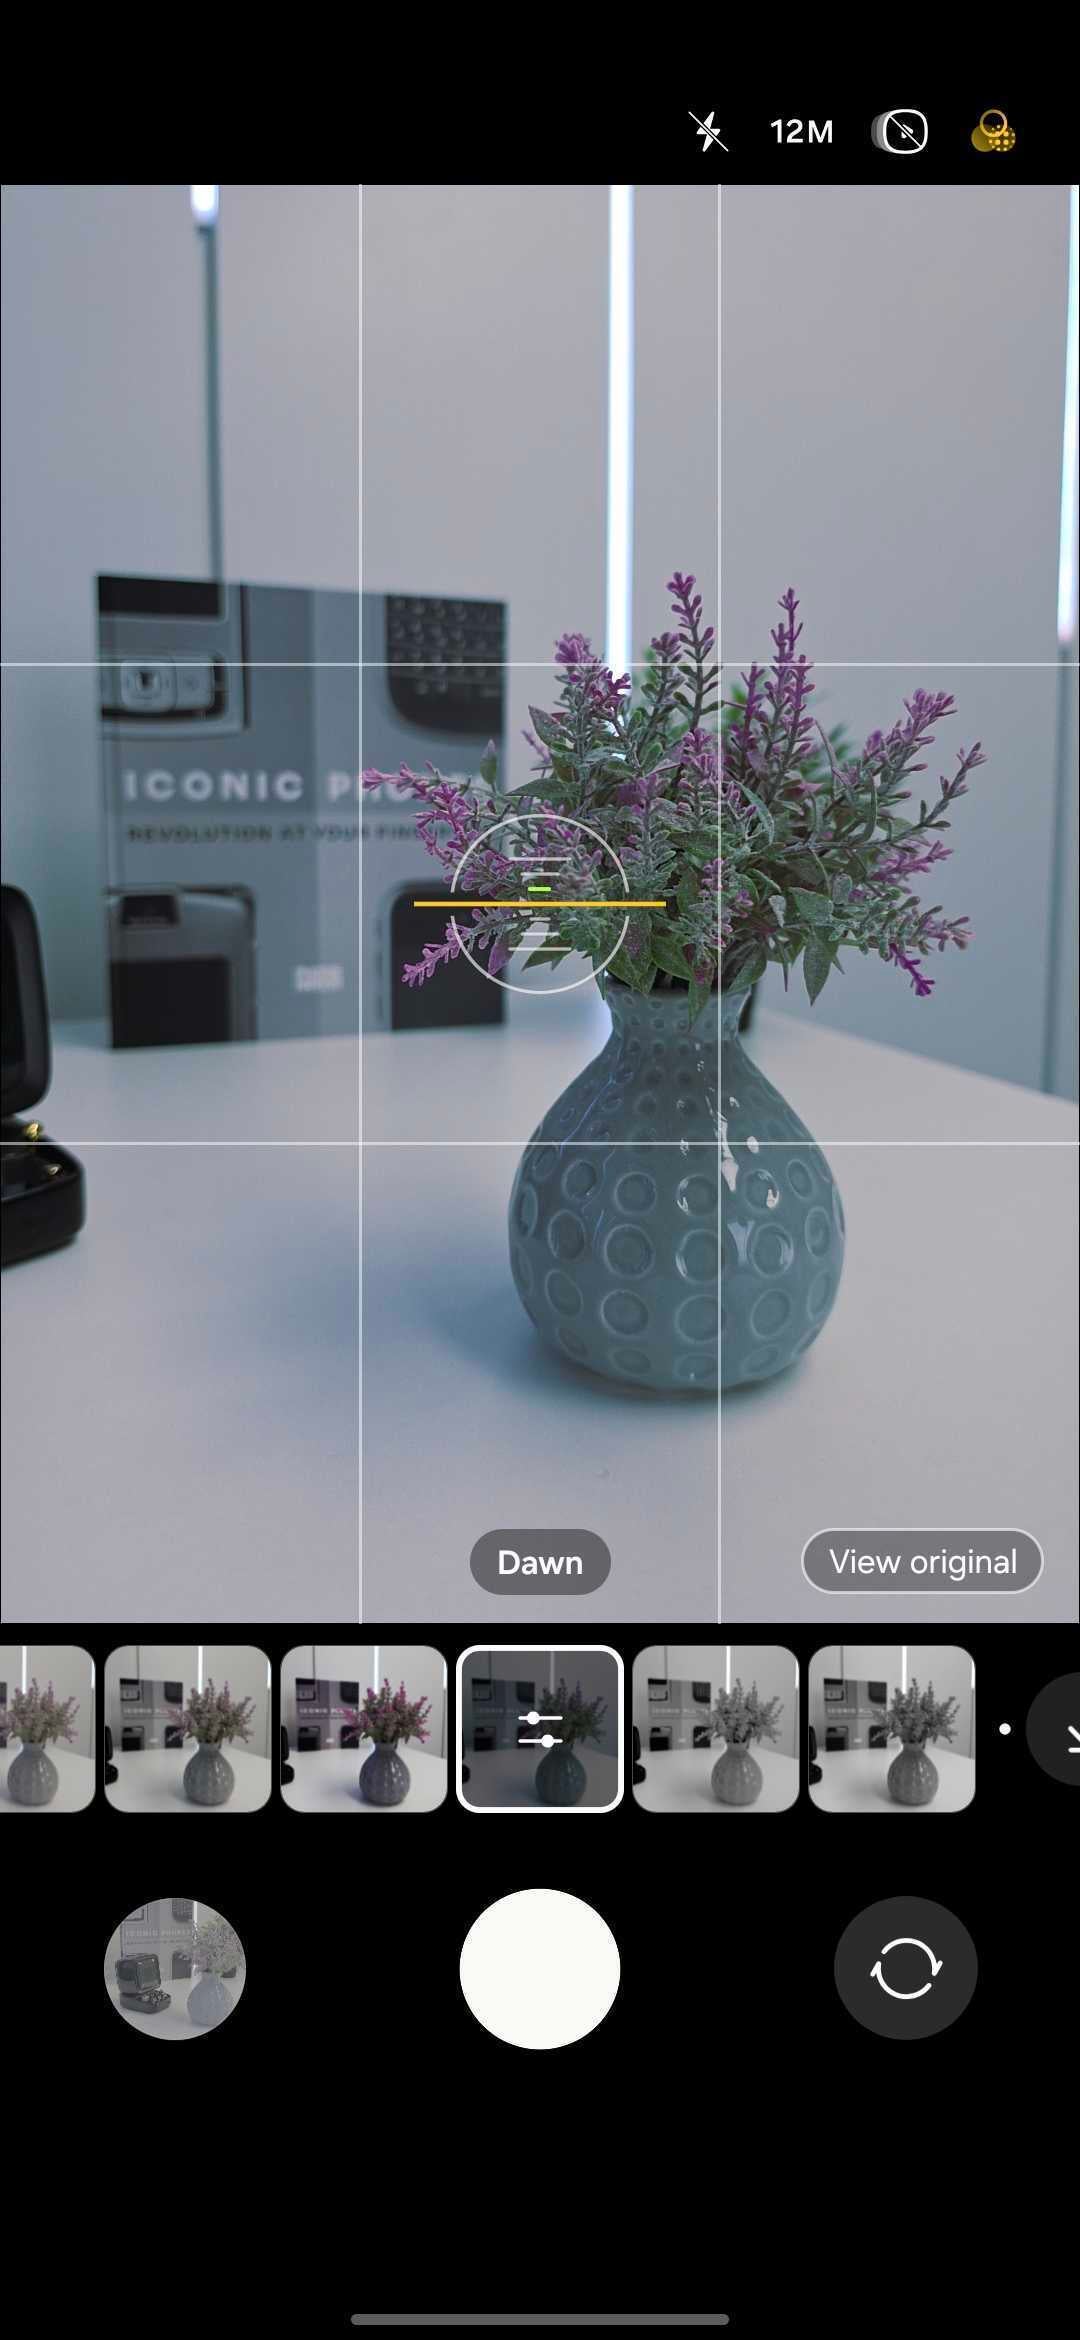
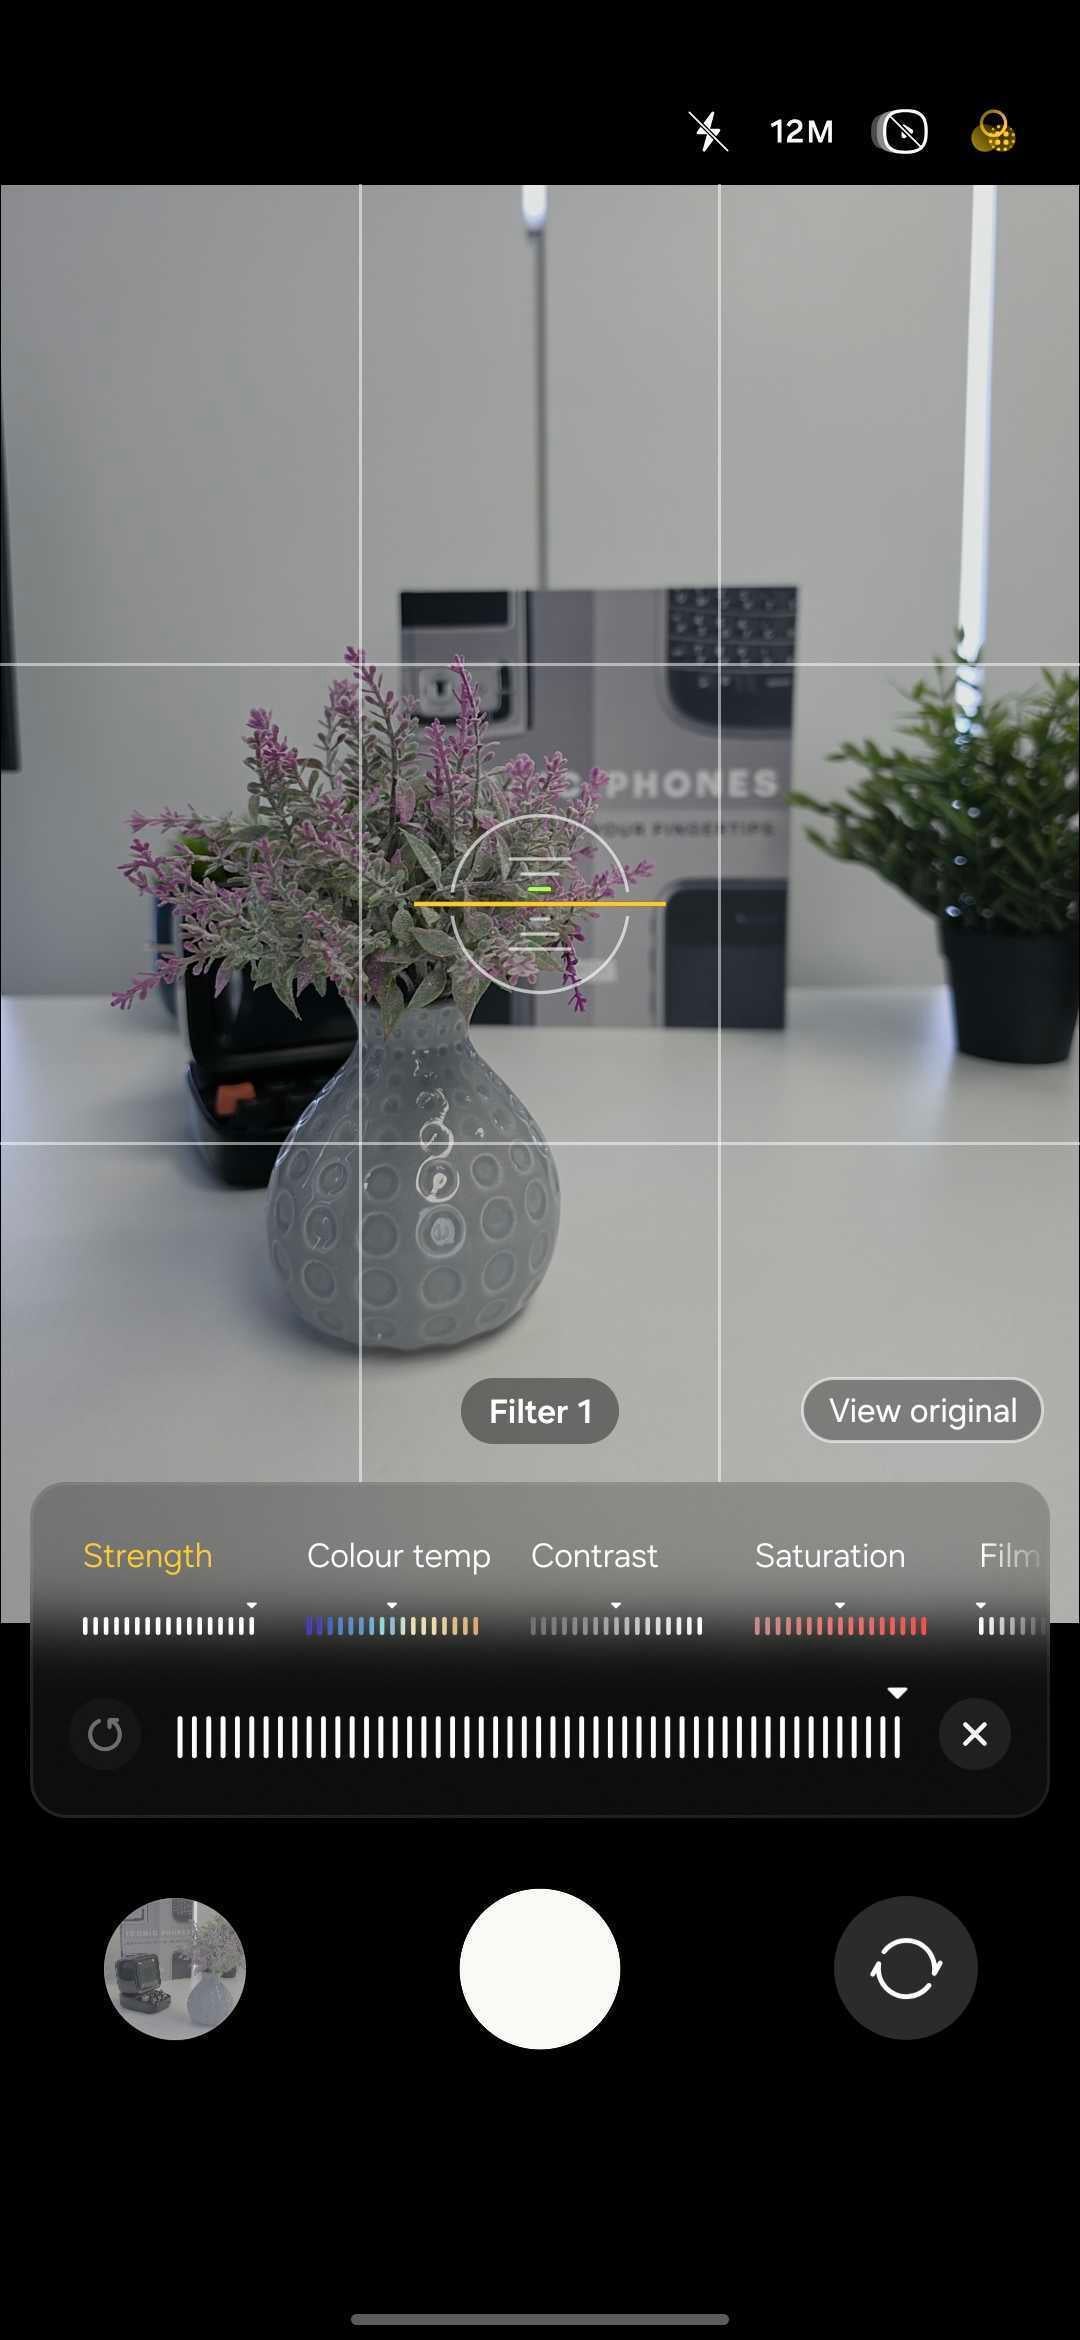
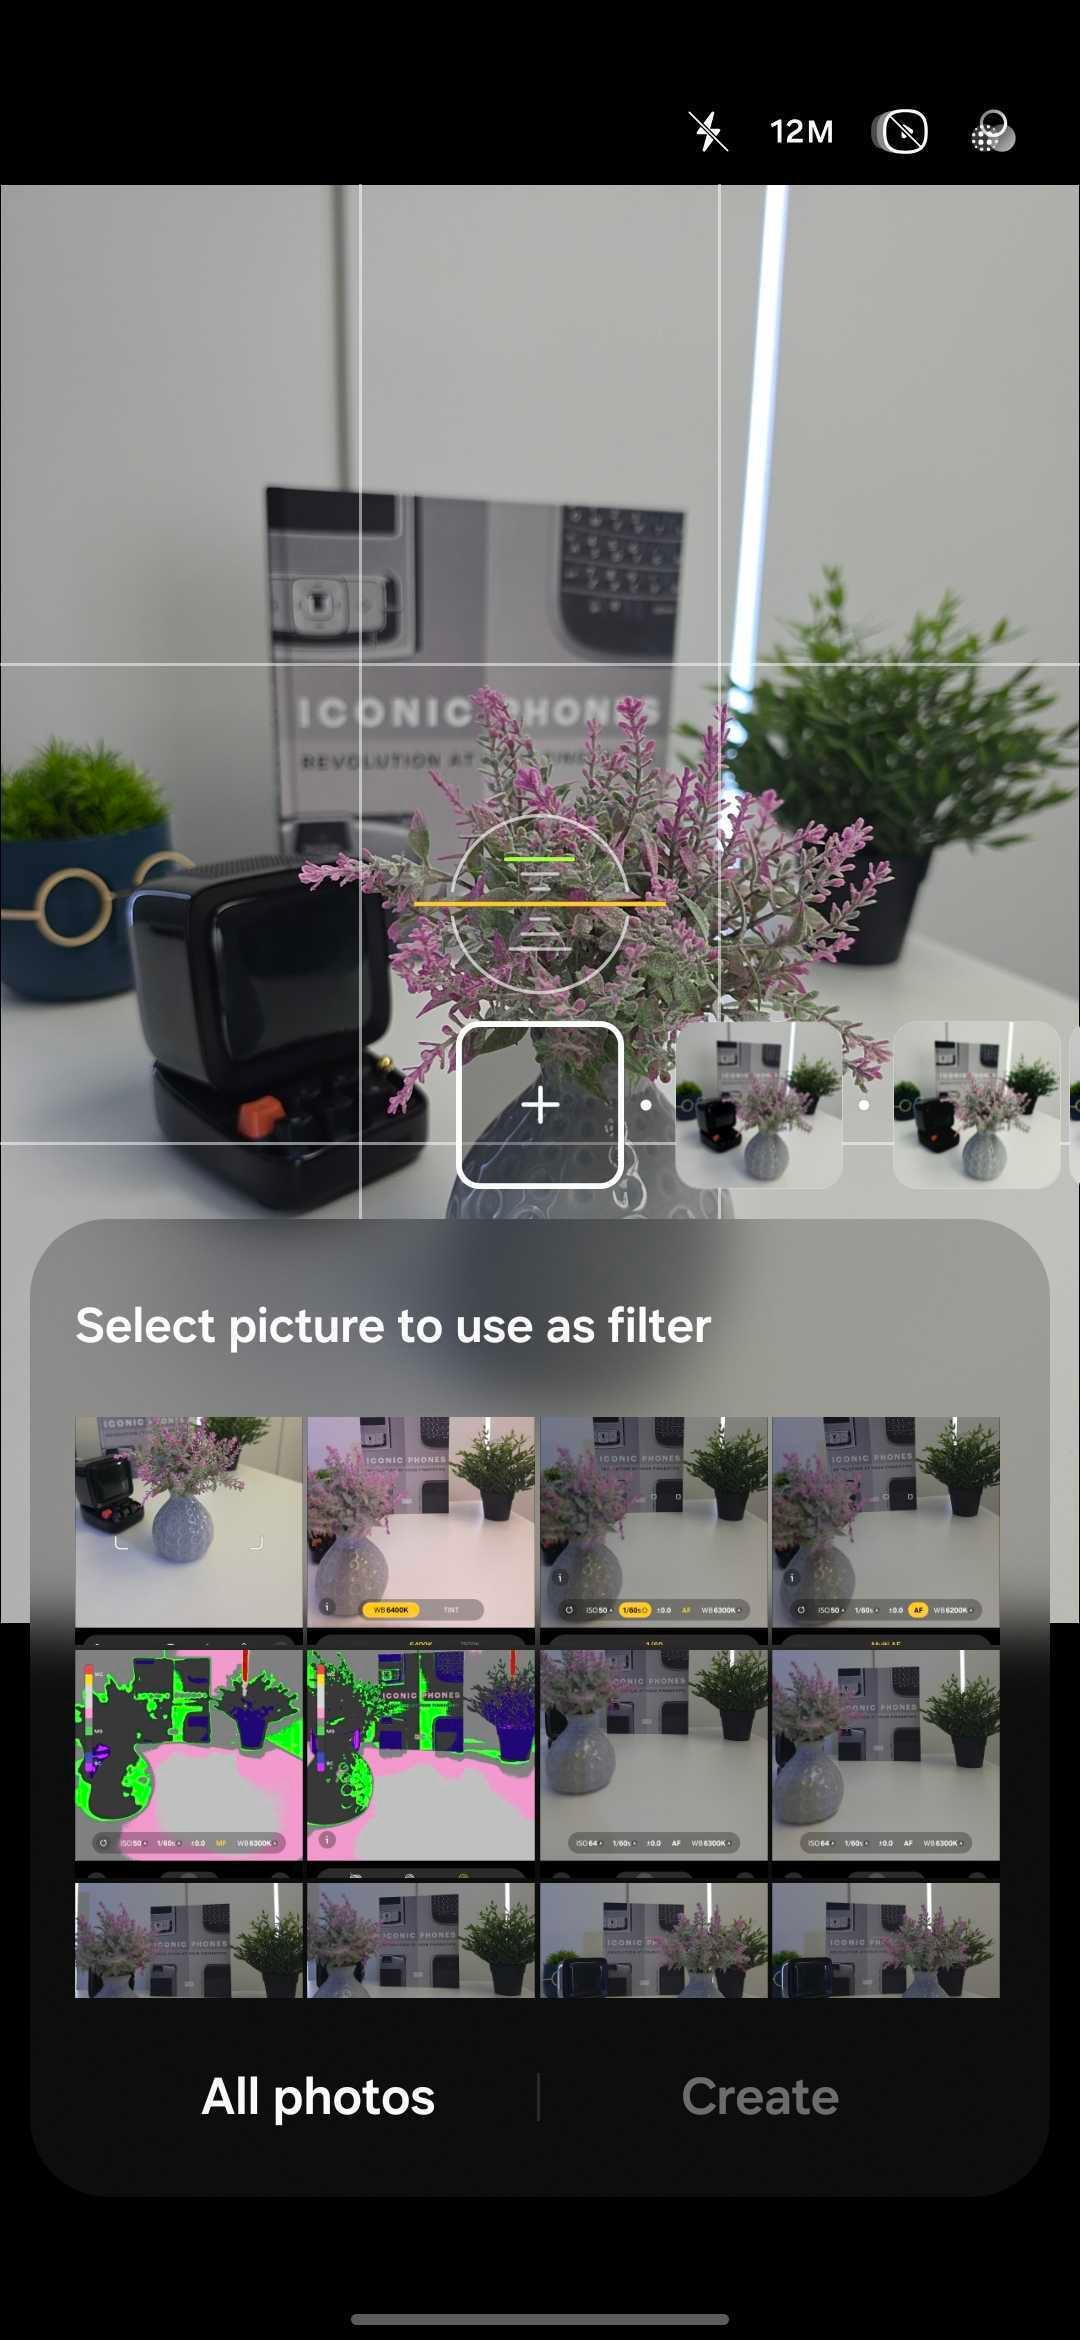
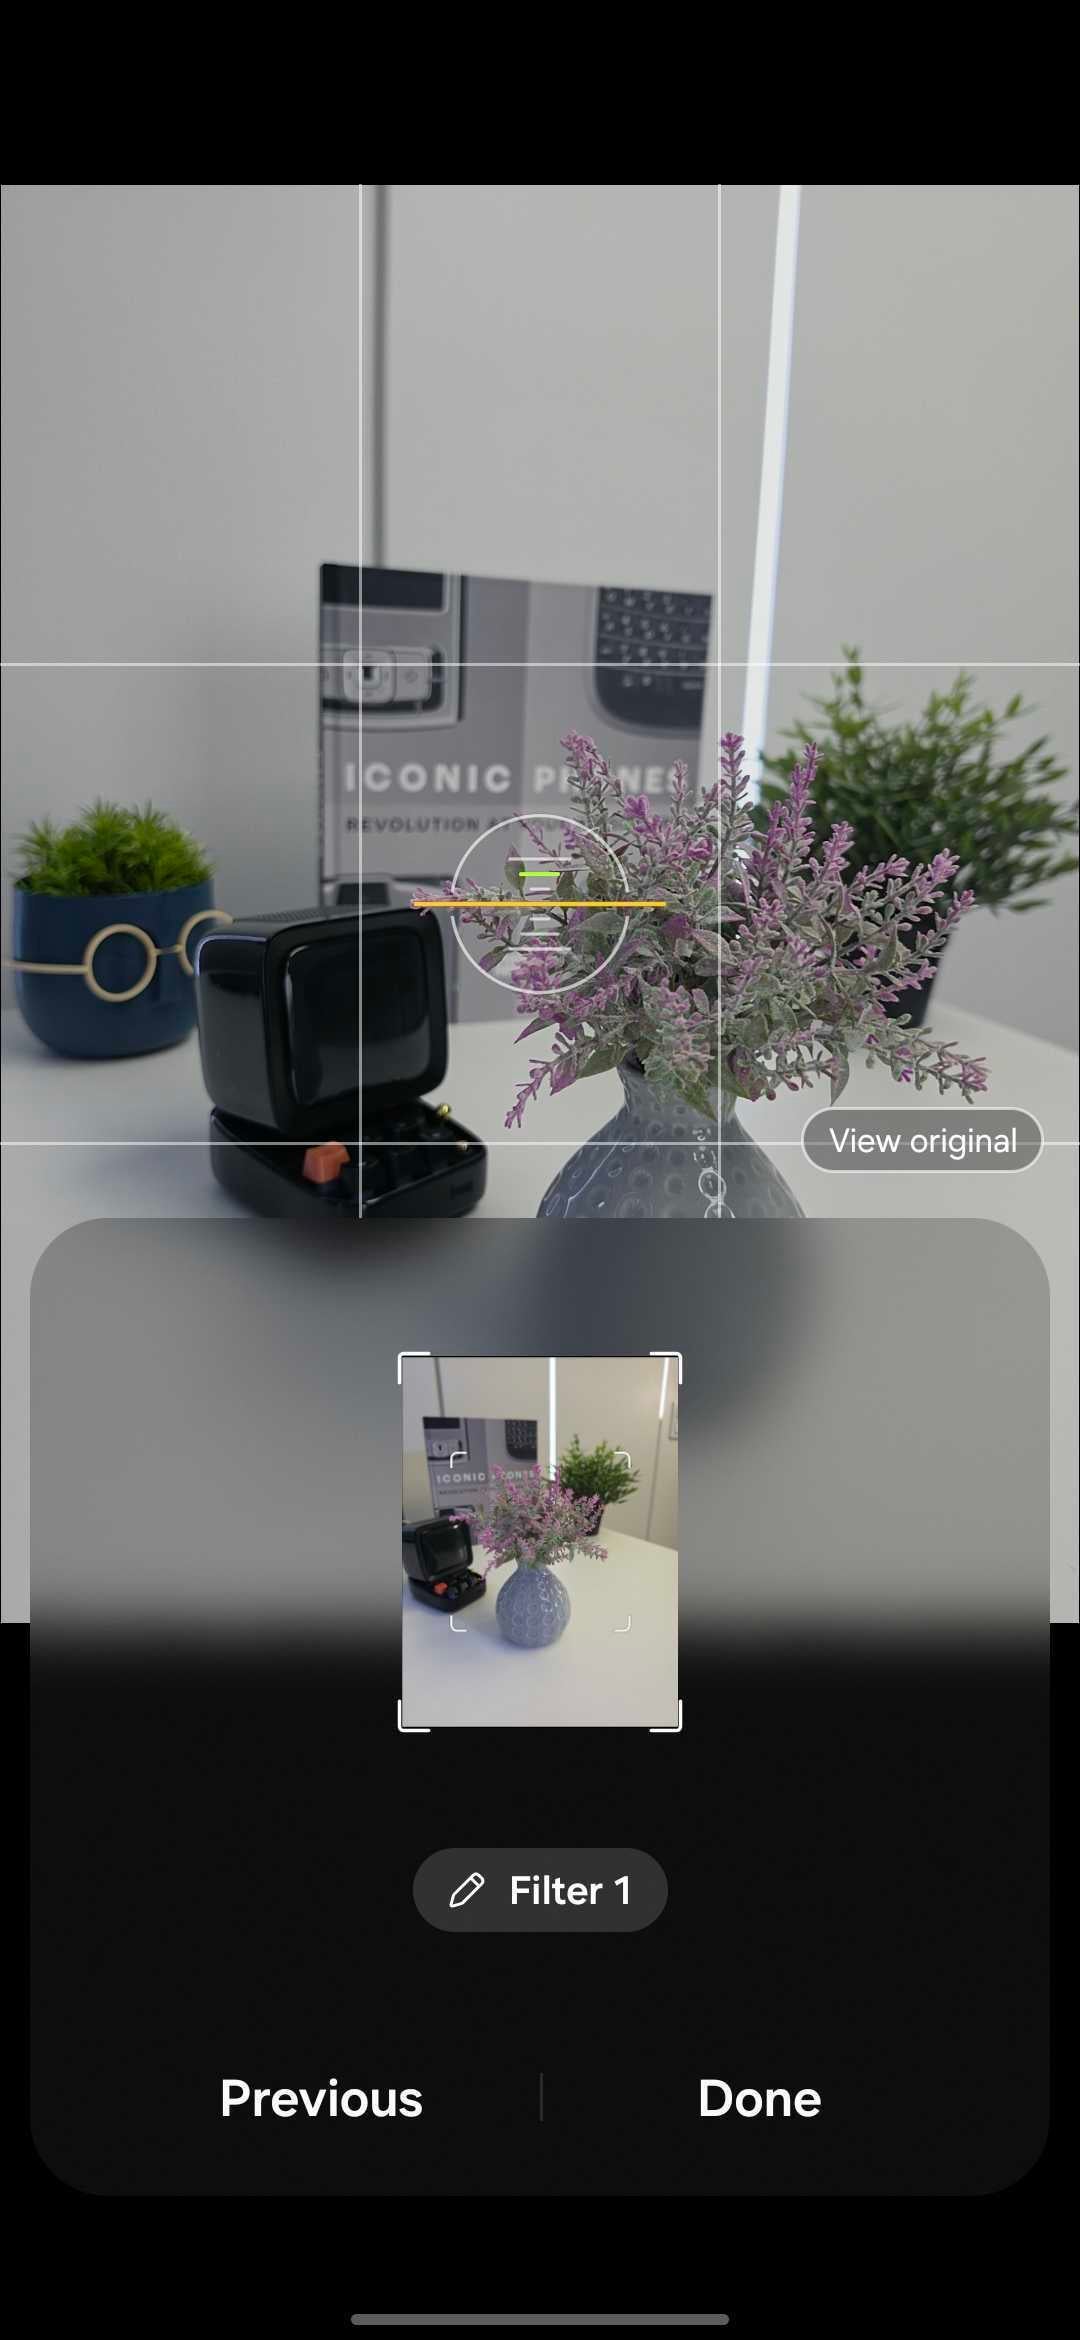
Creating a custom filter from any photo is quite intuitive.
What the filters do: But these aren’t your typical color overlay filters. Instead, they function more like Apple’s Photographic Styles, offering much more control than standard camera filters.
A standout feature is the ability to “lift” the aesthetic from any existing photo and create a custom filter based on it. Once saved, you can capture photos and videos with that new style in real-time or apply it afterward.
Key takeaway: Standard Photo is your everyday shooting mode. The resolution selector is the first place to go to get higher-quality images. 12MP is the default for speed and file size, but 50MP and 200MP are there when you need more detail.
Quick Tip: Did you know that the Galaxy camera app can keep your last used settings and remember exactly where you left off?
To enable this feature, open the camera settings and scroll down until you see the “Settings to Keep” menu. From there, toggle on the modes and settings you want the app to remember. This way, if you take a portrait but lock your phone and reopen the camera app later, it would stay in portrait mode instead of reverting to the standard photo mode.
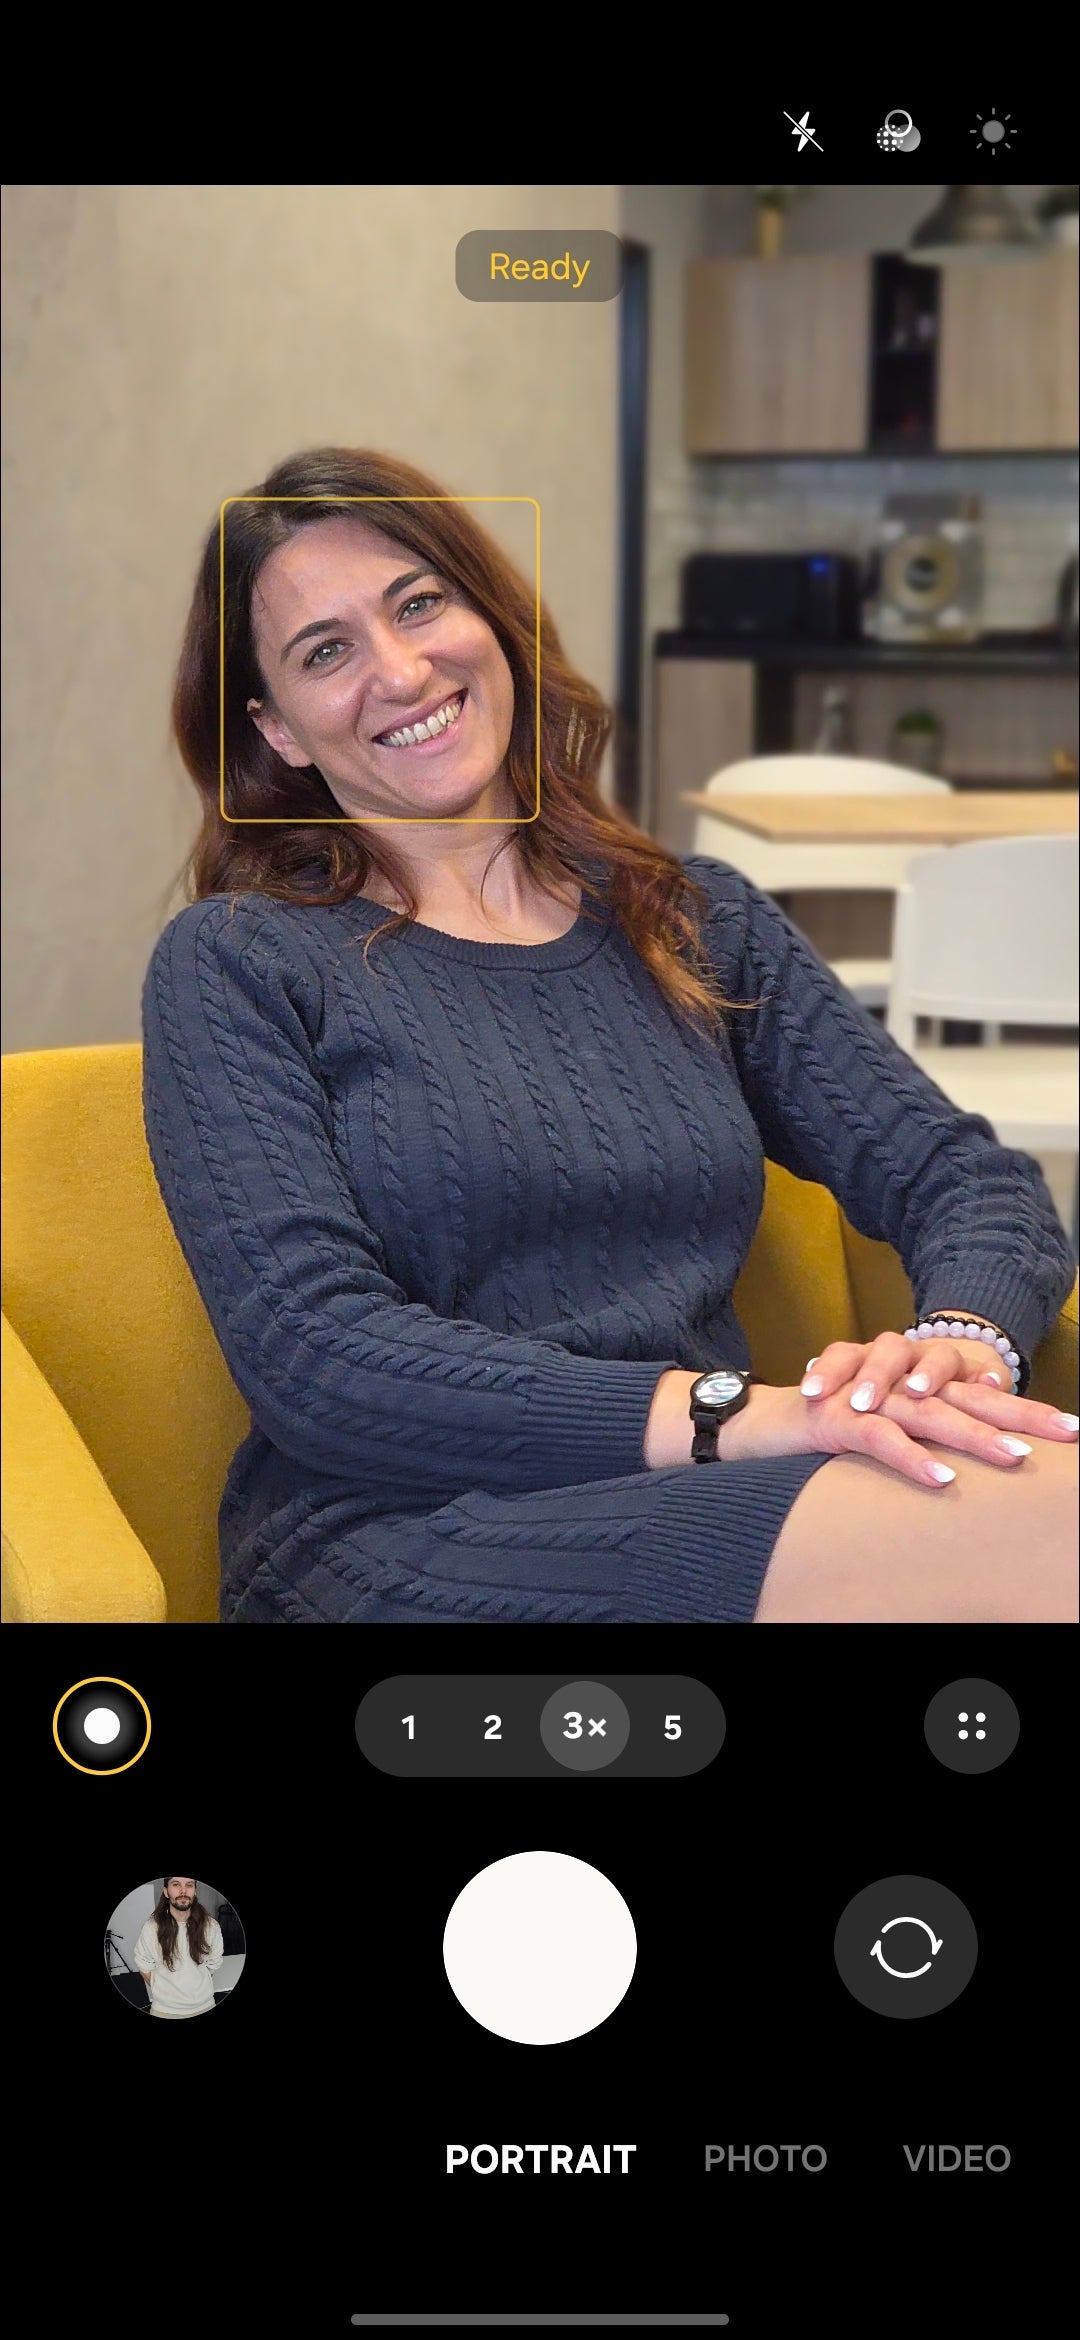
Portrait
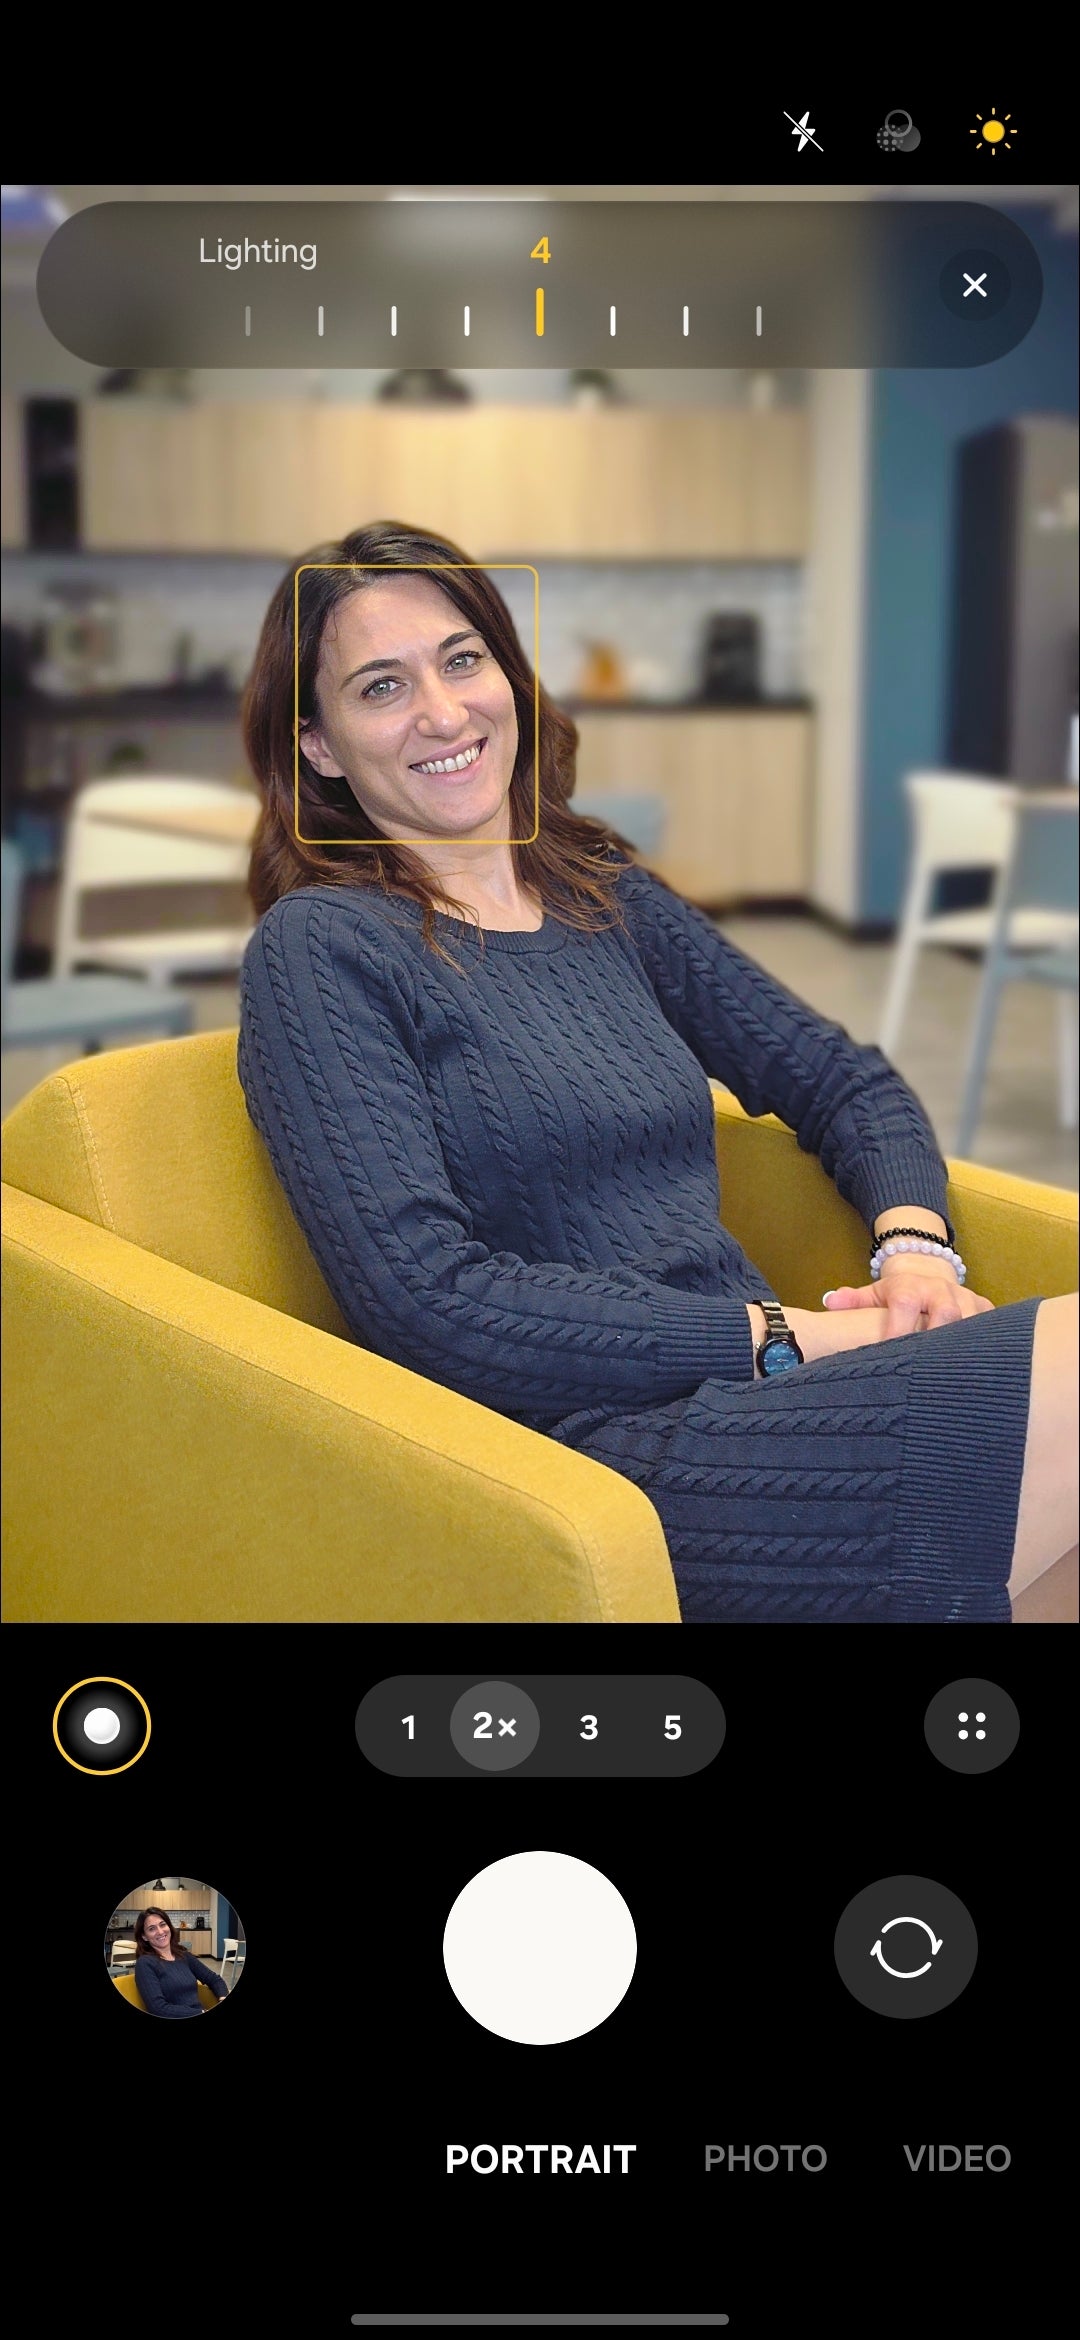
What it is: Portrait Mode is where you go for that "professional camera" look where the person stays sharp in focus while the background gets a soft, artistic blur (the bokeh).
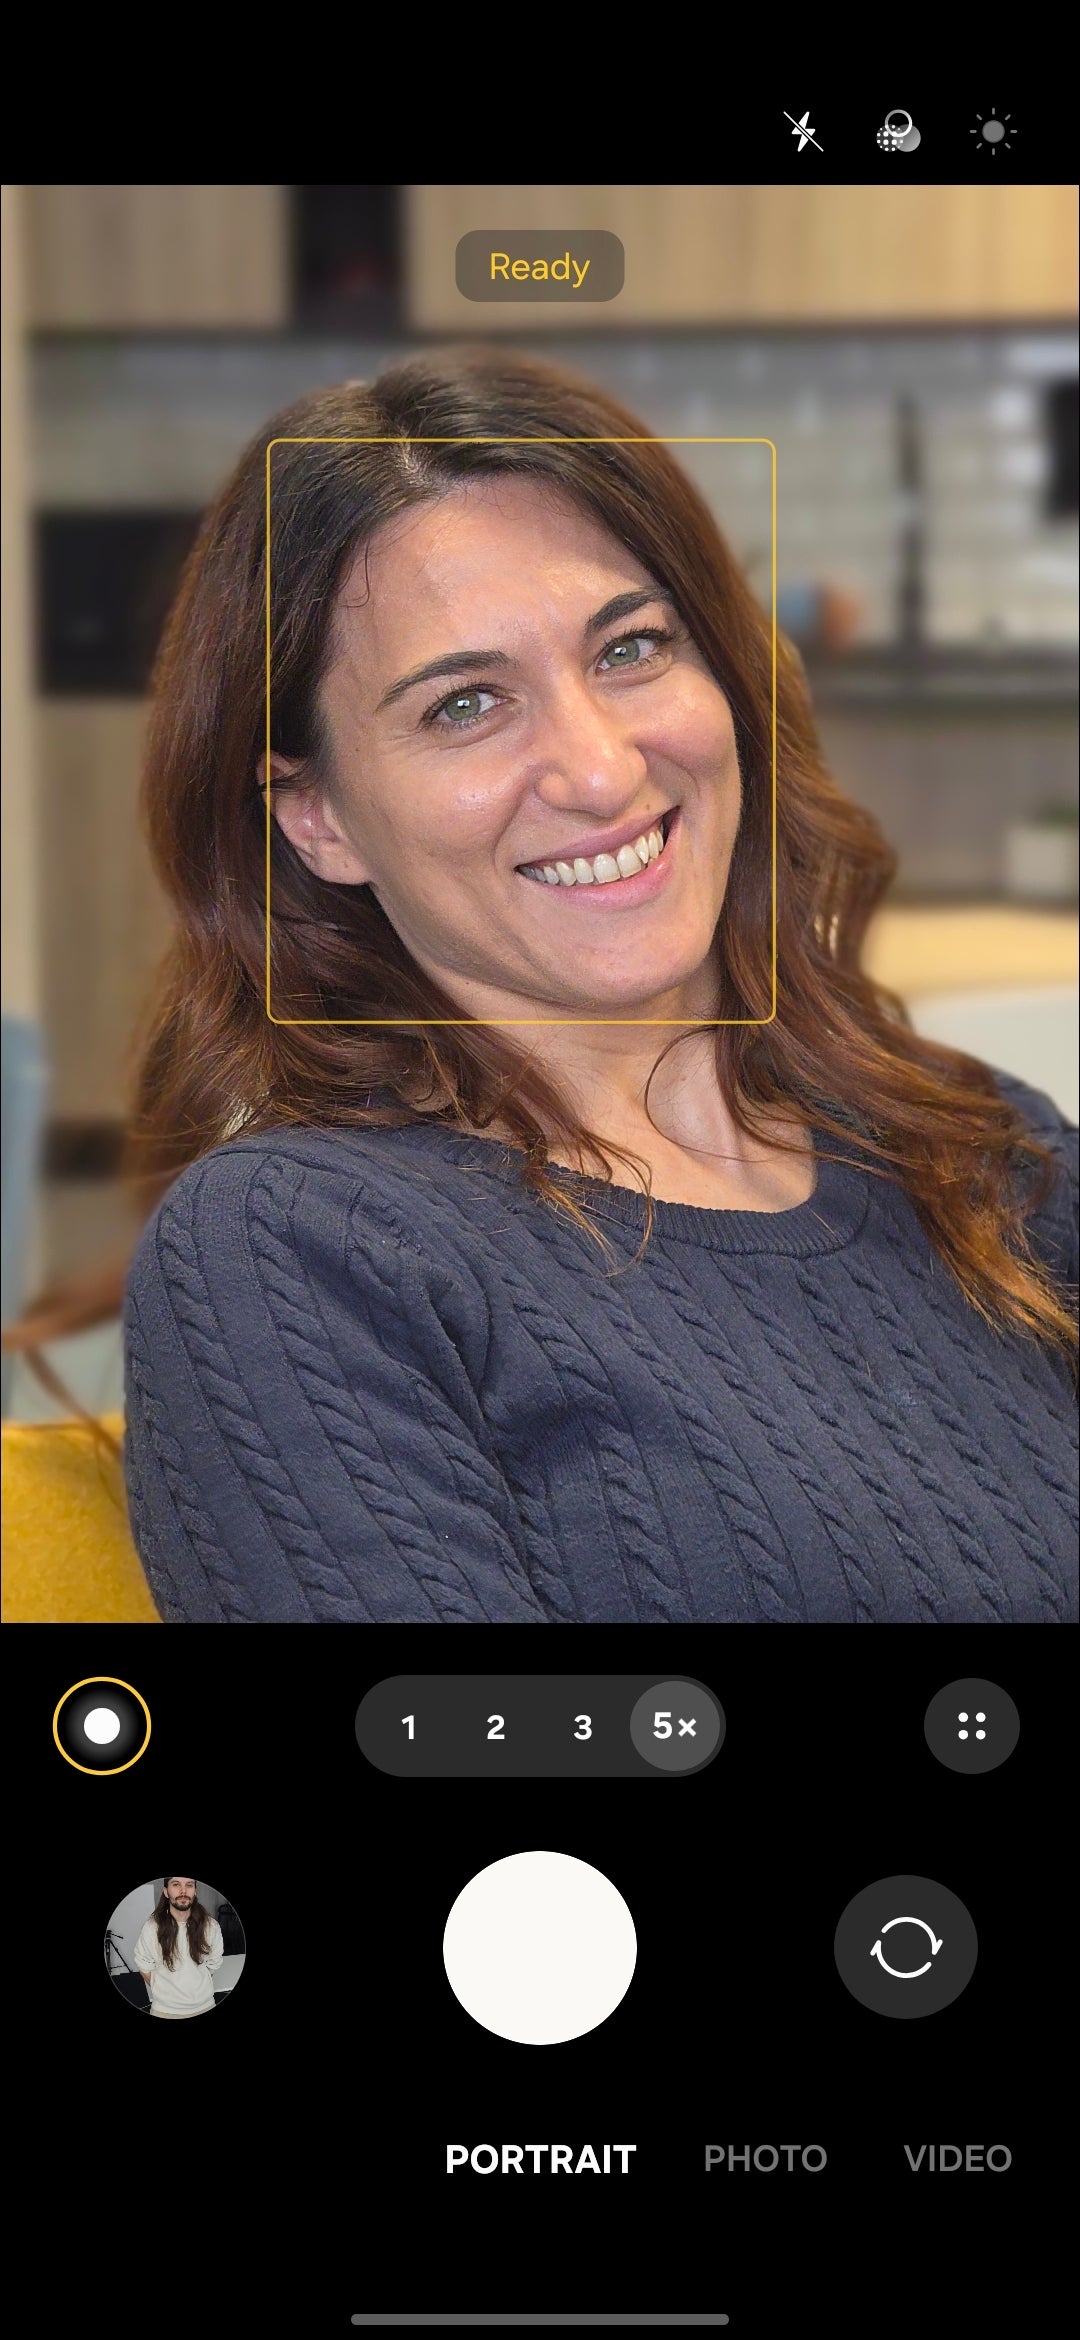
To enter Portrait Mode, swipe right anywhere on the screen or simply tap the “Portrait” button. Here, you can choose the zoom level from 1X to 5X.
2X, 3X, and 5X portraits on the Galaxy S26 Ultra.
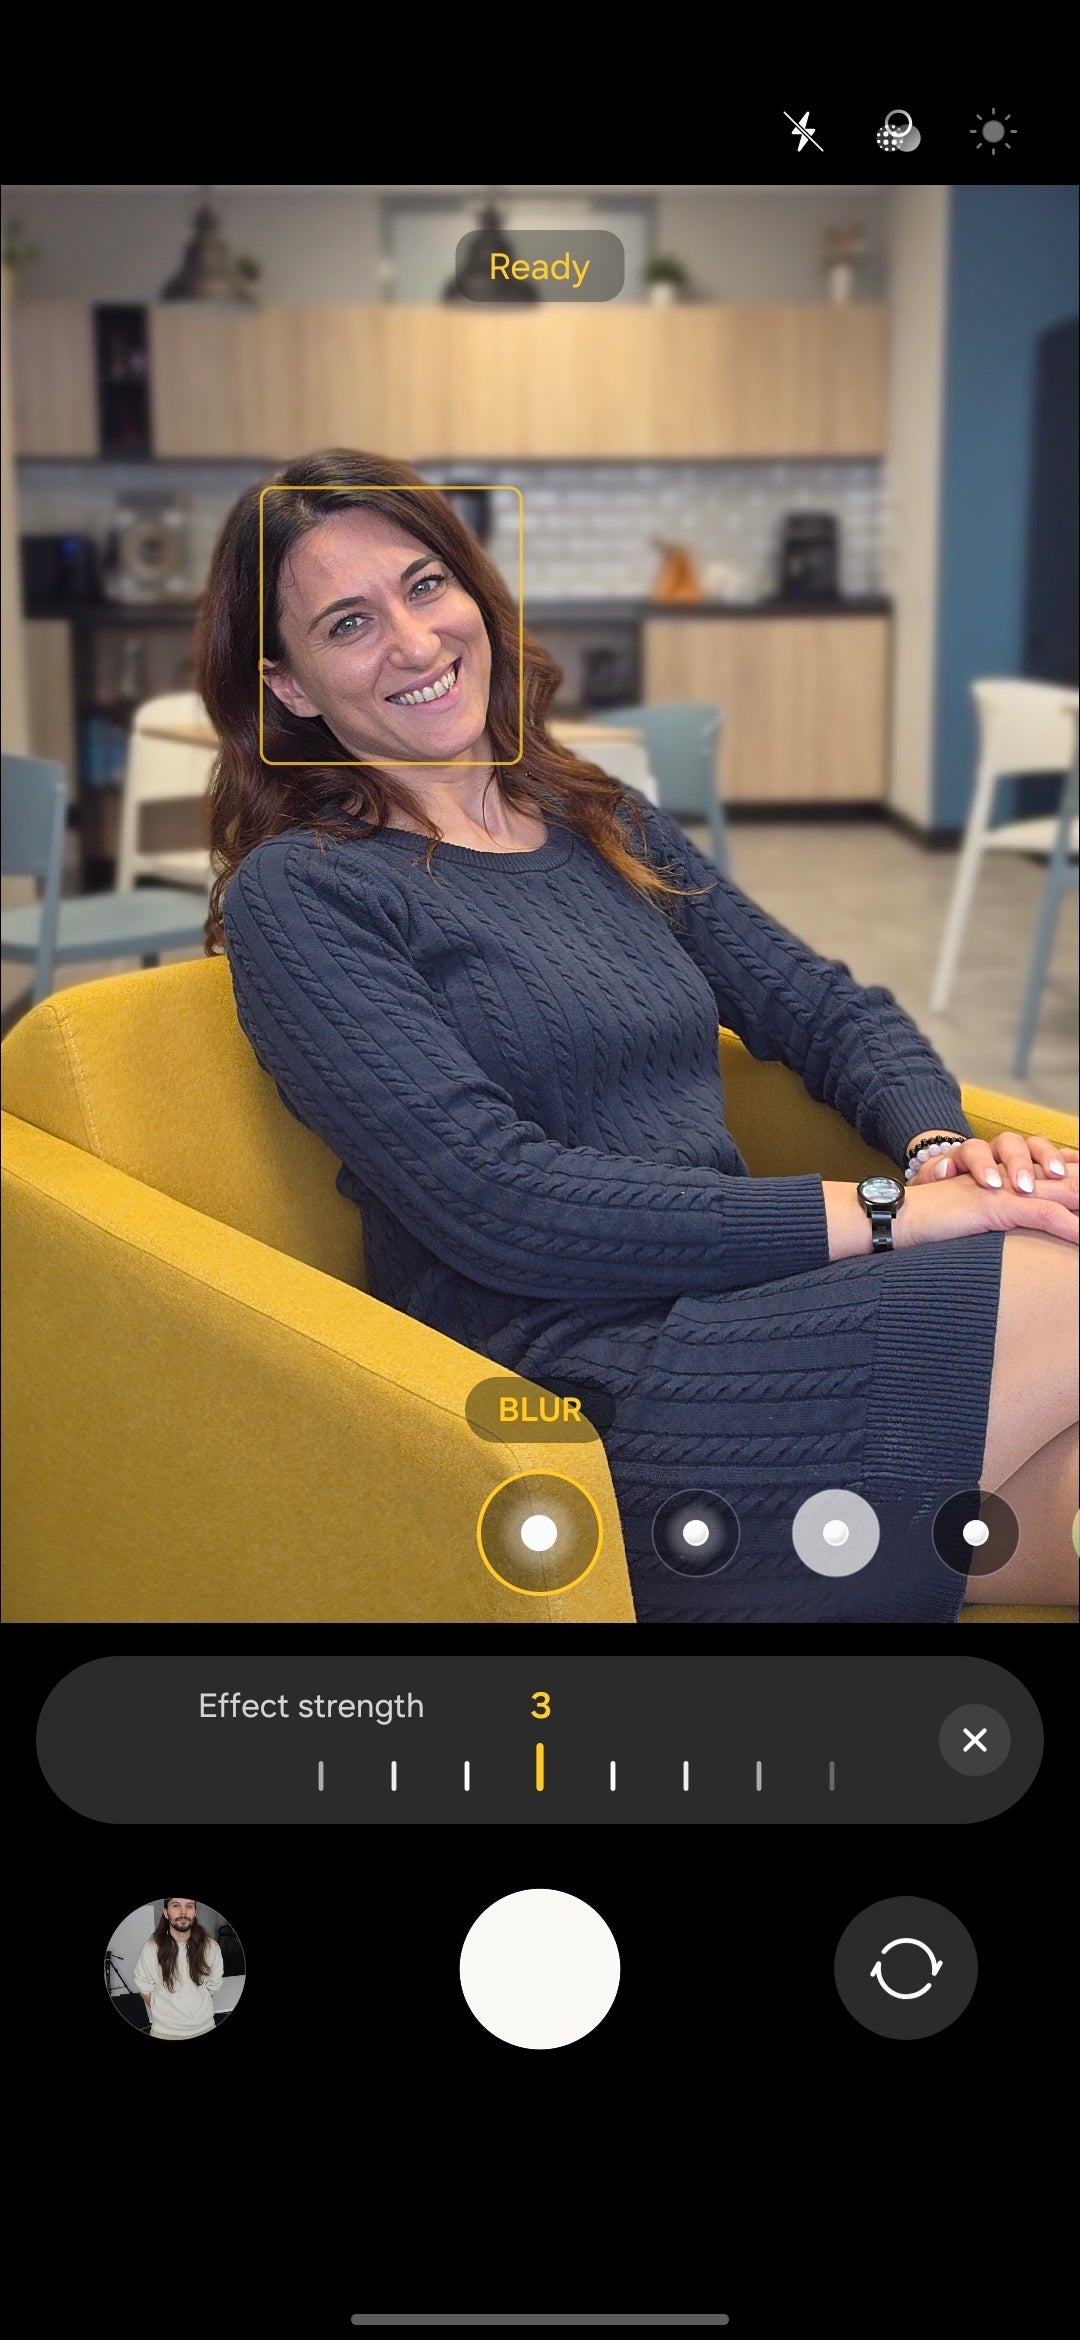
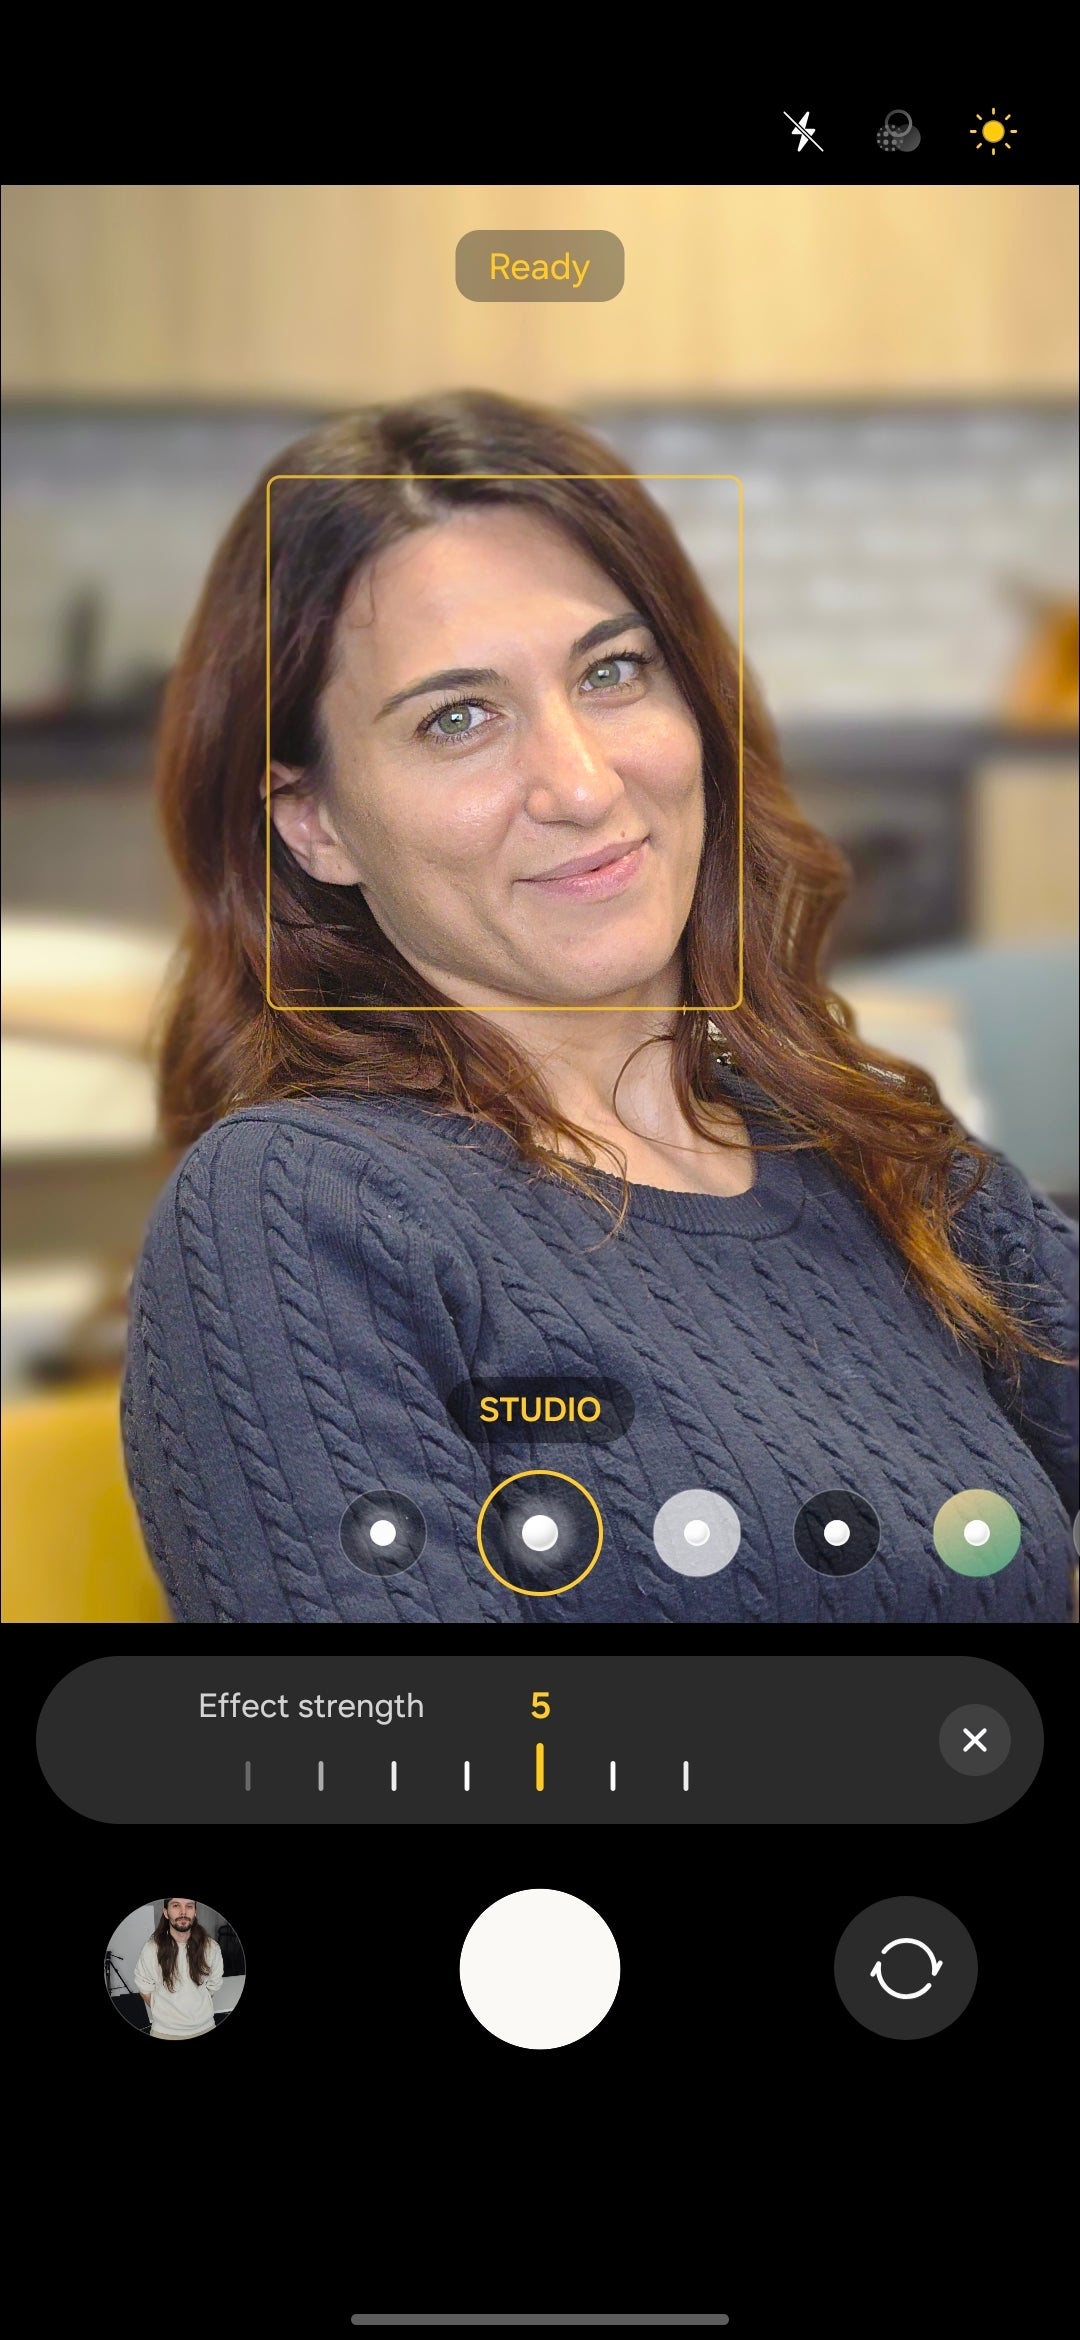
In portrait mode, you can select between a few different portrait lighting and blur styles. Aside from the standard blur, which lets you select an effect strength between one and seven, you can also pick between Studio, Low-Key Mono, High-Key Mono, Backdrop and Color Point, each giving a distinct visual identity to your portraits.
Aside from regular blur, you can apply different lighting effects to your portraits.
For the first time this year, the Galaxy S26 and S26+ models also score a 5X portrait mode. Previously, they were limited to 3X portrait zoom.
When to use it: Use Portrait Mode to get polished, subject-focused shots. This mode is perfect for headshots, close-up portraits, or any scene where you need to separate the subject from a busy background.
Key takeaway: Avoid the 1X setting for portraits. Wider lenses introduce facial distortion at close range. The 3X and 5X native zoom lenses on the Galaxy S26 Ultra produce more flattering, natural-looking pictures.
Note: One curious detail here is that Portrait mode photos do not support motion data (they are not “Live Photos”). Samsung supports motion photos in the standard photo mode, but it would be nice to someday have that feature for portraits as well.
Pro mode
What it is: Pro mode gives you full manual control over your Galaxy S26 camera, bypassing the camera's automatic decision-making.
What it does: It lets you adjust key settings like ISO, shutter speed, exposure compensation, focus and white balance. Playing around with these gives you much greater creative control and helps you get the most out of the hardware.
Another big advantage of Pro mode is the ability to shoot in RAW format. RAW photos preserve far more image data than standard JPEGs, giving you a lot more flexibility to adjust exposure, recover highlights or fine-tune colors in post.
Zoom behavior changes in Pro mode. Instead of seamlessly switching between cameras as you zoom, in Pro mode you are constrained within the zoom range of each camera, and the phone won't auto-switch to another one. You still can zoom, but only within a certain, reasonable range for each camera.
These are the zoom ranges for all Galaxy S26 cameras:
up to 3X with the ultrawide
between 1X and 10X with the main camera
between 3X and 15X with the telephoto camera
between 5X and 25X with the super telephoto (5X) camera
Pro photo mode gives easy access to the essential controls.
Aside from focusing manually, which gives you precise control of the cameras in some niche situations, you can also select between single-point and multi-point autofocus.
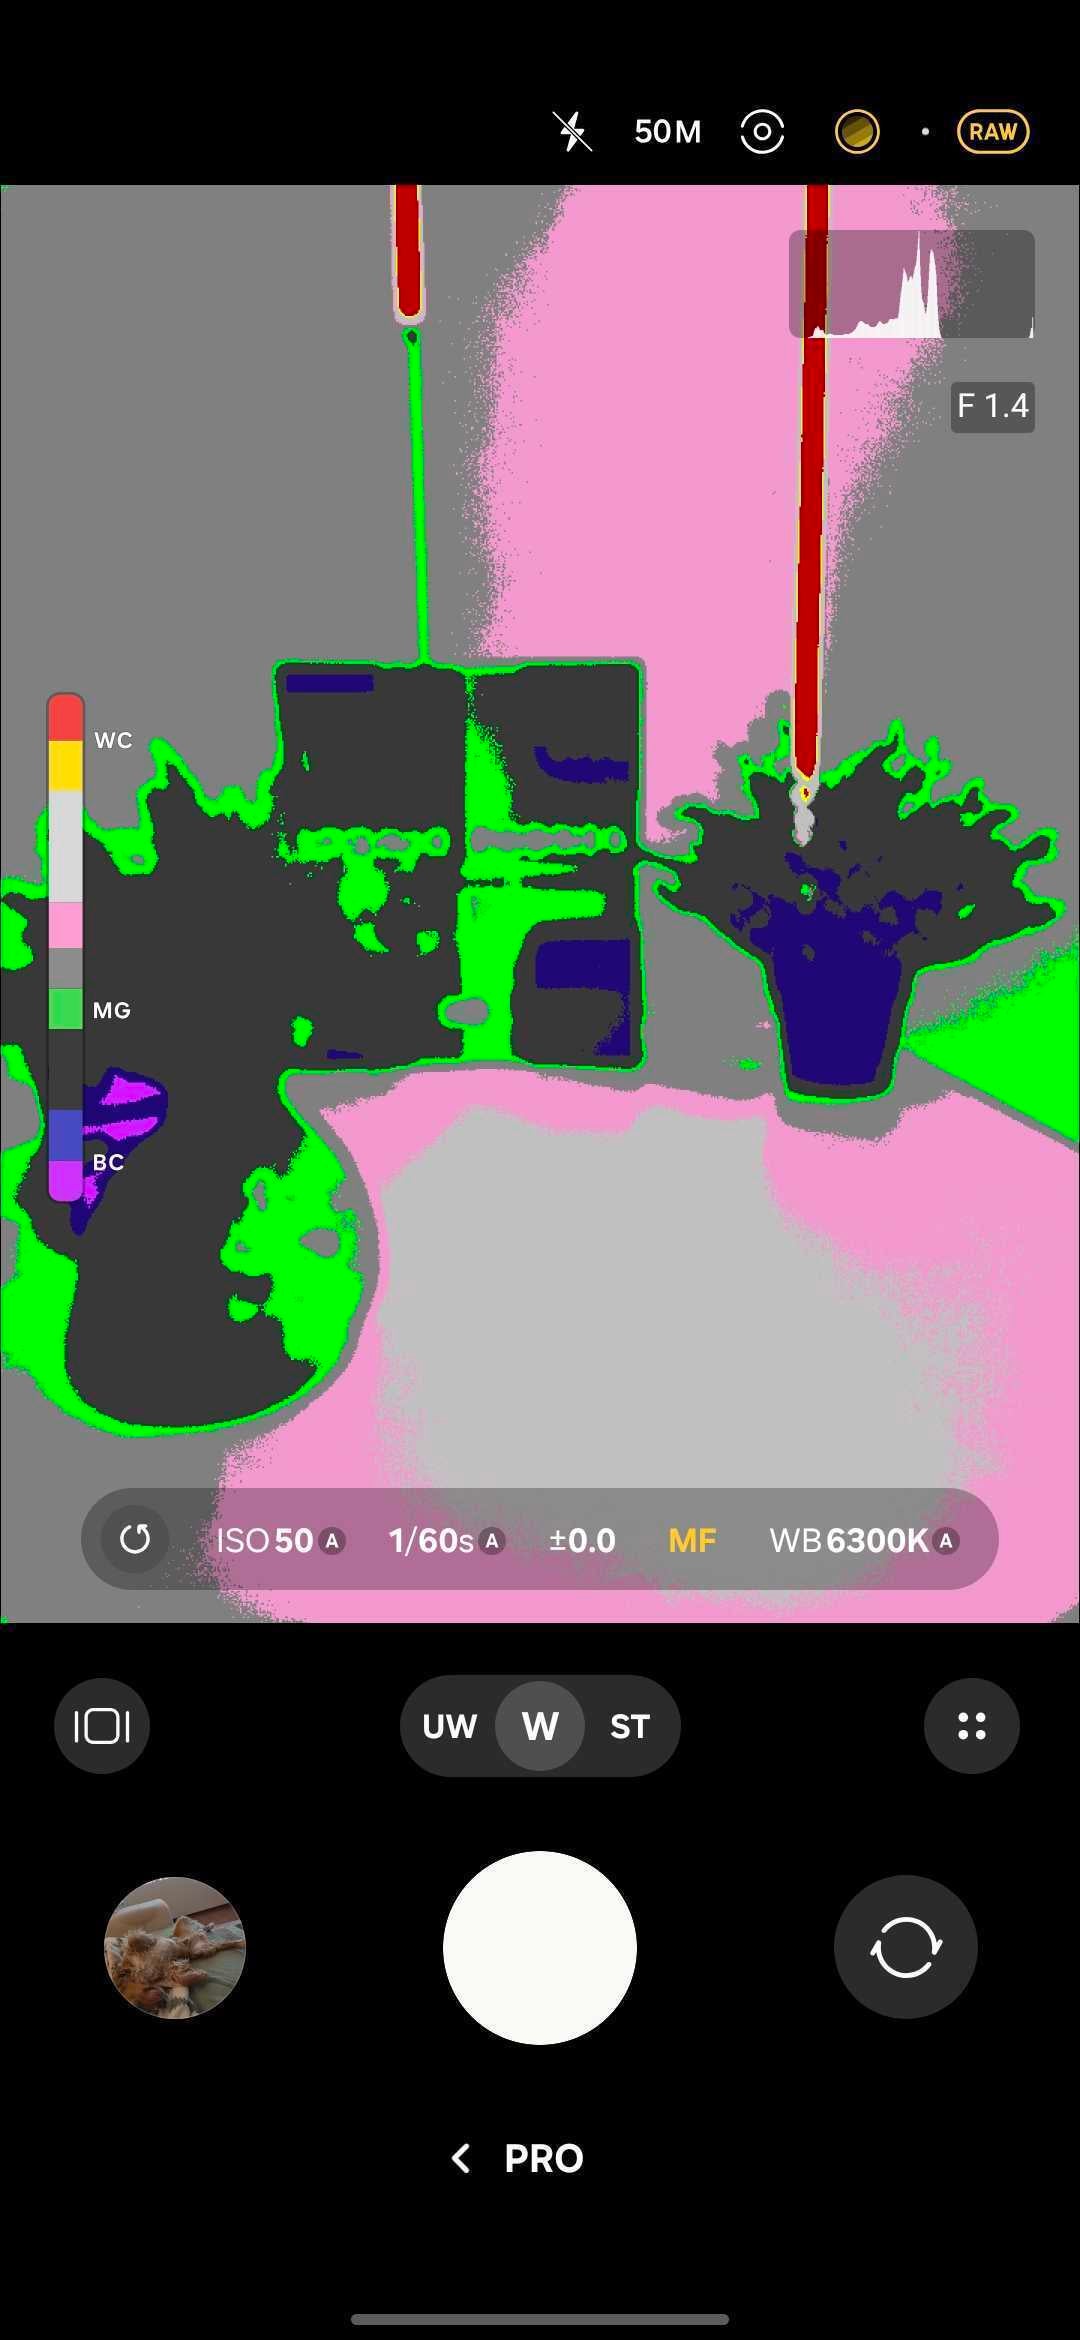
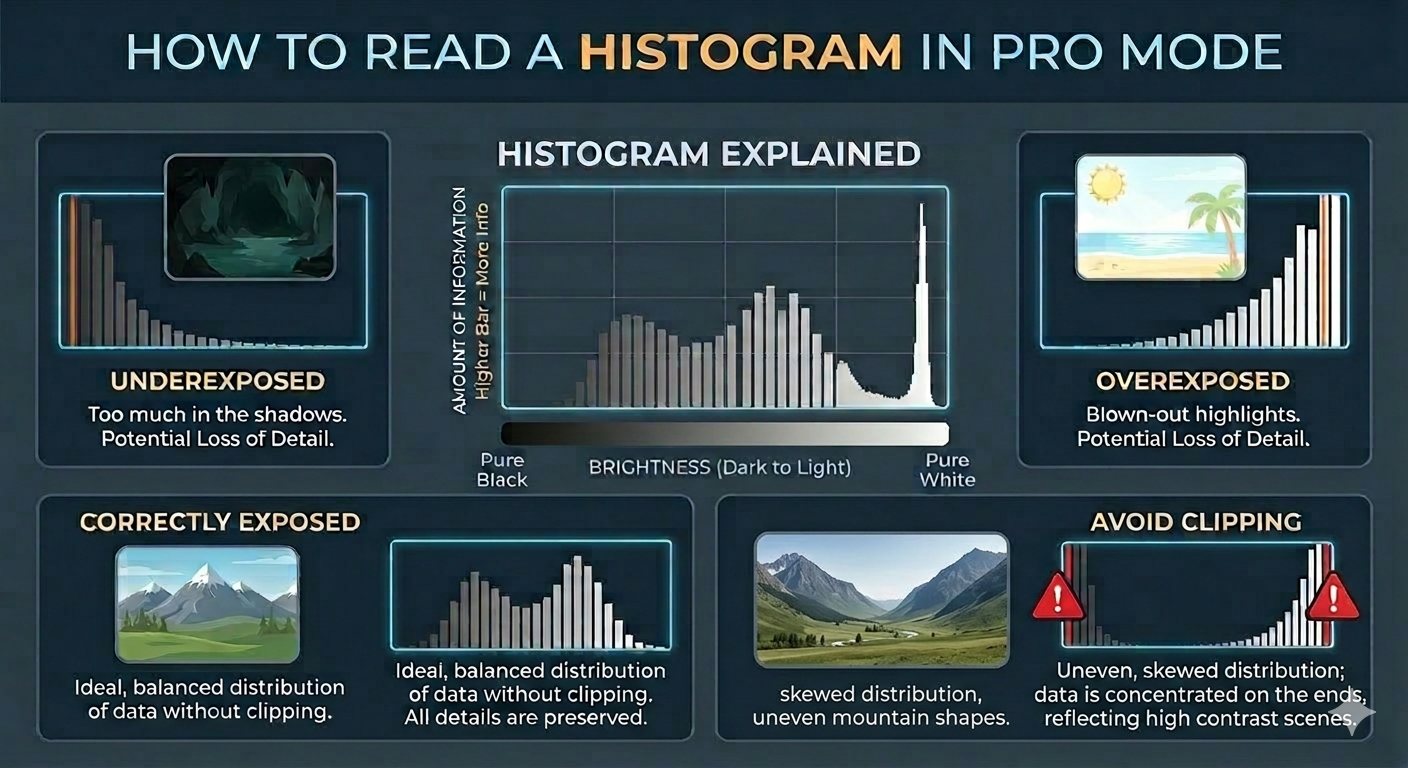
Monitoring tools: Pro mode also includes a histogram, a real-time graph that helps you nail a proper exposure.
So how do you make sense of it? Simple — the left side represents shadows and the right represents highlights.
In an ideal world, your histograms should look like “mountains”, so your photo is not too dark or too bright. The key takeaway here is that you should carefully look at your histograms and avoid clipping, where the bars become too high at either the left or right ends of the graph.
Here's an infographic detailing how to read a histogram in Pro mode:
Tips and tricks on how to properly read a histogram. | Image by Gemini
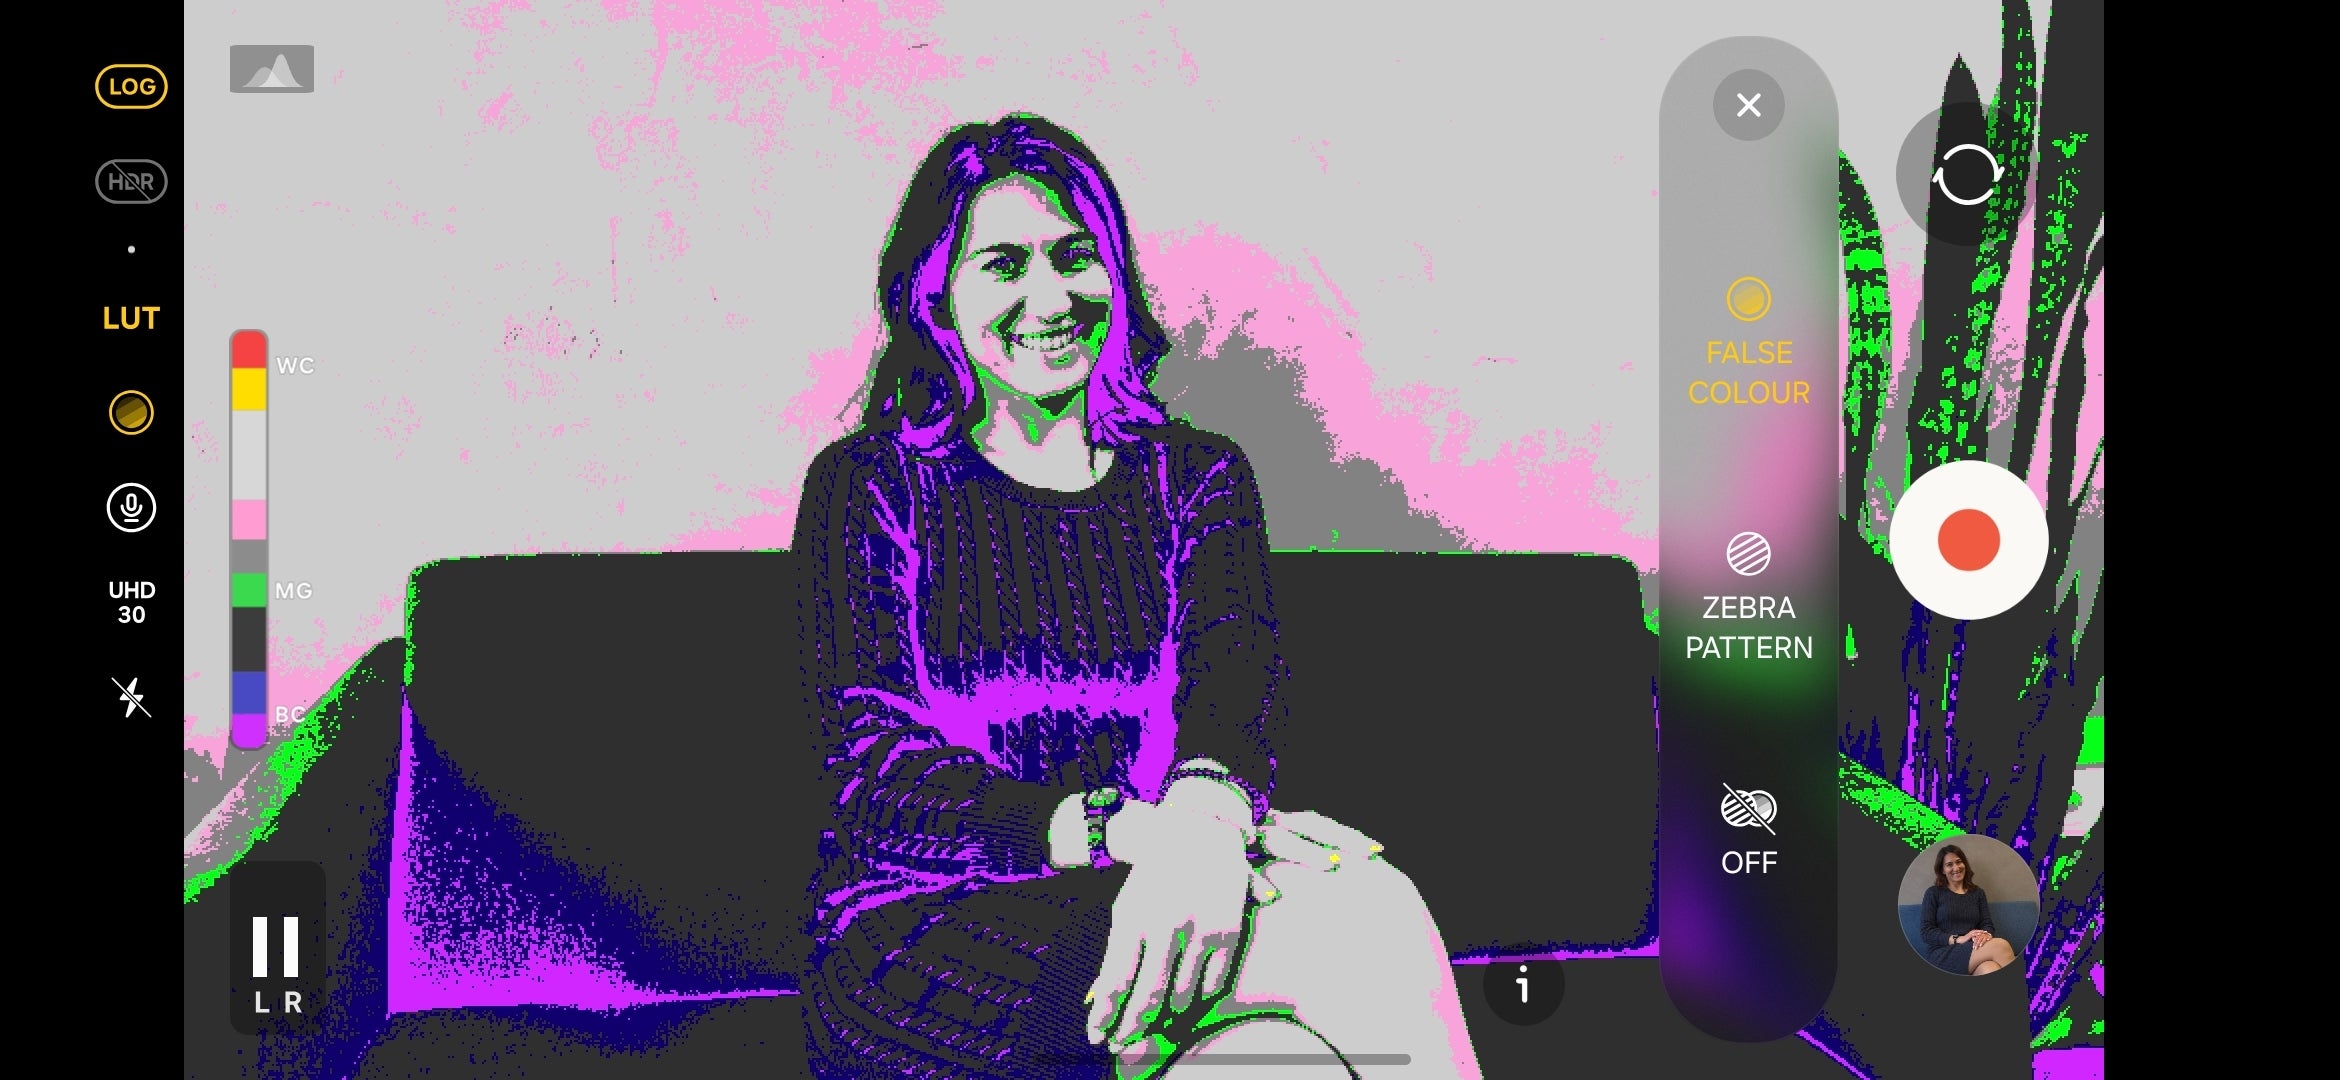
For even deeper control, the shortcuts menu gives you two professional-level monitors: Zebra patterns, which will show you exactly what’s in focus, and False color, which projects the exposure levels straight to the viewfinder. This color coding makes balanced exposure much simpler: green indicates a proper exposure, red and yellow warn about overexposure, while blue or magenta depict underexposed areas.
When to use it: Use Pro Mode when auto settings won’t give you the result you want. Creative long exposure shots, such as moving water, low-light pictures requiring a specific shutter speed, or any time when you plan to edit the RAW file.
Key takeaway: The histogram and false color tools are the fastest way to confirm a correct exposure before you shoot.
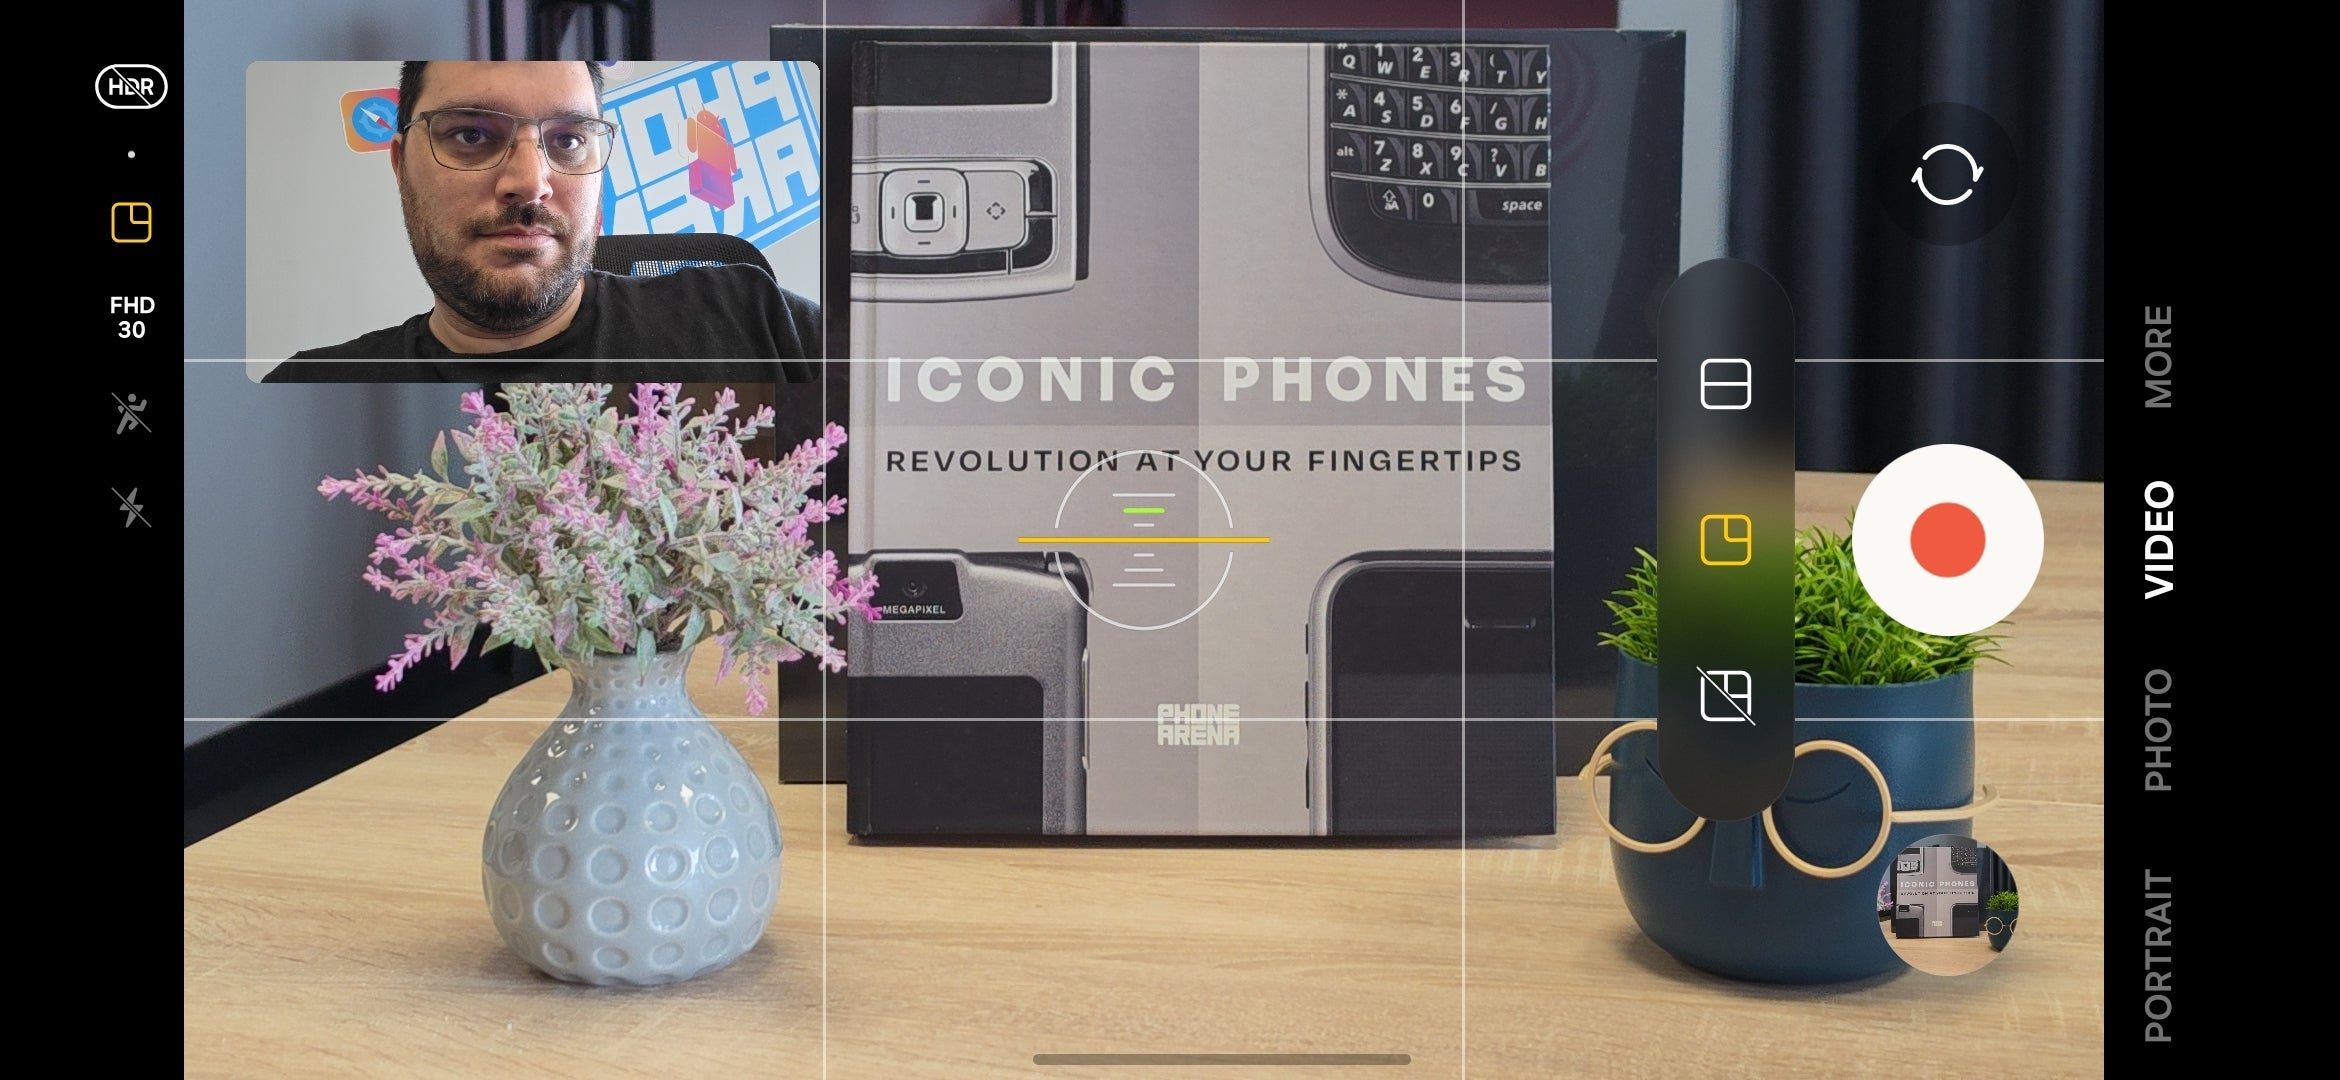
Video
Standard video
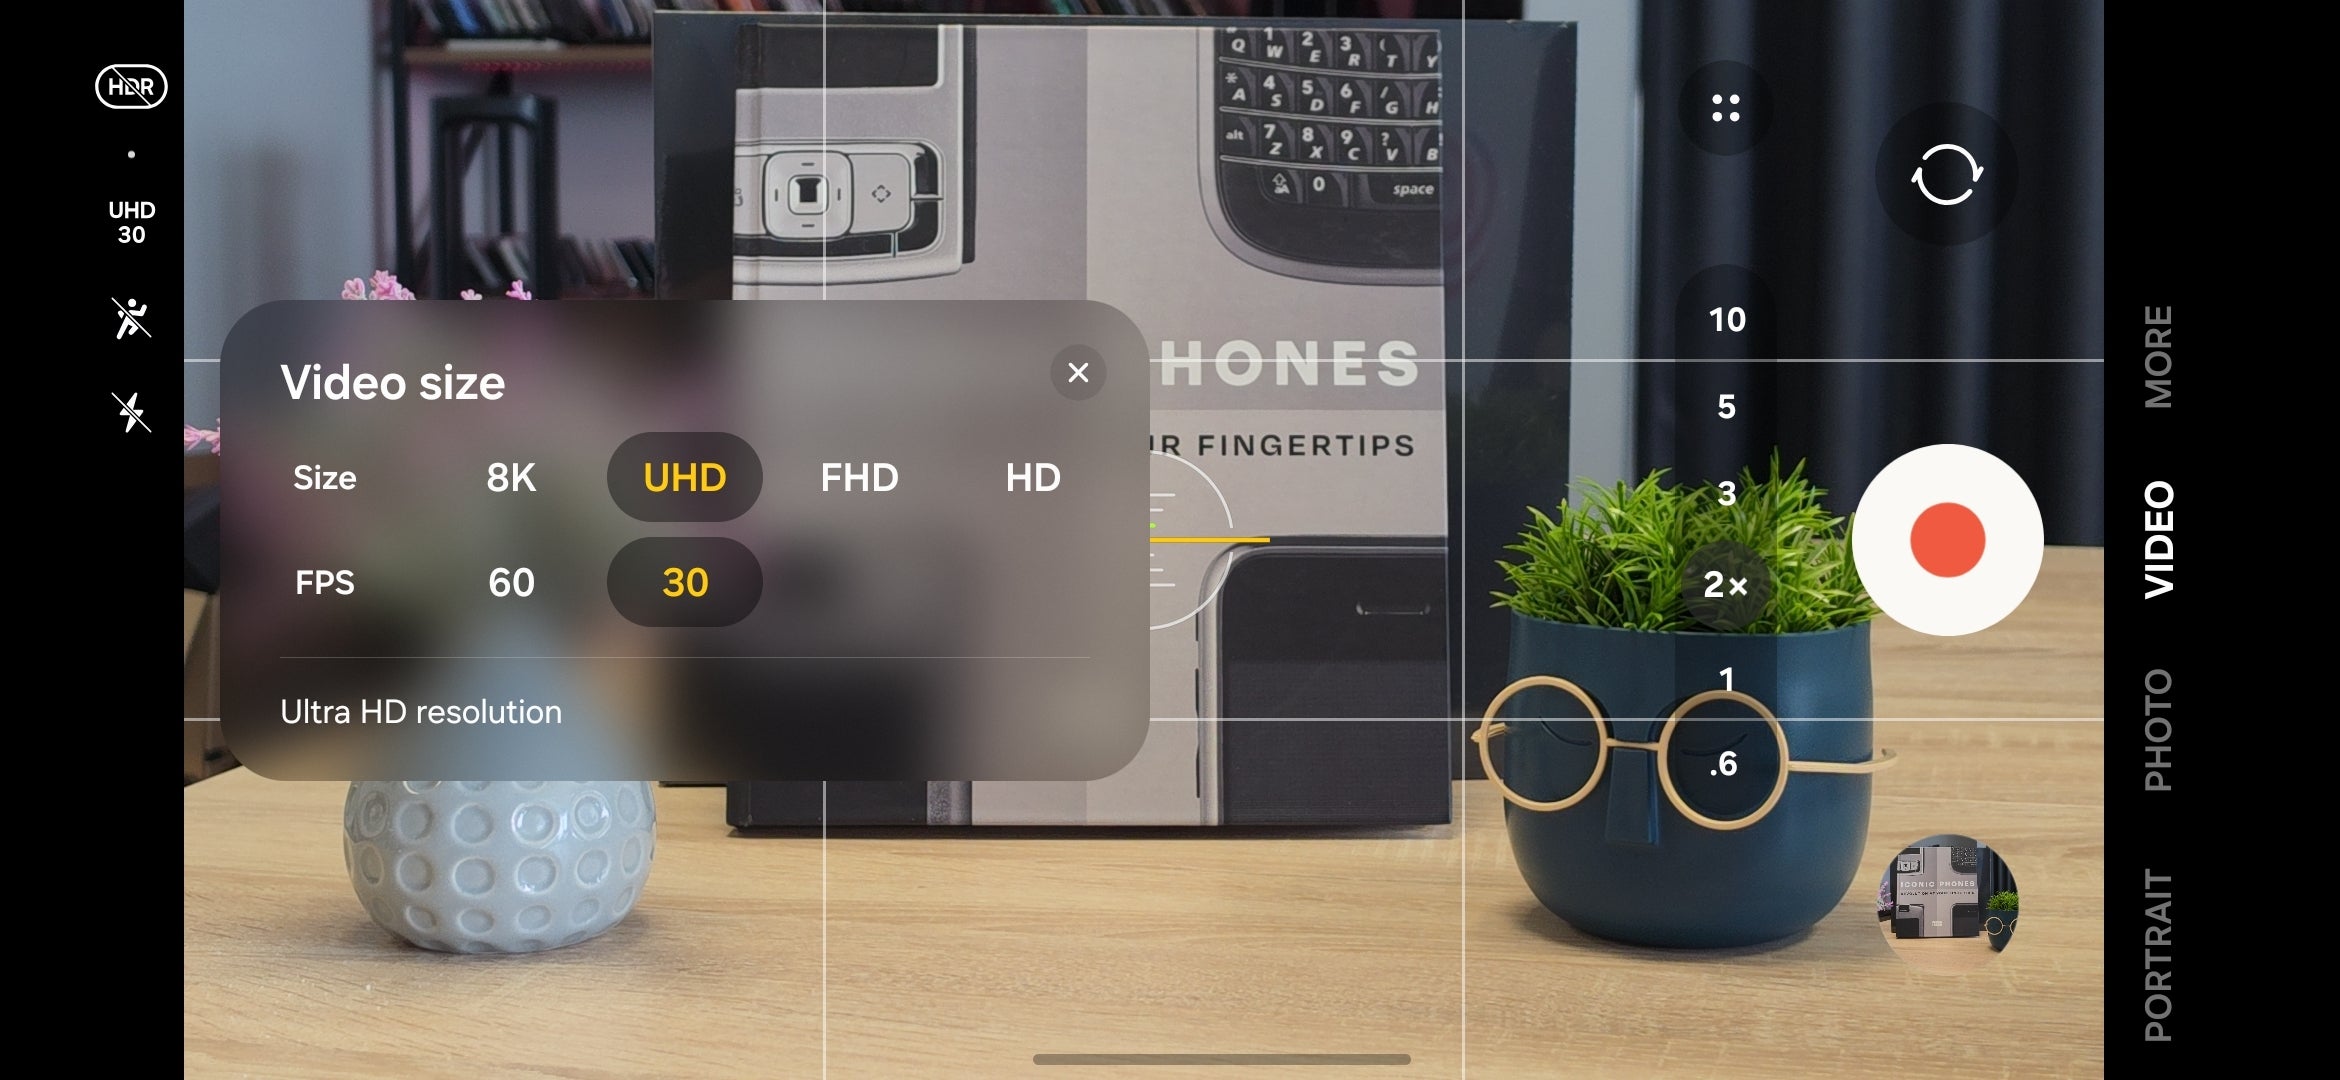
What it is: A quick swipe left from Photo mode brings you to Video mode. This is the default video mode, and it has the same familiar and intuitive interface with a shutter button and the zoom selector front and center.
Deeper adjustments are once again tucked away in a flyout menu, where you can access your resolution and framerate (8K 30fps, 4K 60/30fps, 1080p 60/30fps, 720p 60/30fps), aspect ratios (16:9, 1:1, and Full) and exposure compensation.
The viewfinder in video-recording mode. | Image by PhoneArena
Here, you can also enable Dual Recording (using both the front and rear cameras simultaneously) in either Picture-in-Picture (PiP) or Split-screen view. For PiP, you can move the front-video frame around and enlarge it a little, which is quite useful if you vlog a lot.
The best part? Simply tapping the front camera switch while recording swaps the rear and front cameras so that you can alternate between showing your face and your subject.
Dual-recording is useful for vlogging, among other things. | Image by PhoneArena
There’s also an Auto Framing feature here, which automatically zooms in and out to keep the subject in the frame, similarly to Apple’s Center Stage. However, as this feature crops from the main camera sensor, you can’t zoom past 2X when Auto Framing is enabled.
On the topmost (or leftmost when you capture video in landscape mode, as you should) shortcut bar, you have access to the HDR toggle, a quick resolution switcher, your flash mode selector, and finally, the stabilization mode. Aside from the Super Steady mode[1], new this year is the Horizon Lock stabilization mode, which enables exceptional stabilization that will keep your footage level even in the most extreme scenarios.
If the Galaxy S26 Ultra detects that you’re too close to the subject you are about to record, it will suggest enabling the Focus Enhancer mode. Indicated by a small flower icon at the bottom, Focus Enhancer automatically switches to the ultrawide camera, which has a slightly shorter focal point than the wide camera. The downside is that you get a deep depth of field, so the background bokeh isn’t as creamy as with the main camera.
Key takeaway: Standard Video covers most recording scenarios. Use Dual Recording for vlog-style footage or Horizon Lock when shooting in motion.
Tip: The Galaxy S26 Ultra is one of very few phones that lets you switch to the front camera while recording with the rear cameras. Simply tap the camera switch button or swipe up/down to flip between cameras mid-shot. It’s a small feature, but really useful and cool.
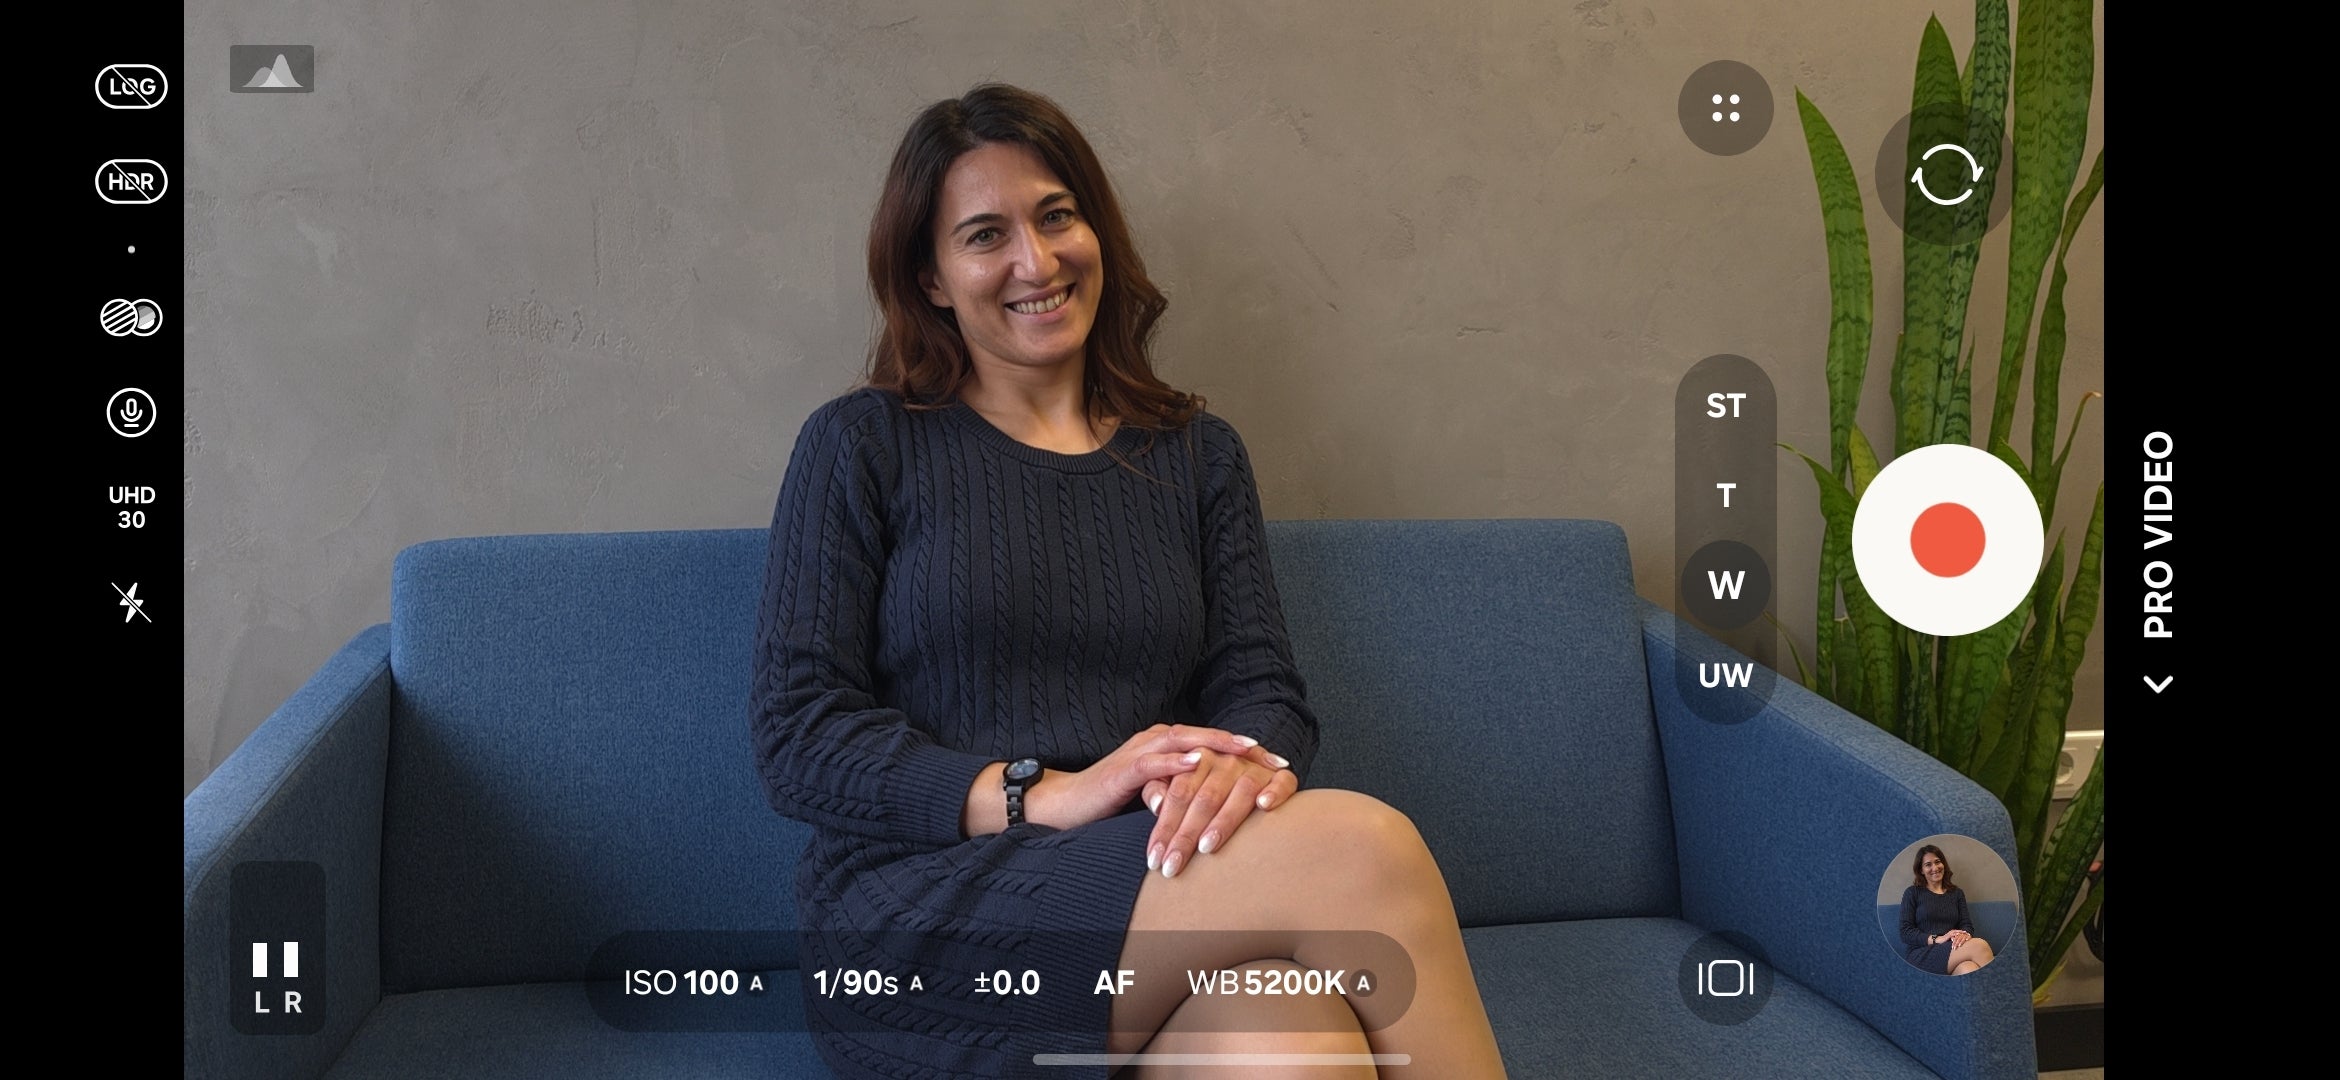
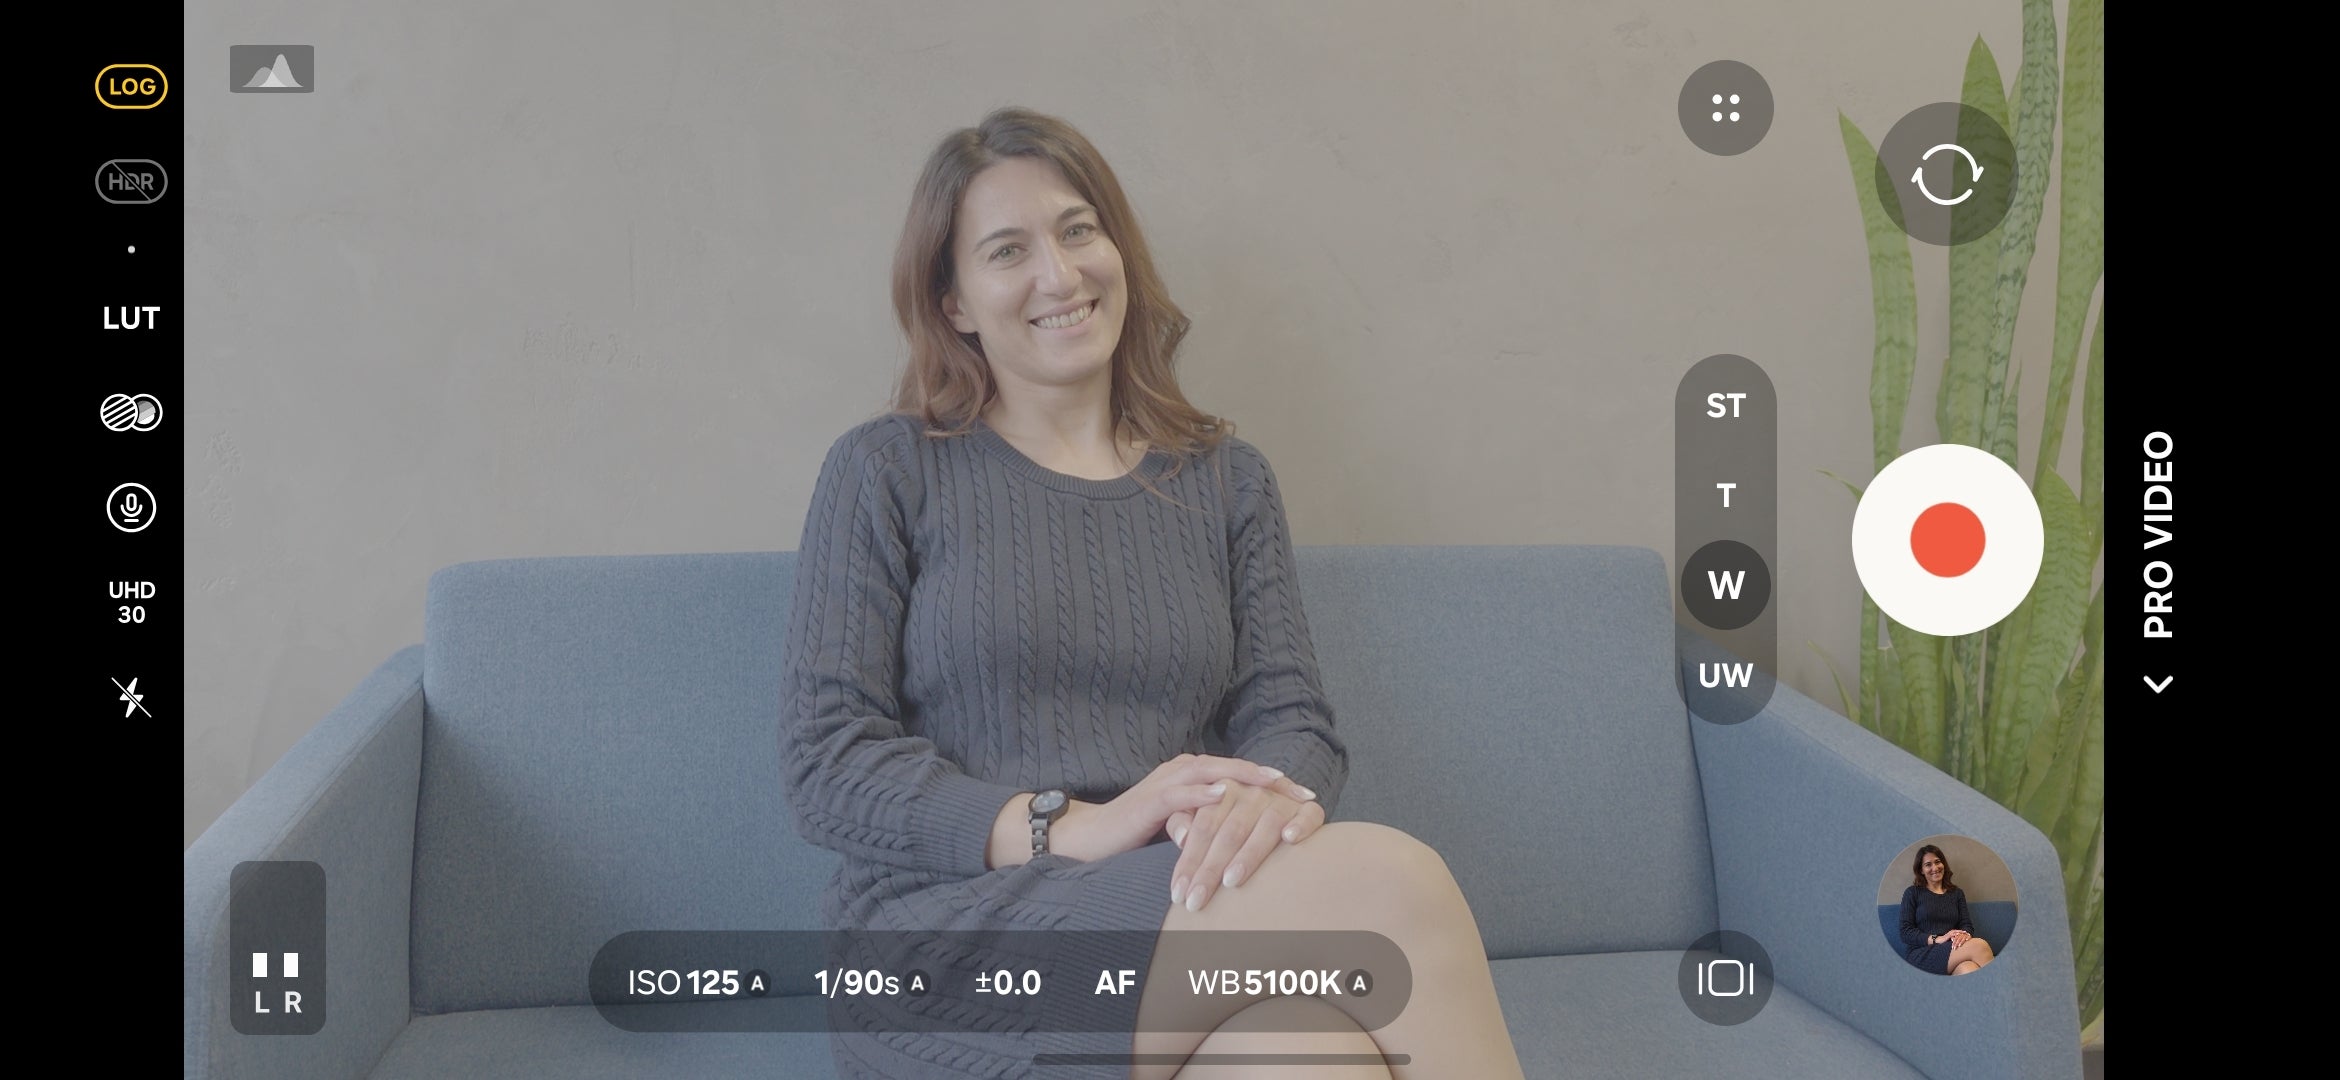
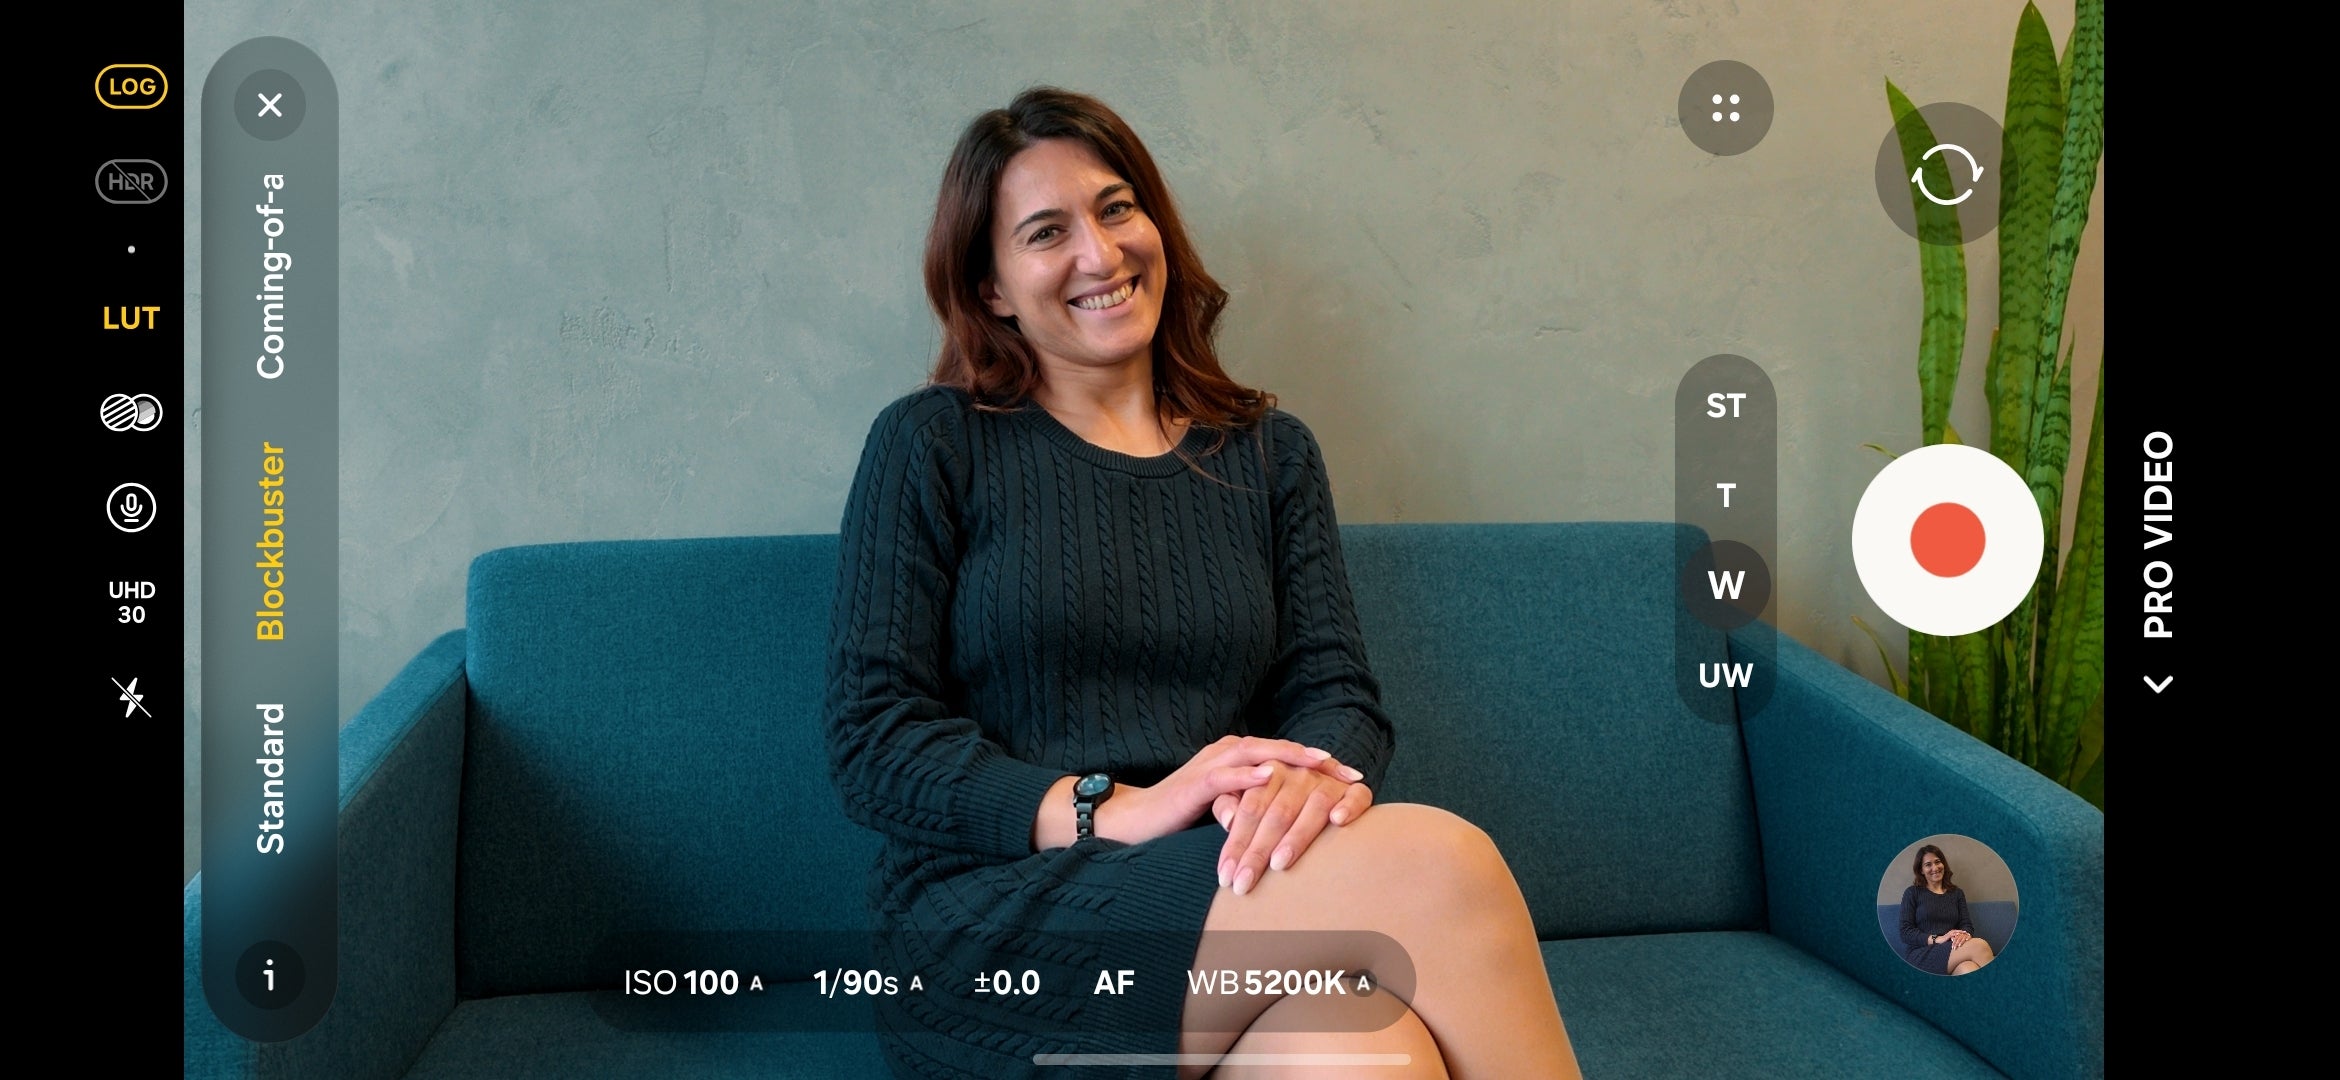
Pro Video
What it is: Pro Video mode gives you full manual control over every setting and zoom speed, so you can film high-quality, cinematic videos just the way you want.
You switch to the Pro Video mode from the More tab at the bottom of the Camera app and it unlocks advanced, pro-grade control over your footage.
Just like in Pro photo mode, you can manually adjust the focus, white balance, shutter speed, ISO and exposure compensation. This level of control is especially useful for Nightography Video[2], where fine-tuning your settings can make a significant difference in low-light results.
Pro Video mode on the Galaxy S26 Ultra. | Image by PhoneArena
In Pro Video mode, the camera is also locked once you select it, so if you zoom in or out too much, the camera wouldn’t auto-switch to another one. You can still zoom with each of the cameras you pick, but the ranges are specific for each camera: up to 3X digital zoom with the ultrawide, up to 10X with the wide one, and so on.
Additionally, Pro Video mode includes a smooth zoom control, so you can control the zoom speed. This way, you can get more cinematic and fluid zoom transitions in videos.
Pro Video mode also unlocks additional frame rates like 8K at 24 fps, 4K120 and FHD120.
You can also record HDR videos and capture LOG videos with real-time LUT preview, but only if you stick with the default HEVC format, which delivers H.265 videos; if you switch over to the more compatible H.264 format, you lose access to these features.
Log video (top) vs Log video + LUT preview enabled (below) | Image by PhoneArena
With the Galaxy S26 Ultra, you can also capture professional footage with Samsung’s new APV (Advanced Professional Video) codec, which you have to explicitly enable in Camera settings > Video format.
While this codec is fantastic for editing without losing quality, the files are huge. Because they take up so much space, we recommend plugging in an external drive, which you can easily enable in settings.
Like in Pro photo mode, you can enable helpful exposure tools like zebras and false color patterns.
False color is useful when you need to identify any exposure problems with your scene. | Image by PhoneArena
APV videos can either be captured in HDR or LOG, and you can choose between an HQ setting (which takes up 1.5 GB per minute) and an LQ setting (more storage-conscious at 750 MB per minute).
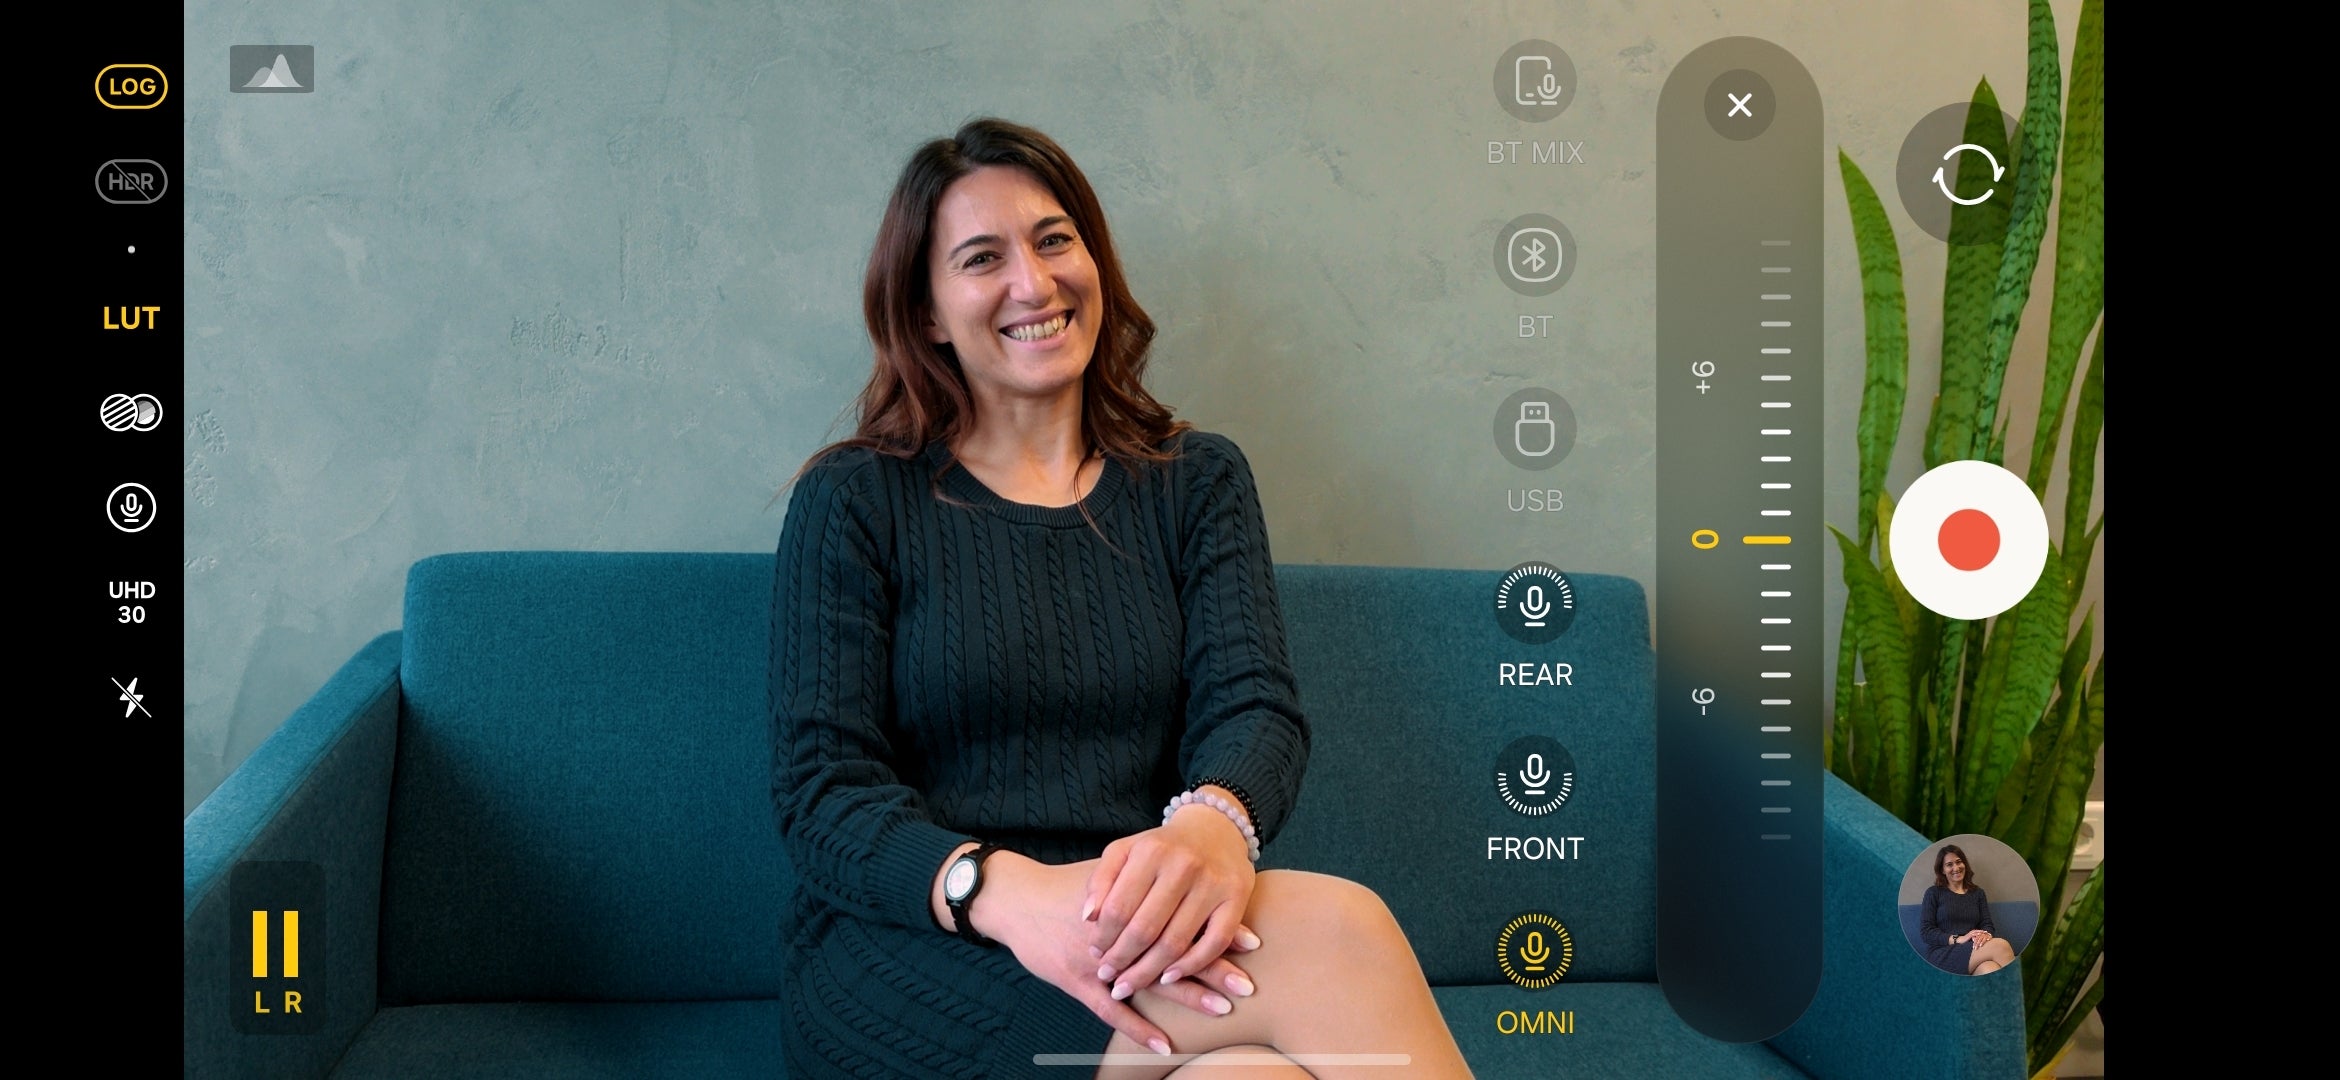
You can choose how audio will be recorded in Pro video mode. | Image by PhoneArena
You can adjust how sound is recorded while capturing Pro video. By default, the “Omni” option is used, which captures audio from all available on-device microphones, which is the standard way video is recorded.
However, depending on your needs, you can opt to only record sound from the front of the device (towards the user) or solely from the rear, with a separate slider for the gain of each microphone.
That’s not all, though: you can use professional recording equipment by connecting it through the USB port or via Bluetooth. You can even opt for a mix of on-device microphones and an external device to get a more professional audio recording for your footage.
Key takeaway: Use Pro Video when you need consistent manual settings for a shoot or when you plan to color grade your footage. Stick with HEVC if you plan to shoot LOG video or HDR.
Portrait Video
What it is: Portrait Video mode lets you record videos with a blurry background to make your subject stand out. This gives the footage a professional, cinematic feel.
With the Galaxy S26 Ultra, you can record Portrait Videos using the main camera, with the option to digitally zoom between 1X and 3X.
You get a shallow depth-of-field effect in your videos, and you can fine-tune the look by adjusting the blur intensity to your preference.
In terms of quality, you can choose between 4K UHD and FHD resolution, with frame rates capped at 30 fps.
Key takeaway: Use Portrait Video when shooting a single subject. This is perfect for interviews, talking-head clips, or dance videos where background separation keeps distractions away. Keep in mind the 30fps cap.
Essential Camera Settings
There are actually a whole bunch of useful camera settings tucked away in the camera app menu. A lot of them can directly impact the quality of your photos and videos, so it’s definitely worth taking a few minutes to explore the options.
The camera settings of the Galaxy S26 Ultra.
Scanning –– This menu lets you enable or disable text, document and QR code scanning with the Galaxy S26 Ultra camera. In the document scanning submenu, you can set a preferred scan resolution. All of these options are enabled by default, and it’s usually best to leave them on as they make the camera a lot more versatile in everyday use.
Shot suggestions — In certain scenes, this feature might guide you to take better photos. It’s disabled by default, but you don’t lose anything by enabling it, and it can come in handy when you need a little extra help composing your photo.
Photo enhancer –– This feature lets you set your preferred level of post-processing intensity. By default, it’s set to “Prioritize quality”, which aims to squeeze out the best quality out of the camera hardware, but can take a couple of seconds extra. In contrast, the “Prioritize speed” option can be used to capture photos as fast as possible with minimal processing. The “Balanced” option is a safe middle-ground between the two. Keep in mind that the useful Scene detection feature is only available with the “Prioritize quality” option, but you have to explicitly enable it.
Photo format –– This menu lets you enable the high-efficiency HEIF photo format, which will save you storage space, though you might run into compatibility issues on some websites or apps.
Watermark –– This menu lets you apply a customizable watermark to your photos.
Motion Photos –– In this menu, you can change how motion photos are captured.
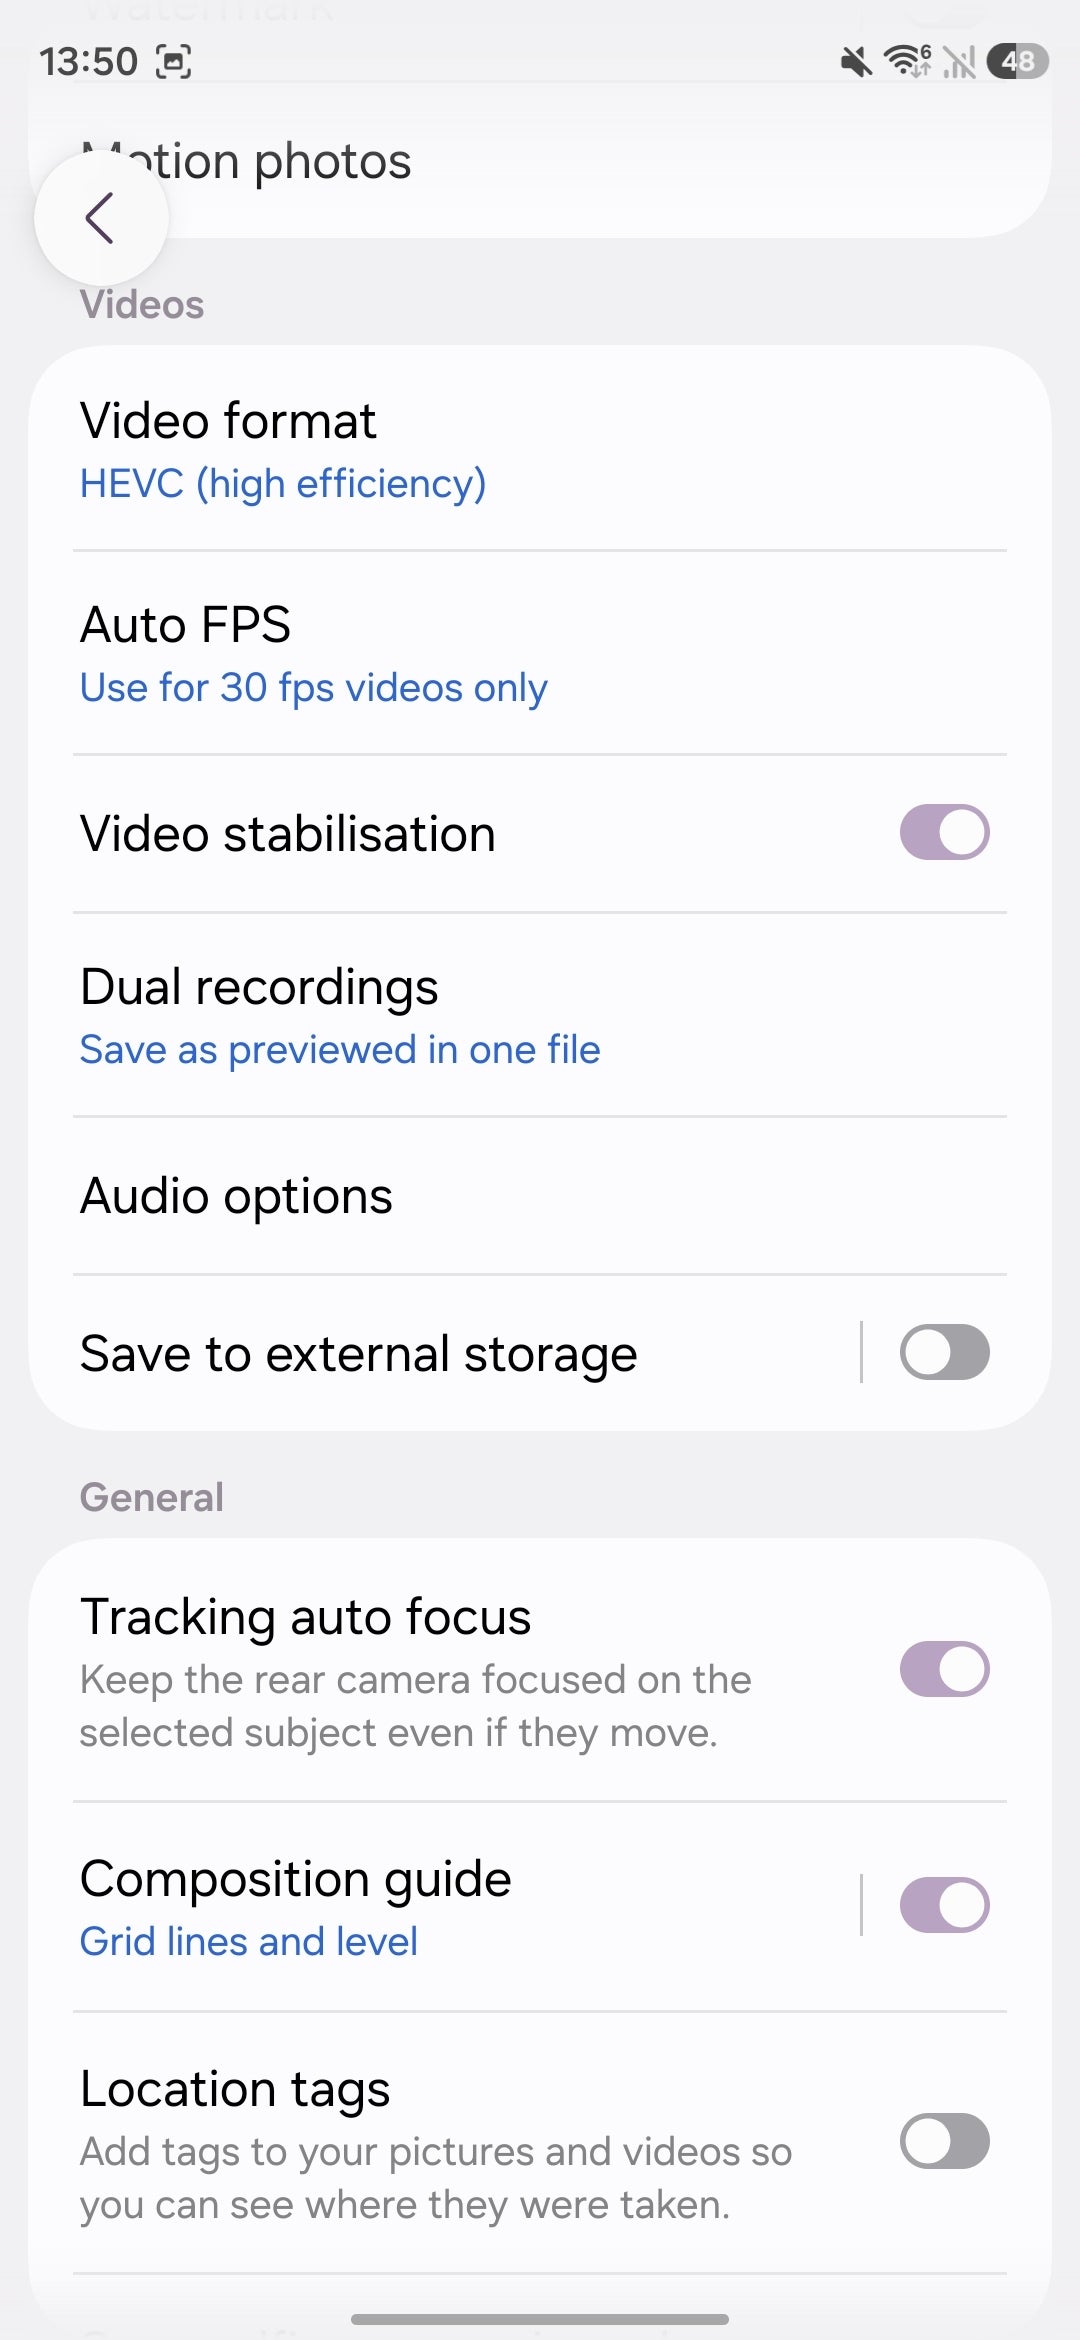
Video format –– Here, you change video-related format settings. You can switch between the default HEVC option to H.264 videos and enable High bitrate videos, HDR, and choose whether Log video can be captured in Pro Video mode only or in both Video and Pro Video modes. You can also toggle Samsung’s APV professional video codec video capture from this menu.
Auto FPS –– The Auto FPS feature lets the Galaxy S26 Ultra camera automatically detect low-light conditions and automatically optimize the recording frame rate in order to capture more light. Aside from disabling this feature, you can opt to enable it for 30 fps or 30/60 fps videos. The latter option is recommended.
Video stabilization –– A hard toggle that disables video stabilization in the camera app. It’s strongly recommended that most people leave this one enabled.
Dual recordings –– This menu lets you determine how the phone will store the dual videos captured with the front and back cameras with the dedicated mode. You can have these in separate files or combined. The latter is the default option and is the more convenient one, but the dual file one gets you more flexibility for post-processing purposes.
Audio options –– This menu lets you enable the Zoom-in mic option which intelligently amplifies audio as you zoom in, as well as the 360 Audio Recording which captures immersive audio from a compatible Bluetooth headset. You can also enable Audio playback here, which allows your Galaxy to play audio and capture video at the same time.
Save to external storage –– By enabling this feature, you can save videos to an external storage drive. You can enable a “Safe save” feature, which splits APV video recordings into multiple MP4 files in order to safeguard against potential data loss if your drive disconnects.
Tracking Auto Focus –– This feature will keep the focus tack sharp on your subject even if they move around. It’s a useful feature, better enable it.
Composition guide –– Enable this to get grid lines and a level in the viewfinder, which come in very handy during photo and video composition. My advice here — turn it on as a little helper to get good compositions.
Location Tags –– Enable this if you want GPS data added to your photos and videos.
Save selfies as previewed –– By default, Galaxy phones take selfies mirrored. For a more what-you-see-is-what-you-get approach, turn this option on, and selfies will be saved as they appear in the viewfinder.
Swipe preview –– This feature lets you select what happens when you swipe down in the viewfinder: you can choose to switch between the front and rear cameras, open the quick controls menu (where all the essential settings reside), or do nothing.
Shooting methods –– Here, you can choose if you want to capture a picture or a video with voice commands or when you show your palm to the front camera in selfie mode. A floating shutter button for extra accessibility can be enabled here. You can also decide if volume buttons should be used as a shortcut to take a video or a picture, zoom in or out, or just control the Galaxy S26 sound volume.
Settings to keep –– In this menu, you can pick which settings should persist when you launch the camera. You can opt to keep the last used camera mode, selfie angle, picture resolutions, filters, Super Steady, portrait zoom, and exposure.
Vibration feedback –– Enables or disables vibration when interacting with the camera.
Conclusion
Samsung’s camera app is the Swiss army knife of mobile photography.
It’s intuitive enough for users who only want the point-and-shoot experience but is also full to the brim with professional-grade features that allow more adept camera fans to tailor the camera to their unique needs.
While it’s true that the former approach delivers great results already, especially in Nightography, where the algorithms do an outstanding job, mastering the more professional tools the Galaxy S26 Ultra provides can lead to superior results.
[1] Super Steady Mode - Super Steady results may vary depending on editing method and/or shooting conditions. [2] Nightography Video - Results may vary depending on light condition, subject and/or shooting conditions.
Peter is a skilled writer with over 13 years of experience at PhoneArena. He has published nearly 300 phone reviews and comparisons. This vast experience helps him navigate the mobile tech landscape with ease. He enjoys everything Android but relies on a MacBook Pro daily.
A discussion is a place, where people can voice their opinion, no matter if it
is positive, neutral or negative. However, when posting, one must stay true to the topic, and not just share some
random thoughts, which are not directly related to the matter.
Things that are NOT allowed:
Off-topic talk - you must stick to the subject of discussion
Offensive, hate speech - if you want to say something, say it politely
Spam/Advertisements - these posts are deleted
Multiple accounts - one person can have only one account
Impersonations and offensive nicknames - these accounts get banned
To help keep our community safe and free from spam, we apply temporary limits to newly created accounts:
New accounts created within the last 24 hours may experience restrictions on how frequently they can
post or comment.
These limits are in place as a precaution and will automatically lift.
Moderation is done by humans. We try to be as objective as possible and moderate with zero bias. If you think a
post should be moderated - please, report it.
Have a question about the rules or why you have been moderated/limited/banned? Please,
contact us.


Things that are NOT allowed:
To help keep our community safe and free from spam, we apply temporary limits to newly created accounts: