
How to take epic photos of lightning storms with your smartphone camera (using manual controls)

The weather can be tricky to predict this time of the year. At one moment you have the sun joyfully spreading its rays across the land, then a couple of hours later, a thunderstorm comes out of nowhere to ruin your plans for the evening. But there's a silver lining to all this – shooting photos of lighting is a fun exercise for every photography enthusiast.
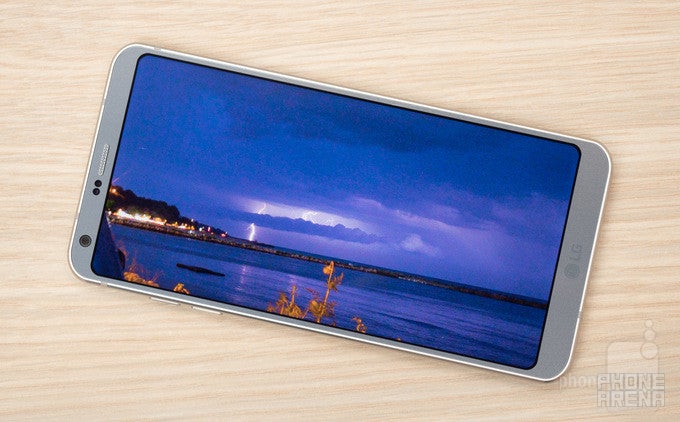
In this article I'm going to share with you a number of tips and tricks on photographing lightning using your smartphone. The images that I'm about to show were taken with an LG G6 since that's what I had on hand at the time, but the advice below should apply to most other smartphones with manual camera controls: the LG V20 and V10, the Galaxy S8 and Galaxy S7, or the HTC U11 or HTC 10, to name a few.
Step 1: Preparation phase
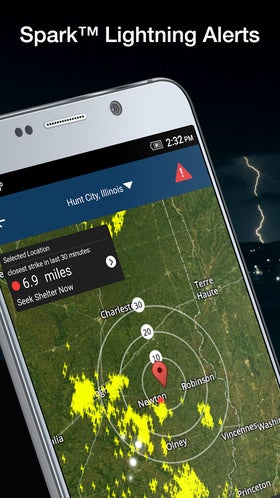
The WeatherBug app can alert you when lightning storms are expected in your area
When it's certain that a storm is nearing, take a few moments to visually track the clouds' movement. This will give you an idea of where the storm is headed. Lightning isn't going to strike in the same spot for the whole duration of the storm. It will slowly drift along with the wind's direction, so you might need to re-adjust the positioning of your camera accordingly.
Most importantly, stay dry and safe. Getting soaked is probably not worth the likes you're going to get. Getting struck by a bolt doesn't sound like fun either.
Lightning is most spectacular to observe at night or after sunset, but such conditions dictate the use of a tripod for best results. I didn't have one, so I had to improvise – I placed the LG G6 on the hood of my car resting against my wallet. The most important thing to remember is that the phone needs to be completely stationary as photos are being taken. Even the slightest movement will result in blur, and that's not something you want in the shot.
Step 2: Configuring the camera
It is highly unlikely that you'll manage to snap a good lightning photo with your phone's camera set to auto. The software simply wouldn't know how to expose such a tricky scene properly. In this situation, it is best to configure the camera manually, and here is how I set the LG G6 to get my shots:
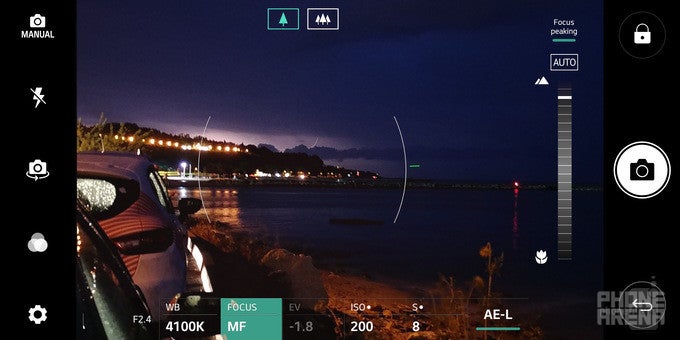
- Flash: disabled. It isn't needed in this case.
- Sensitivity: ISO200. This setting determines how bright the lightning bolt will appear in the photo. Set it to a lower value if images turn out too bright.
- Shutter speed: 8 seconds. Every photo takes 8 seconds to capture. The camera absorbs light constantly during this 8-second period, and lightning that strikes within this timeframe will be captured. Just remember to keep the camera as steady as possible. You may need to use a shorter duration if your photos turn out too bright.
- Focus: Manual, just a notch before infinity. This will ensure that the lightning bolts appear nice and sharp.
- White balance: 4100K. This is a value that I picked because it looked fine to me. Feel free to experiment with it.
- Timer: 3 seconds. The camera will start taking a photo 3 seconds after you press the camera button. This is done to avoid motion blur. If you have a Bluetooth camera button like those that come with some selfie sticks, you can use that instead.
- Save as RAW: enabled. This one is completely optional. RAW photos are more suitable for editing in advanced applications, such as Snapseed or Adobe Lightroom.
- Sound and notifications: disabled. Because the last thing you want is a photo spoiled by your phone vibrating.
Step 3: Editing your awe-inspiring masterpieces
Maybe luck will be on your side and you'll be able to capture some truly epic lightning shots. But more often than not, your images might need a tweak or two to look their best. How you edit your images is up to you, but in most cases, rotating the image to straighten the horizon is advisable. In addition, I would recommend zooming on the lightning by cropping the image. Adding an extra dash of contrast might also make your image pop, so give that a try as well. All these settings should be supported by pretty much every phone's stock gallery app.
Lightning photos taken with manual camera controls
Popular stories


Latest News


Things that are NOT allowed:
To help keep our community safe and free from spam, we apply temporary limits to newly created accounts: