There was no shortage of demonstrations during the Nokia Lumia 1020 announcement, showing us what the smartphone's 41MP camera was capable of. (Watch the event here in case you've missed it.) And one of these demos included light painting – a form of art that has been growing in popularity over the past years. At a glance, it might seem difficult to create such drawings, but in reality, even a photography newbie can do it. All it takes is a few minutes of practice, a handheld light source, some basic knowledge as to how to set the camera's settings right, and a buddy to hold the camera for you, unless you have a tripod at hand.
So here's how you make light paintings using the Nokia Lumia 1020. First thing you need is a suitable location. The place must be really dark – a bedroom, or your back yard at night, for example. Then choose what you want to draw. It would be a good idea to pick something rather simple for your first shot, such as a basic shape. Feel free to use your phone's display as a light source. Set it to maximum brightness and open a bright image on its screen. Solid colors work best. A flashlight or a set of glowsticks will also do.
Read Next
Now it is time to compose the shot. Ask your buddy to stand about 10 feet back and use the camera viewfinder to make sure you'll fit within the image. Without taking a photo, practice "drawing" your painting in mid-air without your light source leaving the frame.
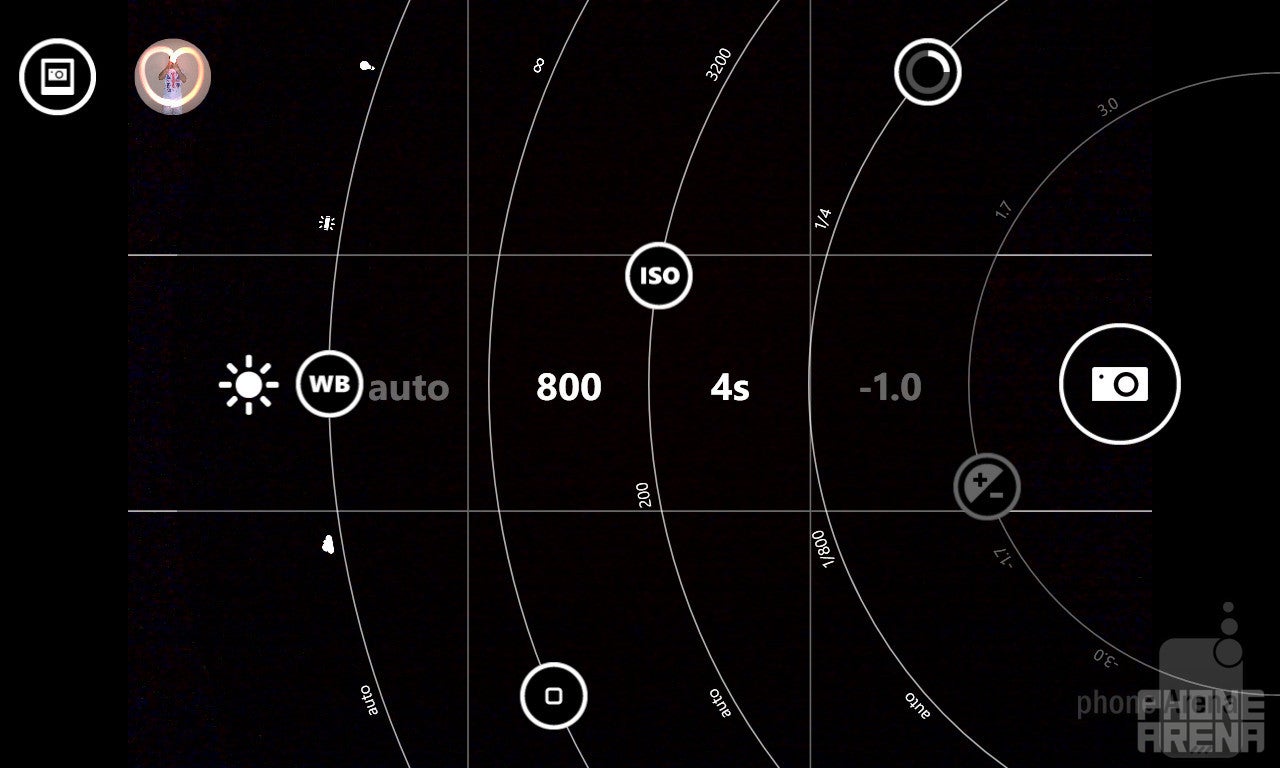
Settings on the Nokia Pro Cam app suitable for light drawing
After you're done practicing, use the Nokia Pro Cam app to set the camera's settings manually. You will need a long exposure so set it to 4 seconds. ISO of 400 or 800 should do. You can turn the camera flash on or off, depending on whether you want whoever's drawing to appear in the frame or not. Now press the shutter and let the drawing begin!
Read Next
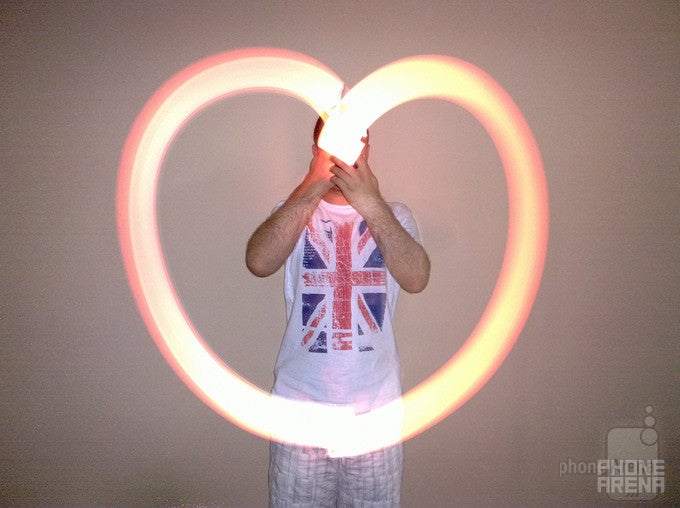
The length of the exposure time – 4 seconds in this case – is how long you have to draw your image. Note that the slower you move your light source, the brighter the stroke will be, and vice versa. Using a tripod isn't necessary, but it would help you achieve best results. Remember, feel free to experiment with multiple light sources of various colors! If your photo turns out too dark, increase the ISO, and turn it down in case the image is too bright. If you've followed our tutorial strictly, you should end up with something like the photo you see below.
The Nokia Lumia 1020 is great for light painting
Six-month unlimited plan is now 57% off
$90
$210
$120 off (57%)
Mint Mobile is now allowing you to get whichever plan you like for either three, six, or 12 months for just $15/mo. If you go for the six-month unlimited service, for instance, you'll now have to pay just $90 upfront instead of $210.
A discussion is a place, where people can voice their opinion, no matter if it
is positive, neutral or negative. However, when posting, one must stay true to the topic, and not just share some
random thoughts, which are not directly related to the matter.
Things that are NOT allowed:
Off-topic talk - you must stick to the subject of discussion
Offensive, hate speech - if you want to say something, say it politely
Spam/Advertisements - these posts are deleted
Multiple accounts - one person can have only one account
Impersonations and offensive nicknames - these accounts get banned
To help keep our community safe and free from spam, we apply temporary limits to newly created accounts:
New accounts created within the last 24 hours may experience restrictions on how frequently they can
post or comment.
These limits are in place as a precaution and will automatically lift.
Moderation is done by humans. We try to be as objective as possible and moderate with zero bias. If you think a
post should be moderated - please, report it.
Have a question about the rules or why you have been moderated/limited/banned? Please,
contact us.


Things that are NOT allowed:
To help keep our community safe and free from spam, we apply temporary limits to newly created accounts: