Unlocking the bootloader is the first step in a journey to the land of custom ROMs, rooting, mods, and all other Android hackery, but for a newbie, it might also be a scary undertaking. In this article, we’ll explain in simple terms what’s a bootloader, and guide you through the surprisingly easy process of unlocking the bootloader of Motorola device like the Moto X and Moto G.
First, let’s clear up all confusion around the term ‘bootloader’. Bootloader has a very literal meaning - it’s the piece of code that’s executed before even the operating system loads. The function of the bootloader is basically to instruct the device how to load the OS. To do so, it has to communicate directly with the processor and motherboard (which are different for virtually every phone), so all in all, the bootloader is a very phone- and platform-specific piece of code. That is why it differs on, say, a Motorola and a Samsung phone. Some manufacturers decide to lock the bootloader on their phones as a way to ensure that no one can change their custom Android user interfaces. Luckily, Motorola has gone the more developer-friendly way, and the company itself provides a bootloader unlock, making the whole process extremely easy.
Recommended For You
Why would you want to unlock the bootloader, though? Installing a custom ROM is one reason, but an unlocked bootloader is also often required for getting root access to the system.
If you have already made up your mind about unlocking the bootloader, we can get started with the unlocking process now. This guide applies for the Motorola Moto X and Moto G.
First, here are the pre-requisites for it all to work:
Back up your phone first!!!
The phone’s battery must be charged to at least 80%.
USB debugging must be “ON”.
Motorola USB drivers must be installed on a computer, you can grab them from here.
Warning: Unlocking your phone’s bootloader voids its warranty. It also completely wipes (formats) your Android phone’s internal memory including applications, contacts, images and so on.
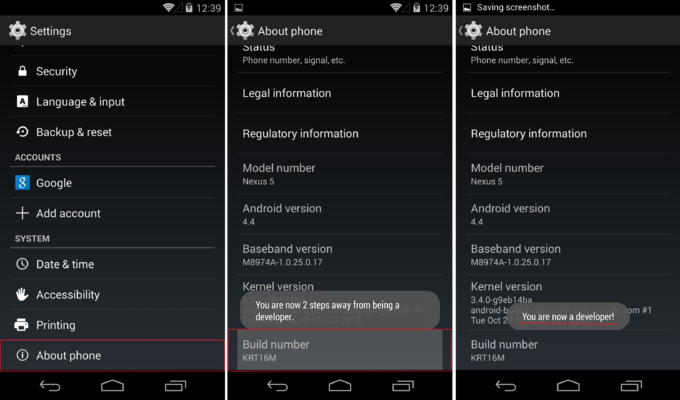
1. Connect your phone to your computer via a USB cable. You have to enable USB debugging mode on your smartphone. To do so, simply navigate to Settings > About Phone > scroll to the bottom > tap Build number seven (7) times. You'll get a short pop-up in the lower area of your display saying that you're now a developer.
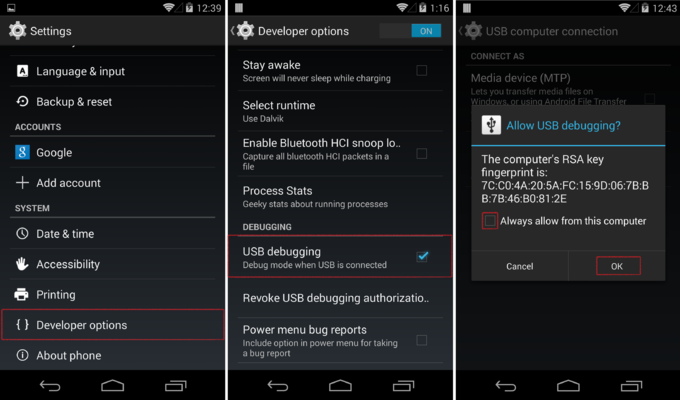
2. Go back and now access the Developer options menu, check ‘USB debugging’ and click OK on the prompt.
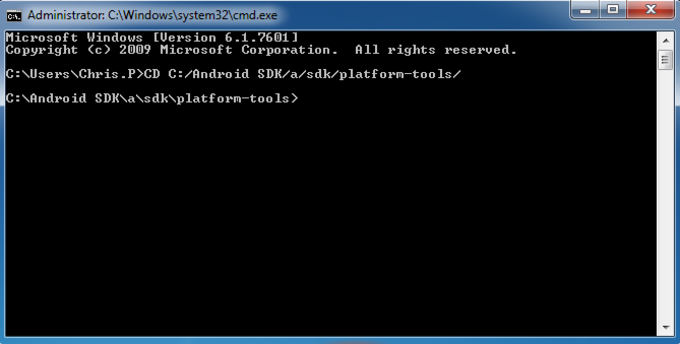
3. Now, it’s time to open Command Prompt (terminal) and get serious. Don’t worry, all you’d need to do is copy and paste some code in it, it's not hard at all. To open the terminal in Windows 7 hit the ‘Windows’ key, type ‘cmd’, and hit Enter; in Windows 8, you’d need to navigate to the new Modern UI home panel, and just type in ‘cmd’ there.
Once you open the terminal, you need to change the folder to Platform Tools in the Android SDK. Typically, it looks something like this, but you have to find the exact path where you installed the Android SDK on your computer: C:/Android SDK/adt-bundle-windows-x86_64-20131030/sdk/platform-tools/
To change the folder you just copy the above path (as it is on your computer) and put ‘cd’ in front of it, so the whole command would look like so: cd C:/Android SDK/adt-bundle-windows-x86_64-20131030/sdk/platform-tools/
4. Now, you are ready to start putting in the first commands that control your phone. In the command line type in the following:
adb devices
Hit ‘Enter’, and you should see the following: List of devices attached TA8900F923 device
The code will differ for different devices, so just make sure that something along these lines appears in the list of devices.
Next, type in: adb reboot bootloader
This will make the phone reboot in bootloader mode. You’d need to wait a short while and see the bootloader menu.
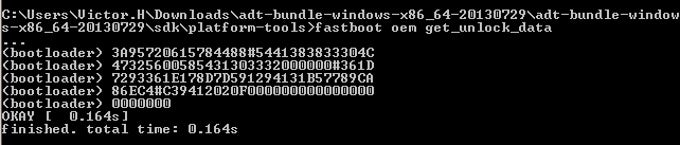
Next, type the following in the terminal: fastboot oem get_unlock_data
This will return you a unique string of code spread across five lines. It should look something like this: (bootloader) 3A95720615784488#5441383833304C (bootloader) 47325600585431303332000000#361D (bootloader) 7293361E178D7D591294131B57789CA (bootloader) 86EC4#C39412020F000000000000000 (bootloader) 0000000 OKAY [ 0.164s] finished. total time: 0.164s
Congratulations, you have completed the first important part - this is your unique phone identifier. Now, you need to copy just the numbers appearing after ‘(bootloader)’, and that’s a bit tricky in the Windows Command Prompt. First, right click anywhere in the Terminal, select Mark, and mark the whole block of text. Then, hit enter. This will put all this copied text in the clipboard. Now, in an app like Notepad, simply paste the copied text and delete everything except for the numbers. Combine all numbers together so that they appear as a single string like so:
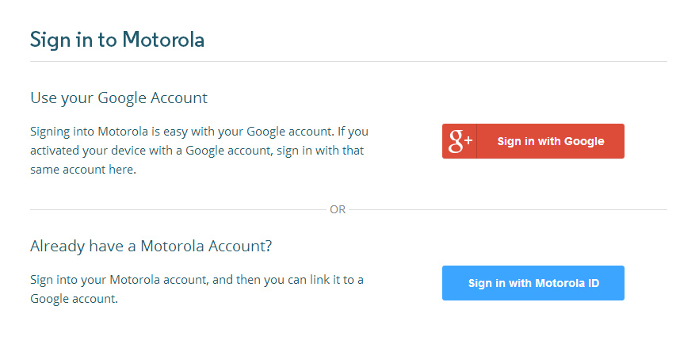
5.Copy this super-long string and head straight to Motorola’s official website, sign and skip right to step 6.
Paste the already copied super-long string and click on the “Can my device be unlocked?” button. Make sure you have removed all blank spaces from the copied string, and you should get a green light to get your bootloader unlocked.
Accept the user agreements, and head to your email, where Motorola has sent you the final instructions.
6. FINAL INSTRUCTIONS: Copy the 20-character key that Motorola sent you via email. Then, in the terminal (make sure your phone is still connected to your computer via USB), type:
fastboot devices To check that your phone is listed, and next:
fastboot oem unlock UNIQUE_KEY Where instead of 'UNIQUE_KEY' you type in your own 20-character key that Motorola sent you via email.
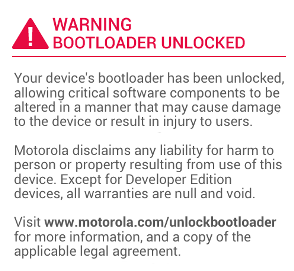
7. Congrats! If you have entered all info correctly, your phone should be rebooting by itself, showing you the image you see on the right. And yes, now you have your bootloader unlocked!
It was a bit tedious, but not hard, was it? Let us know if this worked out for you and how the whole process went in the comments section below.
Get Visible as low as $20/mo for 1 year. Limited time offer with code: FRESHSTART
$20
/mo
$25
$5 off (20%)
Offer Ends 6.1.2026 at 11.59pm ET. New members get $5/mo off the $25/mg Visible plan, $35/mo Visible+ plan, or $45/mo Visible+ Pro plan for the first 12 months. Promo code FRESHSTART required at checkout.
Victor, a seasoned mobile technology expert, has spent over a decade at PhoneArena, exploring the depths of mobile photography and reviewing hundreds of smartphones across Android and iOS ecosystems. His passion for technology, coupled with his extensive knowledge of smartphone cameras and battery life, has positioned him as a leading voice in the mobile tech industry.
A discussion is a place, where people can voice their opinion, no matter if it
is positive, neutral or negative. However, when posting, one must stay true to the topic, and not just share some
random thoughts, which are not directly related to the matter.
Things that are NOT allowed:
Off-topic talk - you must stick to the subject of discussion
Offensive, hate speech - if you want to say something, say it politely
Spam/Advertisements - these posts are deleted
Multiple accounts - one person can have only one account
Impersonations and offensive nicknames - these accounts get banned
To help keep our community safe and free from spam, we apply temporary limits to newly created accounts:
New accounts created within the last 24 hours may experience restrictions on how frequently they can
post or comment.
These limits are in place as a precaution and will automatically lift.
Moderation is done by humans. We try to be as objective as possible and moderate with zero bias. If you think a
post should be moderated - please, report it.
Have a question about the rules or why you have been moderated/limited/banned? Please,
contact us.


Things that are NOT allowed:
To help keep our community safe and free from spam, we apply temporary limits to newly created accounts: