Taking good photos with a premium phone is easy nowadays. Practically any $1000+ phone packs both the hardware and software to produce crisp, poster-worthy photos even if handled by a child.
Taking good photos with a cheap phone, on the other hand, can be a challenge. I was reminded of this after playing with the Moto G14 for a couple of weeks, and while I think it’s an okay phone for its $150 price, I don’t see it winning awards for its camera capabilities. It’s safe to say that the latter applies to all other cheap, entry-level phones.
But there are ways to take good photos with a cheap camera (or at least non-terrible ones). No, there’s no secret, magic trick that can make a $150 phone take photos like the latest iPhone, Galaxy or Pixel phone, but there are things you can do to minimize the camera limitations typical for a camera on a cheap phone.
Tip #1: Be still, be patient
There’s no way around it: cheaper phones are slower overall, and so are their cameras. There’s likely to be a significant delay between the moment you press the button and when the photo is actually taken (a.k.a. shutter lag), and the shutter sound you hear is not always a reliable indicator that your camera is done taking the shot.
Recommended For You
In other words, you have to be patient when taking photos with cheap phones. Give them an extra second after you press the button to ensure you don’t end up with a blurry mess. Disabling features like HDR or AI enhancements should speed things up, but image quality is likely to be affected too.
Tip #2: Know all your camera shortcuts
Speaking of speed, cheap cameras are also slow to open. That is why it is a good idea to know every possible camera shortcut your camera offers.
Some Android phones can have their cameras opened from stand-by or any screen with a double press of the power button – a shortcut that’s either available in the camera settings or is enabled by default. Motorola phones have their own unique approach – you can open their camera apps with a quick double twist of the phone.
In any case, knowing your camera shortcuts gives you those extra few seconds of time that could make the difference between taking the shot and missing it.
Tip #3: Camera settings
Even cheap phones nowadays offer a ton of camera settings and modes to play with. I was surprised to find manual camera controls on my Moto G14, and there are even goodies like Burst Mode for action photos and Night Vision for low-light situations. However, not every setting is working in your favor.
Resolution – My Moto G14 has a 50MP camera, but it takes 12.5MP photos by default. I assumed that switching to 50MP mode would give me higher-quality images with more detail, but instead, 50MP photos looked worse.
That’s because the Moto G14’s 50MP camera uses pixel binning – a now-common camera feature that groups neighboring pixels to use them as one larger and more sensitive pixel. This camera is optimized for taking 12.5MP shots, and switching to 50MP mode reduces its already weak light sensitivity.
Your experience may vary if you have a different phone, but if it uses a camera with 32MP or more, it is likely better to stick to the recommended (default) image resolution.
AI Optimizations – Some phones come with built-in software that recognizes what you’re taking a picture of and tries to optimize the camera settings for the situation. Every brand’s algorithms are different, so again, your experience may vary, but it’s not impossible to end up with a photo that’s objectively made worse by exaggerated colors and contrast – just look at those radioactive tomatoes in the picture below!
Whatever phone you have, try to disable any AI scene optimizers and see if you’ll like the clean photos better. As a bonus, turning these off might speed up your camera app. And if you prefer the “optimized” photos with extra color and contrast, that’s fine too.
< With AIWithout AI >
HDR – High Dynamics Range mode is a feature that improves detail in the brightest and darkest areas of the frame. It’s great having it on for improved image quality, and I’d recommend leaving it on at all times. It may noticeably slow down the camera app on cheaper phones, but I think the boost in quality is worth the lag.
< HDR OFFHDR ON >
RAW – Nowadays, even some cheaper phones have a RAW format option in their camera apps. This is a setting that tells the camera to save an uncompressed version of the image alongside the compressed, JPG variant.
The downside of RAW images is that they take up lots of space, slow your camera down, and require specialized software like Adobe Lightroom to open and edit. But the upside is that editing a RAW file yourself may be your best chance at getting the highest-quality image out of your phone’s camera, especially if your camera app’s algorithms go overboard with the sharpening, contrast and saturation dials. It’s no silver bullet, but the RAW option is worth testing if you don’t mind editing photos yourself to get the exact look you want.
Tip #4: Camera modes
Night Mode – Chances are you’ll find some kind of a night mode on most of today’s phones. Fortunately, this one tends to work even on cheaper hardware, but you may need to activate it manually when it’s needed. Use it whenever you can – even for moderately lit scenes indoors or outside at sunset.
When can you use night mode? Well, it works by taking multiple exposures in sequence and then stacking them to produce a clearer, brighter image. Its drawback is that it requires you to keep the camera still for several seconds, and taking images of moving subjects is out of the question.
And again, it doesn’t have to be night for Night Mode to be useful. As long as you have a static scene and you don’t mind the wait, your phone’s Night Mode might perform even better than its HDR algorithms.
< Night Mode OFFNight Mode ON >
Manual/Pro mode – Sorry to say it, but manual camera settings can do very little to compensate for low-quality camera hardware. They might, however, make up for struggling camera software. Of course, it's impractical to shoot in Pro mode only, but manual settings might help you get a better photo in challenging situations.
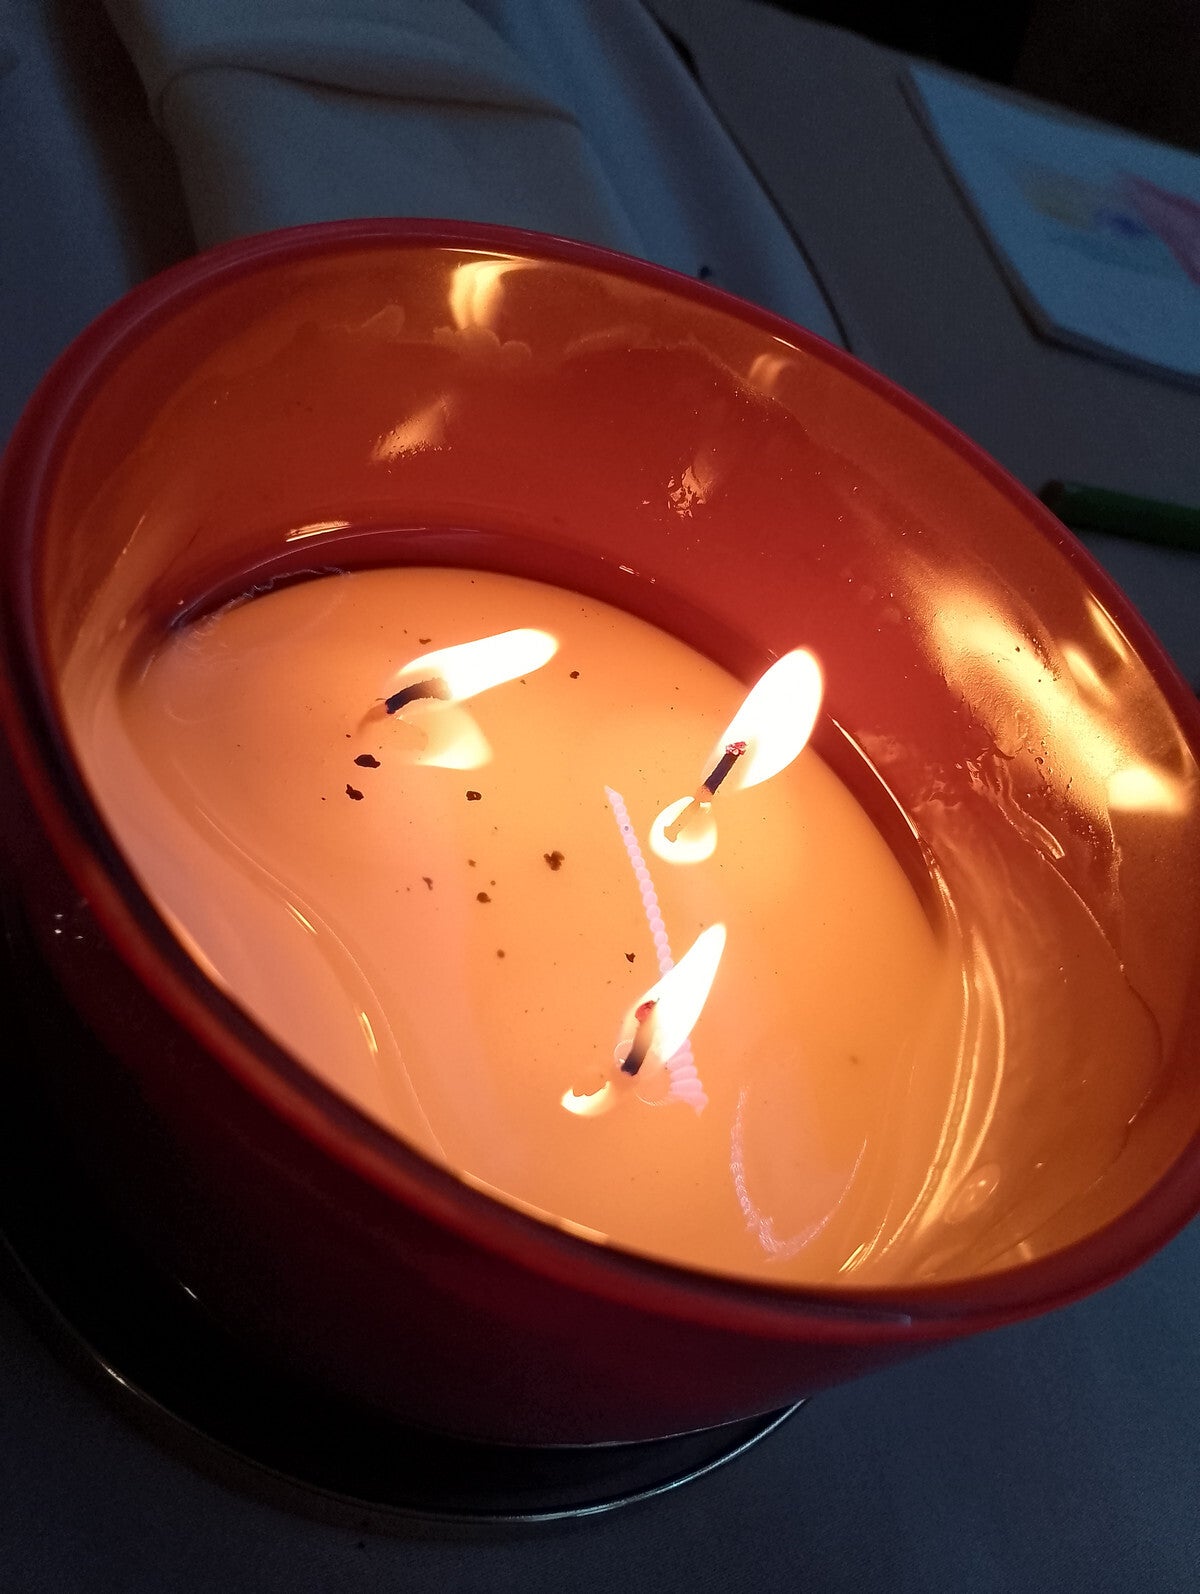
For example, here’s a shot I took on my Moto G14. Its camera couldn't set the right colors as it got confused by the warm glow of the flame. At the same time, The autofocus got thrown off by a reflective puddle of candle wax. So I swiftly switched to Pro mode to set the focus and color temperature manually. The result was a sharper photo with proper colors.
Auto mode - inaccurate colors and focus. Manual mode - accurate colors and sharp focus.
In situations where using a tripod or some sort of support (like a table or a ledge) is an option, you may try combining the lowest ISO setting with a slower shutter speed for minimum noise. This would work only for static situations like landscapes and architecture.
Burst Mode – this underrated and often forgotten feature shoots multiple images in rapid succession. Then you may pick the exact moment of action you want to preserve and discard the rest of the images. The downside is that your burst photos will have HDR turned off, so image quality will suffer. Burst mode is traditionally activated by holding down the capture button.
Zooming – If you have a cheap phone, the best type of zoom is with your legs. If possible, get closer to your subject instead of relying on digital zoom or on a cheap, basic telephoto camera (if your phone has one at all).
Bonus tips
Clean your lens – almost every time someone hands me their phone to take a picture, I look at their camera first. 9 out of 10 times it’s covered in finger grease, so I give it a gentle wipe with my sleeve. Smudges on the camera lens cause soft, hazy photos, especially on cheaper phones which may not have a special lens coating to prevent them.
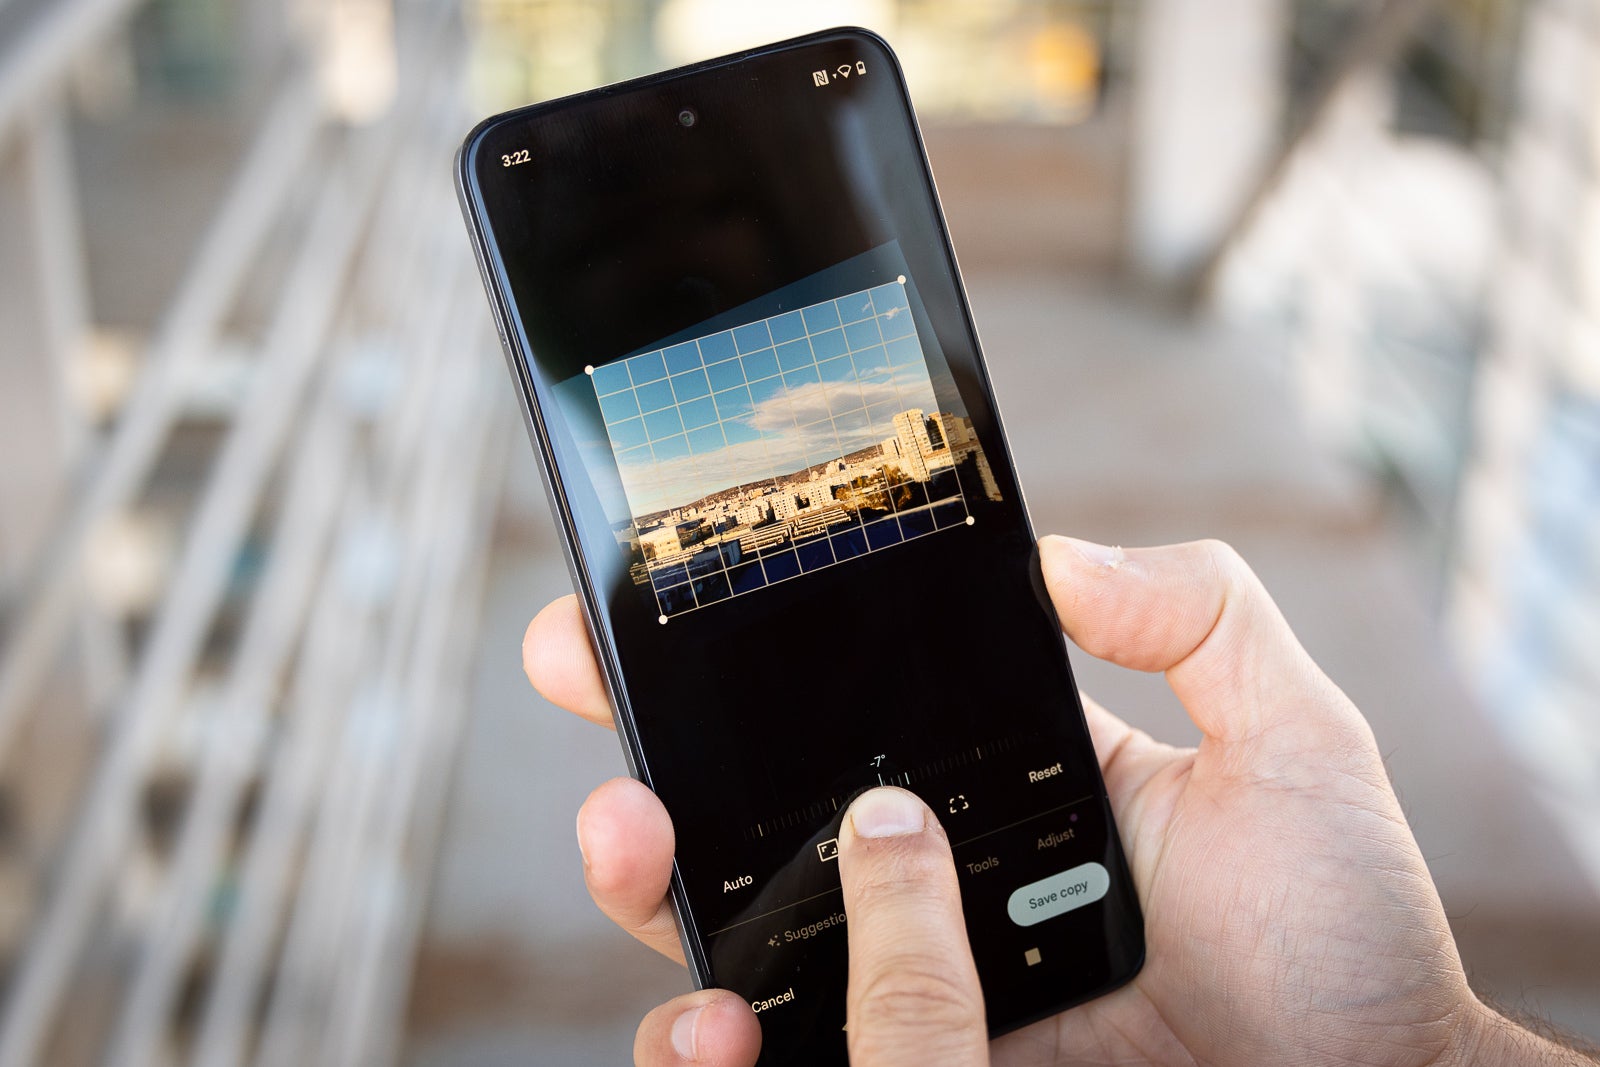
Keep your horizon straight – following this basic composition tip will improve your photos in a subtle way. To help you keep your camera horizontal, enable the grid feature and use it as a guide when composing your shot. Photos can also be easily straightened in Google Photos after they’ve been captured.
A horizontal photo is a better photo. Image credit - PhoneArena
Six-month unlimited plan is now 57% off
$90
$210
$120 off (57%)
Mint Mobile is now allowing you to get whichever plan you like for either three, six, or 12 months for just $15/mo. If you go for the six-month unlimited service, for instance, you'll now have to pay just $90 upfront instead of $210.
A discussion is a place, where people can voice their opinion, no matter if it
is positive, neutral or negative. However, when posting, one must stay true to the topic, and not just share some
random thoughts, which are not directly related to the matter.
Things that are NOT allowed:
Off-topic talk - you must stick to the subject of discussion
Offensive, hate speech - if you want to say something, say it politely
Spam/Advertisements - these posts are deleted
Multiple accounts - one person can have only one account
Impersonations and offensive nicknames - these accounts get banned
To help keep our community safe and free from spam, we apply temporary limits to newly created accounts:
New accounts created within the last 24 hours may experience restrictions on how frequently they can
post or comment.
These limits are in place as a precaution and will automatically lift.
Moderation is done by humans. We try to be as objective as possible and moderate with zero bias. If you think a
post should be moderated - please, report it.
Have a question about the rules or why you have been moderated/limited/banned? Please,
contact us.


Things that are NOT allowed:
To help keep our community safe and free from spam, we apply temporary limits to newly created accounts: