You have a spare NFC tag laying around and you aren't sure how to use it? Here's an idea - power up your Windows PC using the tag and a NFC-enabled Android device. You'll only need 10-15 minutes, three apps on your device, and a simple configuration in your PC's wireless adapter settings.
First, open up your Windows Network and Sharing Center. Click Change adapter settings. Right click your active internet connection and select Properties. Click the Configure button to the right. Go to the Advanced tab, look for the option "Wake on Magic Packet", and set its Value to Enabled.
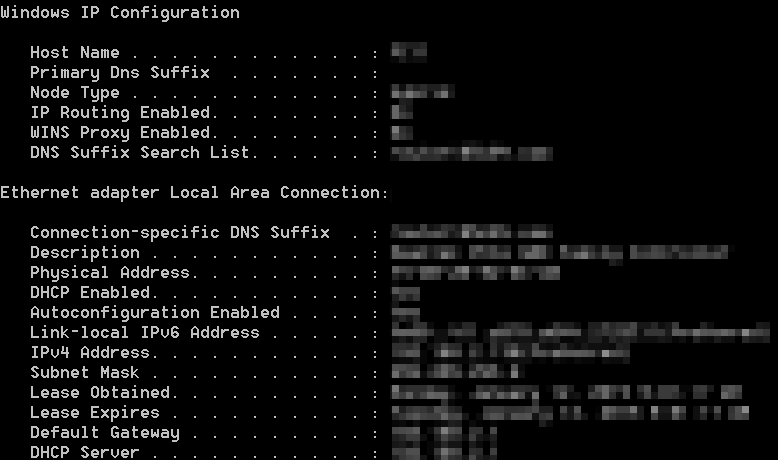
Next, you'll need to get your hands on your computer's IP and MAC addresses. No, you won't be hacking your own PC or anything. You'll just have to run a few simple commands. Hold down the Windows key and press the R key on your keyboard to launch the Run dialog box. In it, type "ipconfig /all" without the quotes. You'll get a command prompt window with a bunch of network data. If the window disappears too quickly, press the Windows + R keys again, type "cmd", hit Enter, then type "ipconfig /all" in the command prompt. What you need to write down are the Physical Address, IPv4 Address, and Subnet Mask values. Keep them near, you'll need them later. Also, your computer has to be on a Wi-Fi connection.
Now, install the following apps on your Android device:
Tasker - download from Google Play. This will be used to automate the processes. The app usually costs $2.99, but you can get a .apk install of a 7-day trial version from here. Install it on your device like any other apk.
Trigger - download from Google Play. This app is used for reading and writing to your NFC tag. It's a free download.
WoL Wake On Lan Wan - download from Google Play. This app sends the command that powers your PC on. It's a free download.
All set? Let's move! Open WoL on your smartphone, and tap Add New button. Type "Home" in the Name field, then type your MAC and IP addresses in the designated fields. Tick the box next to "Send as Broadcast", and enter your Subnet Mask address. You're done! Tap Save and move to Tasker.
In Tasker, tap the three-dot menu button and hit Preferences. Go to the Misc tab and tick the Allow External Access box. Then, go to the Task tab, and tap the + button. Name the task Wake and press the checkmark icon. Tap the "+" button at the bottom, select Plugin, and choose WoL Wake On Lan Wan. Hit the pencil-like icon at the top, and select your Home WoL profile. You can now exit Tasker.
Recommended Stories
Finally, here comes the NFC tag. We'll be using Trigger to write the sequence in it. Open the app, and tap the + button, then tap the next + button. Choose NFC, hit Next, and tap Done. Now, hit Next, tap the + button, select Tasker Task, and tap Next. On the small pop-up window, tap the magnifying glass-like icon, and select the Wake task we created a few paragraphs ago. Tap Add to task. Hit Next, then Done, then get your NFC Tag. You will be writing the task on it, so place your device on the tag, and tap Done when the writing ends.
Wheee-whew! Not that you've gone through all this, you should be able to power on your PC by placing your Android device on the designated NFC Tag, with the display switched on. Find a clever spot for it and enjoy the little piece of the future. If you have any problems, first, check out whether "Wake On Lan" is enabled in your PC's BIOS. Hopefully, this will solve it.
Luis D. has a multitude of news, features and review articles written for PhoneArena. He adeptly demystifies complex technology topics, such as the development of advanced materials for bendable device displays and the evolution of chipset manufacturing.
Loading Comments...
COMMENT
All comments need to comply with our
Community Guidelines
Phonearena comments rules
A discussion is a place, where people can voice their opinion, no matter if it
is positive, neutral or negative. However, when posting, one must stay true to the topic, and not just share some
random thoughts, which are not directly related to the matter.
Things that are NOT allowed:
Off-topic talk - you must stick to the subject of discussion
Offensive, hate speech - if you want to say something, say it politely
Spam/Advertisements - these posts are deleted
Multiple accounts - one person can have only one account
Impersonations and offensive nicknames - these accounts get banned
To help keep our community safe and free from spam, we apply temporary limits to newly created accounts:
New accounts created within the last 24 hours may experience restrictions on how frequently they can
post or comment.
These limits are in place as a precaution and will automatically lift.
Moderation is done by humans. We try to be as objective as possible and moderate with zero bias. If you think a
post should be moderated - please, report it.
Have a question about the rules or why you have been moderated/limited/banned? Please,
contact us.


Things that are NOT allowed:
To help keep our community safe and free from spam, we apply temporary limits to newly created accounts: