Hi everyone and welcome to part five of our Apps Optimized series. After showing you how to get around like a pro with Google Maps, today we’re putting the focus on the mobile apps of one of the most popular music streaming platforms – Spotify.
Spotify is huge. As of November of 2018, the service reported a total of 191 million monthly active users, with 87 million of those being subscribed to the paid Spotify Premium. To put things into perspective, there are only 7 countries in the world with populations larger than Spotify’s active user base. Spotify’s popularity is still increasing at a rapid pace, and it shows no signs of stopping.
The reason for this success is quite simple. The platform launched in the early days of the streaming industry and features a colossal library of songs in combination with a streamlined interface.
Despite the simplicity of the UI, there are a lot of things that can be tweaked and altered in order to improve your overall experience with the platform. Below, you will find a list of our top tips and tricks that are designed to help you get the most out of Spotify – from smarter and more convenient ways to search for music to importing tracks and listening in private.
Recommended For You
Before we commence, we have to mention that a good number of these features are restricted to Spotify Premium, which costs $9.99 per month in the US. However, you can always get a free 30-day trial and see if it’s a worthy investment. Now let’s dig in!
Refine your search and get better results
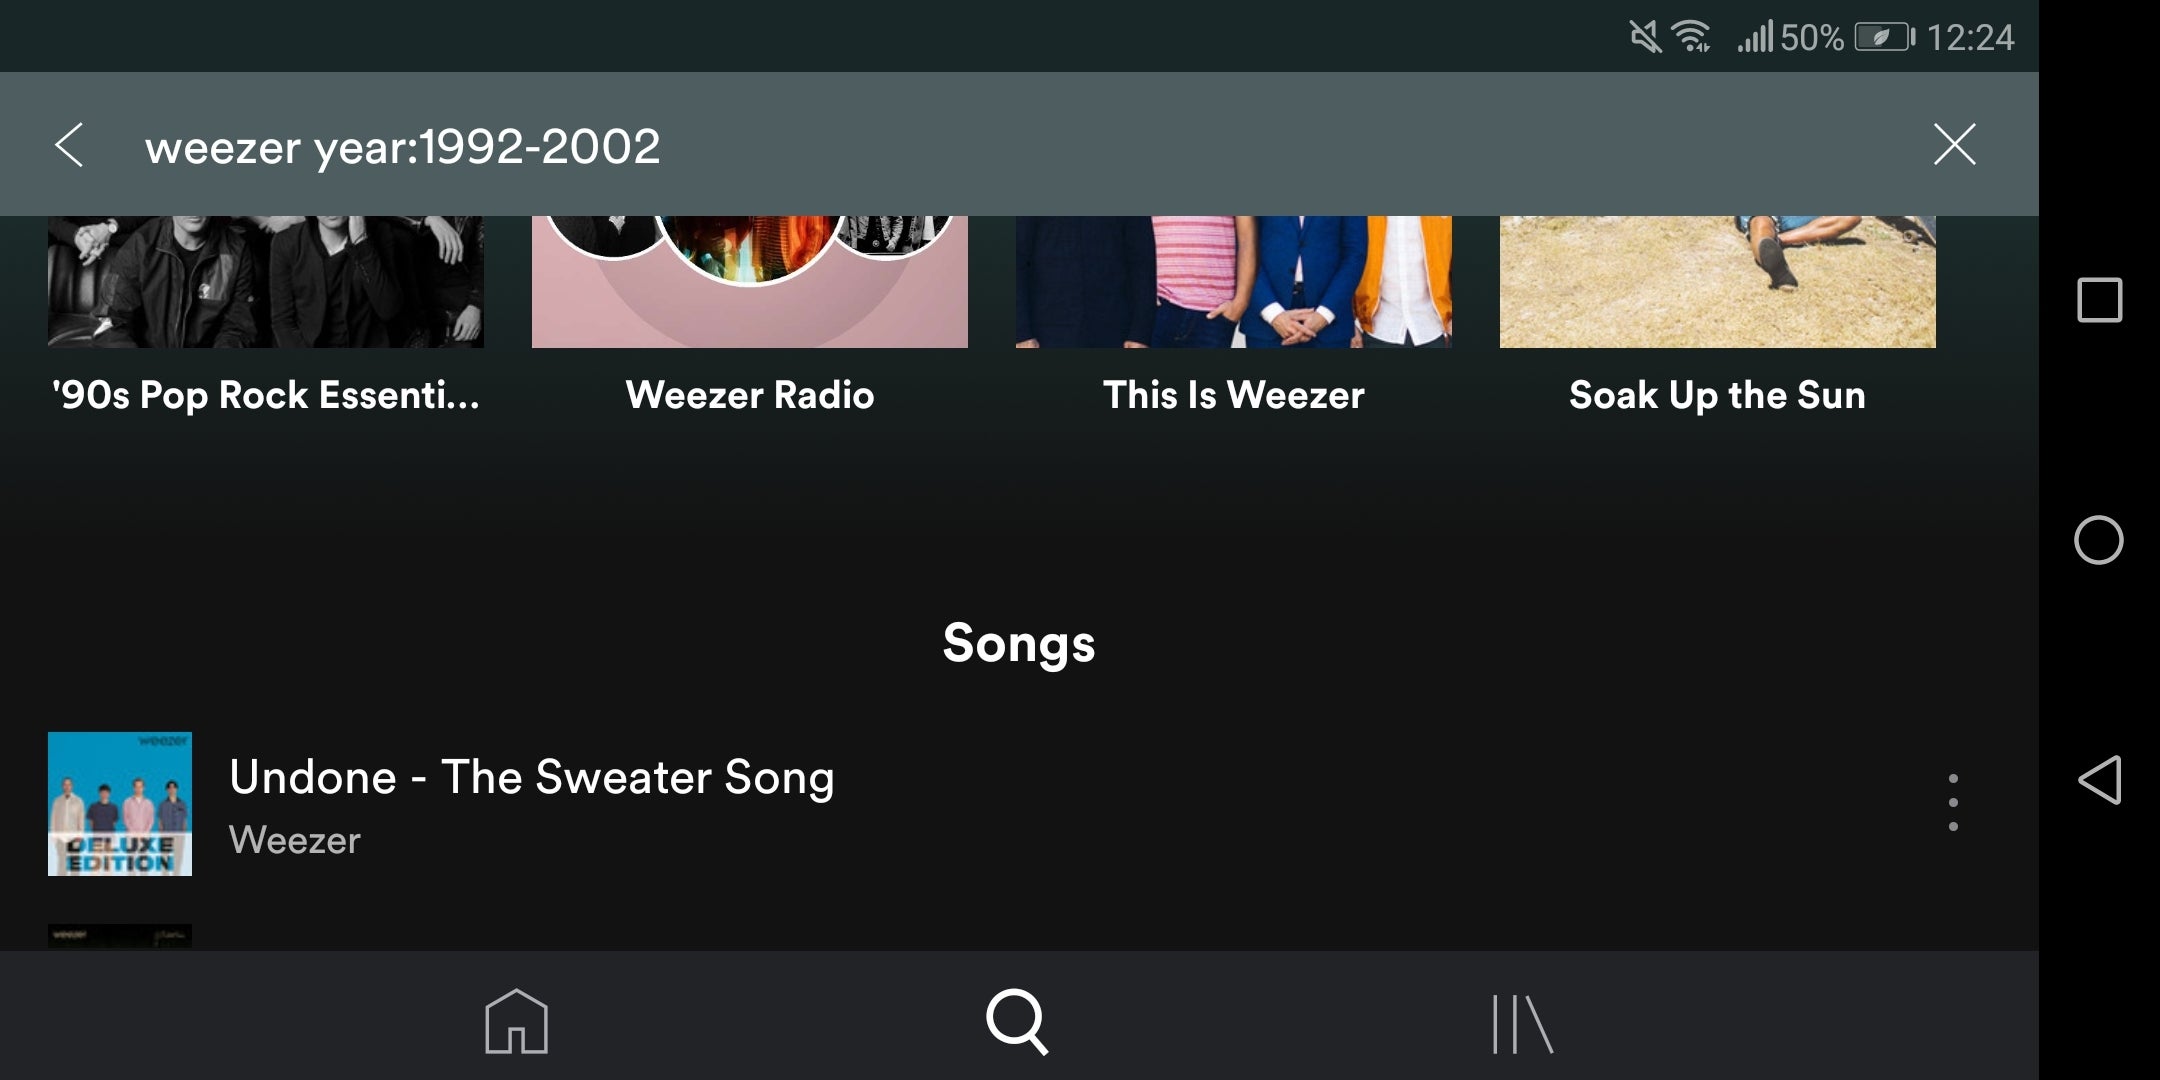
Any Spotify user has probably experienced this at least once – you go into the app, search for an artist, and the results that pop up are so numerous that it becomes difficult to find the song or album you want.
Fortunately, there’s a way to get better results by using different terms in your search. For example, typing in “Weezer year:1992-2000” (without the inverted commas) will prompt Spotify to only show the band’s songs and albums from the 20th century.
You can also use modifiers like “+”, “-“, “and”, ”not”, and “or” to look up or exclude different duets and collaborations. Give it a shot!
Tweak audio quality to your requirements
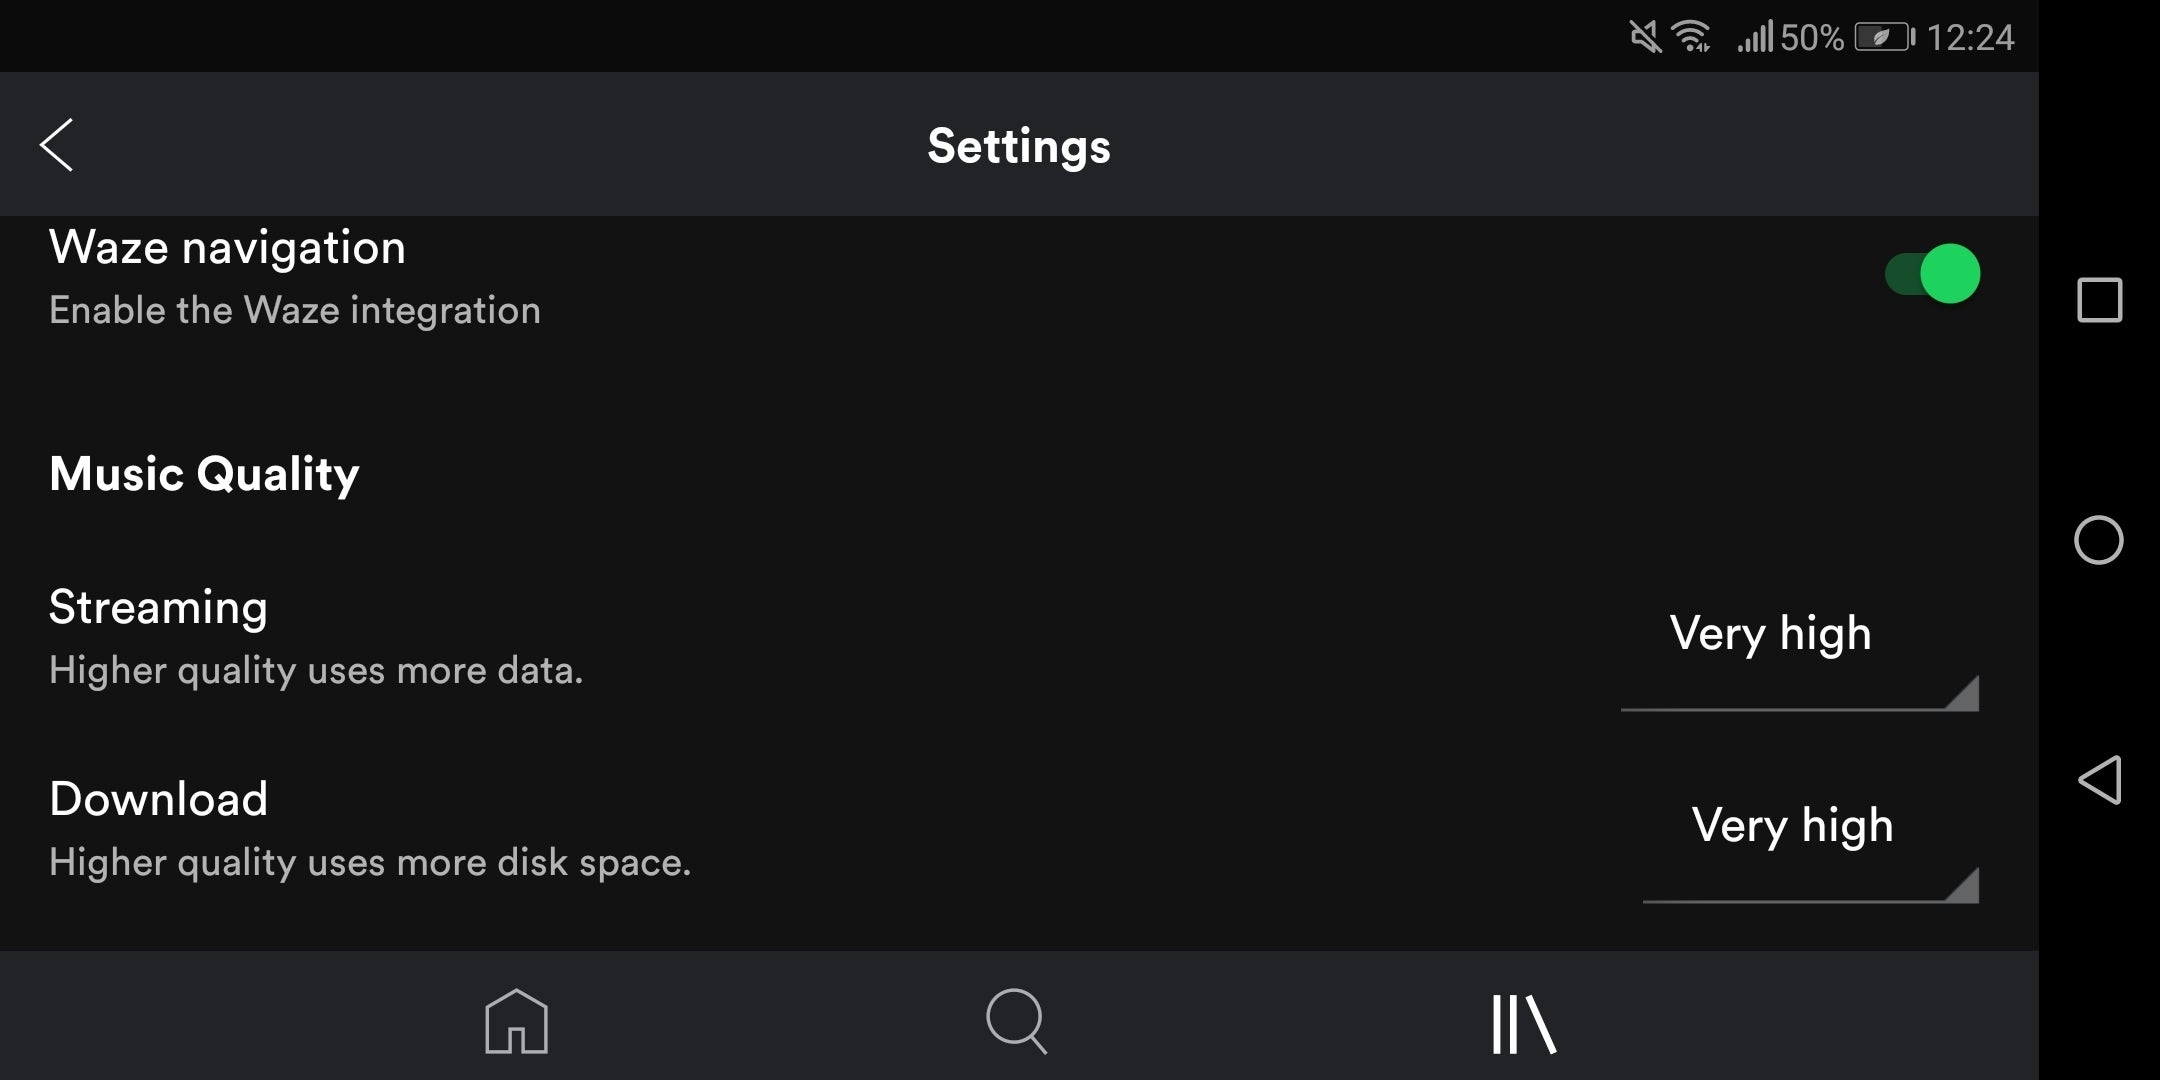
While Spotify doesn’t feature the lossless sound quality of services like Tidal, you can still get up to a decent rate of 320kbit/s. Alternatively, if you find yourself in a situation where you’d like to save data, there are 3 lower settings that go all the way down to 24 kbit/s. Here’s how you can tweak these:
On Android and iOS: Tap the “Your Library” button at the bottom of the app, then hit the “Settings button” at the top right of the screen. Then, scroll down until you see the “Music quality” section. Here’ you can set the quality of the tracks you stream and the ones you’ve chosen to download offline.
Search Spotify with your voice (for USA users only)
Did you know that you can use your voice to search Spotify? Simply do a long-press on the search button and a voice assistant-like menu should pop up. You can look up music, podcasts, videos, genres, playlists, and even your friends!
However, keep in mind that the feature is currently only available for users in the USA. If Spotify Voice doesn’t show up, make sure that the Spotify app has permission to use your microphone by going to Settings -> Apps -> Permissions.
Other ways to control Spotify with your voice
Users that do not reside in the US can always check and see if there’s a “tap to speak” function on their keyboard app and use it after pressing the Search bar. It’s not as fast as Spotify Voice, but it does save you the hassle of typing. Also, you can always use Google Assistant or Siri to interact with the app.
Alternatively, you can also control Spotify if you have a smart speaker at home. Alexa-powered devices work with Spotify Premium, while Google Home is even compatible with the free version!
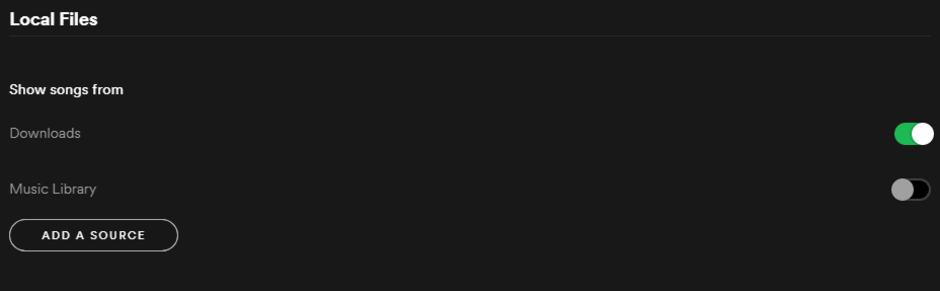
Import your own music
In addition to the millions of songs you have on Spotify, you can also import music from your own library. However, you’re going to need a computer for that, as the mobile app does not have this feature. Here’s how to do it:
1. Click the ▼ button that’s right next to your profile name in the top-right corner of the desktop app. 2. Go to Settings -> Local files -> Add a Source. Supported formats include .mp3, .m4p, and .mp4
You can also listen to these uploaded files on your mobile app. After you’ve completed the above steps, add the imported files to a playlist, make sure that you’re on the same WiFi network as your desktop app, select said playlist on the mobile app, and switch on “Download”.
Check your subscription status
As you might know, Spotify Premium is a subscription service that renews itself automatically. If you’re planning to opt out of Premium and you don’t want to be charged for another month, it’s always a good idea to know the day in which your subscription ends.
In order to do that, just enter your internet browser of choice, then log into your account page. Once you’re logged in, one of the first things you should see is the date on which Premium is supposed to renew. Click “manage plan”, and then change it or cancel it.
Save your Discover Weekly playlists
The Discover Weekly playlists are one of Spotify’s standout features. At the beginning of each week, the service uses an advanced algorithm to recommend you 30 new songs that are based on your tastes, and specifically stuff that you listened to recently. The results are often fantastic, but these playlists disappear and get replaced by new ones every Monday. If you’d like to save these so you can take your time and pick out the hits you love the most, then download this IFTTT applet. It will automatically save you the Discover Weekly mixtapes each week by creating an archive playlist. Neat!
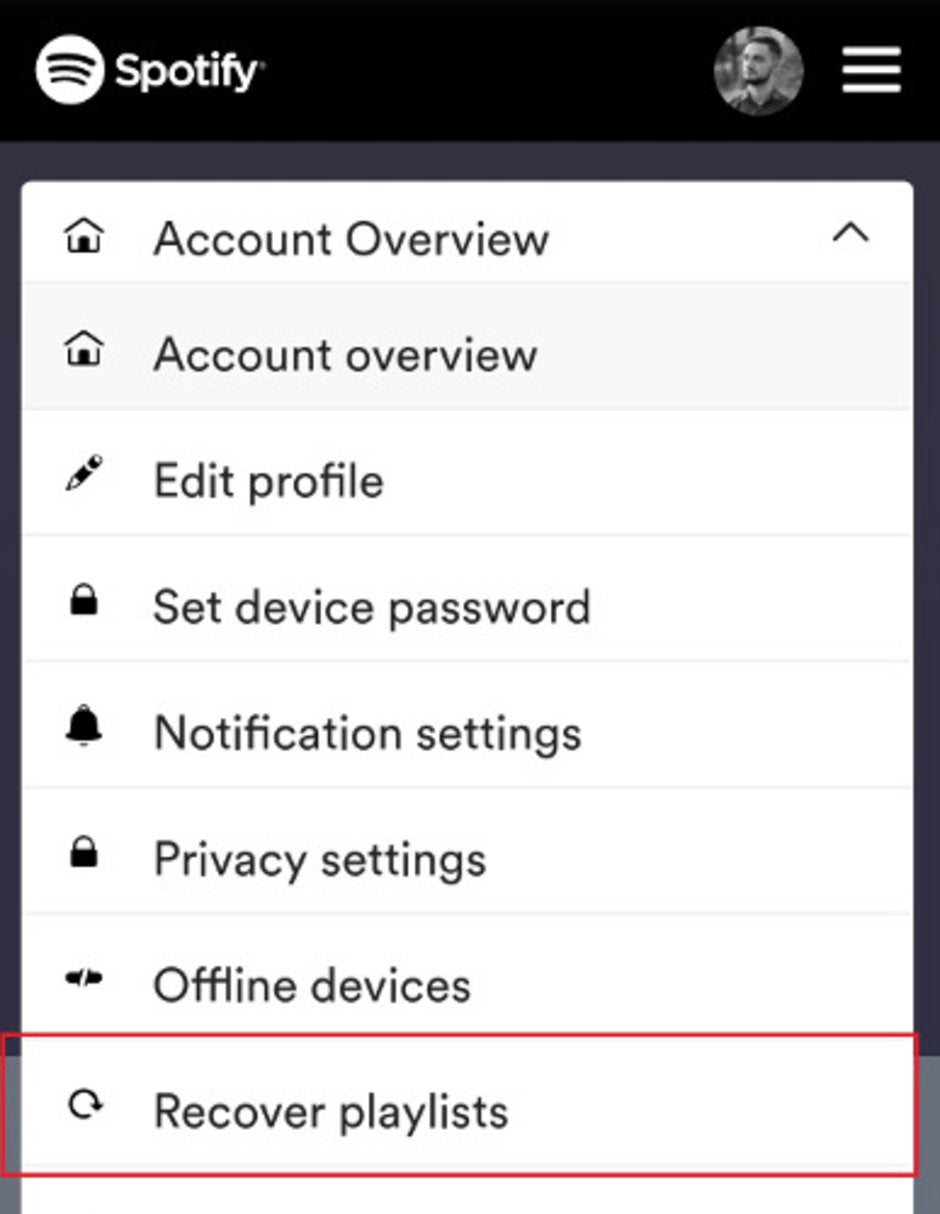
Recover deleted playlists
If you’d like to bring back a playlist you’ve deleted for some reason, you can actually recover these. Just enter your internet browser of choice, then log into your account page. Afterward, tap on the “Account Overview” sliding menu and locate “Recover playlists”. A list of all the deleted playlist should appear next, click on what you want and bring it back for your listening pleasure.
Never let the party stop with AutoPlay
AutoPlay is a nifty feature that plays songs that share the same genre with your current album or playlist after they end. It’s very suitable for those of you looking for a continuous vibe without having to loop the same songs again and again.
Here’s how to enable it:
On Android - Tap the “Your Library” button at the bottom of the app, then hit the “Settings button” at the top right of the screen. Locate AutoPlay and toggle it on or off. On iOS – follow the same steps, then locate the AutoPlay switch in the “Playback” section of “Settings”.
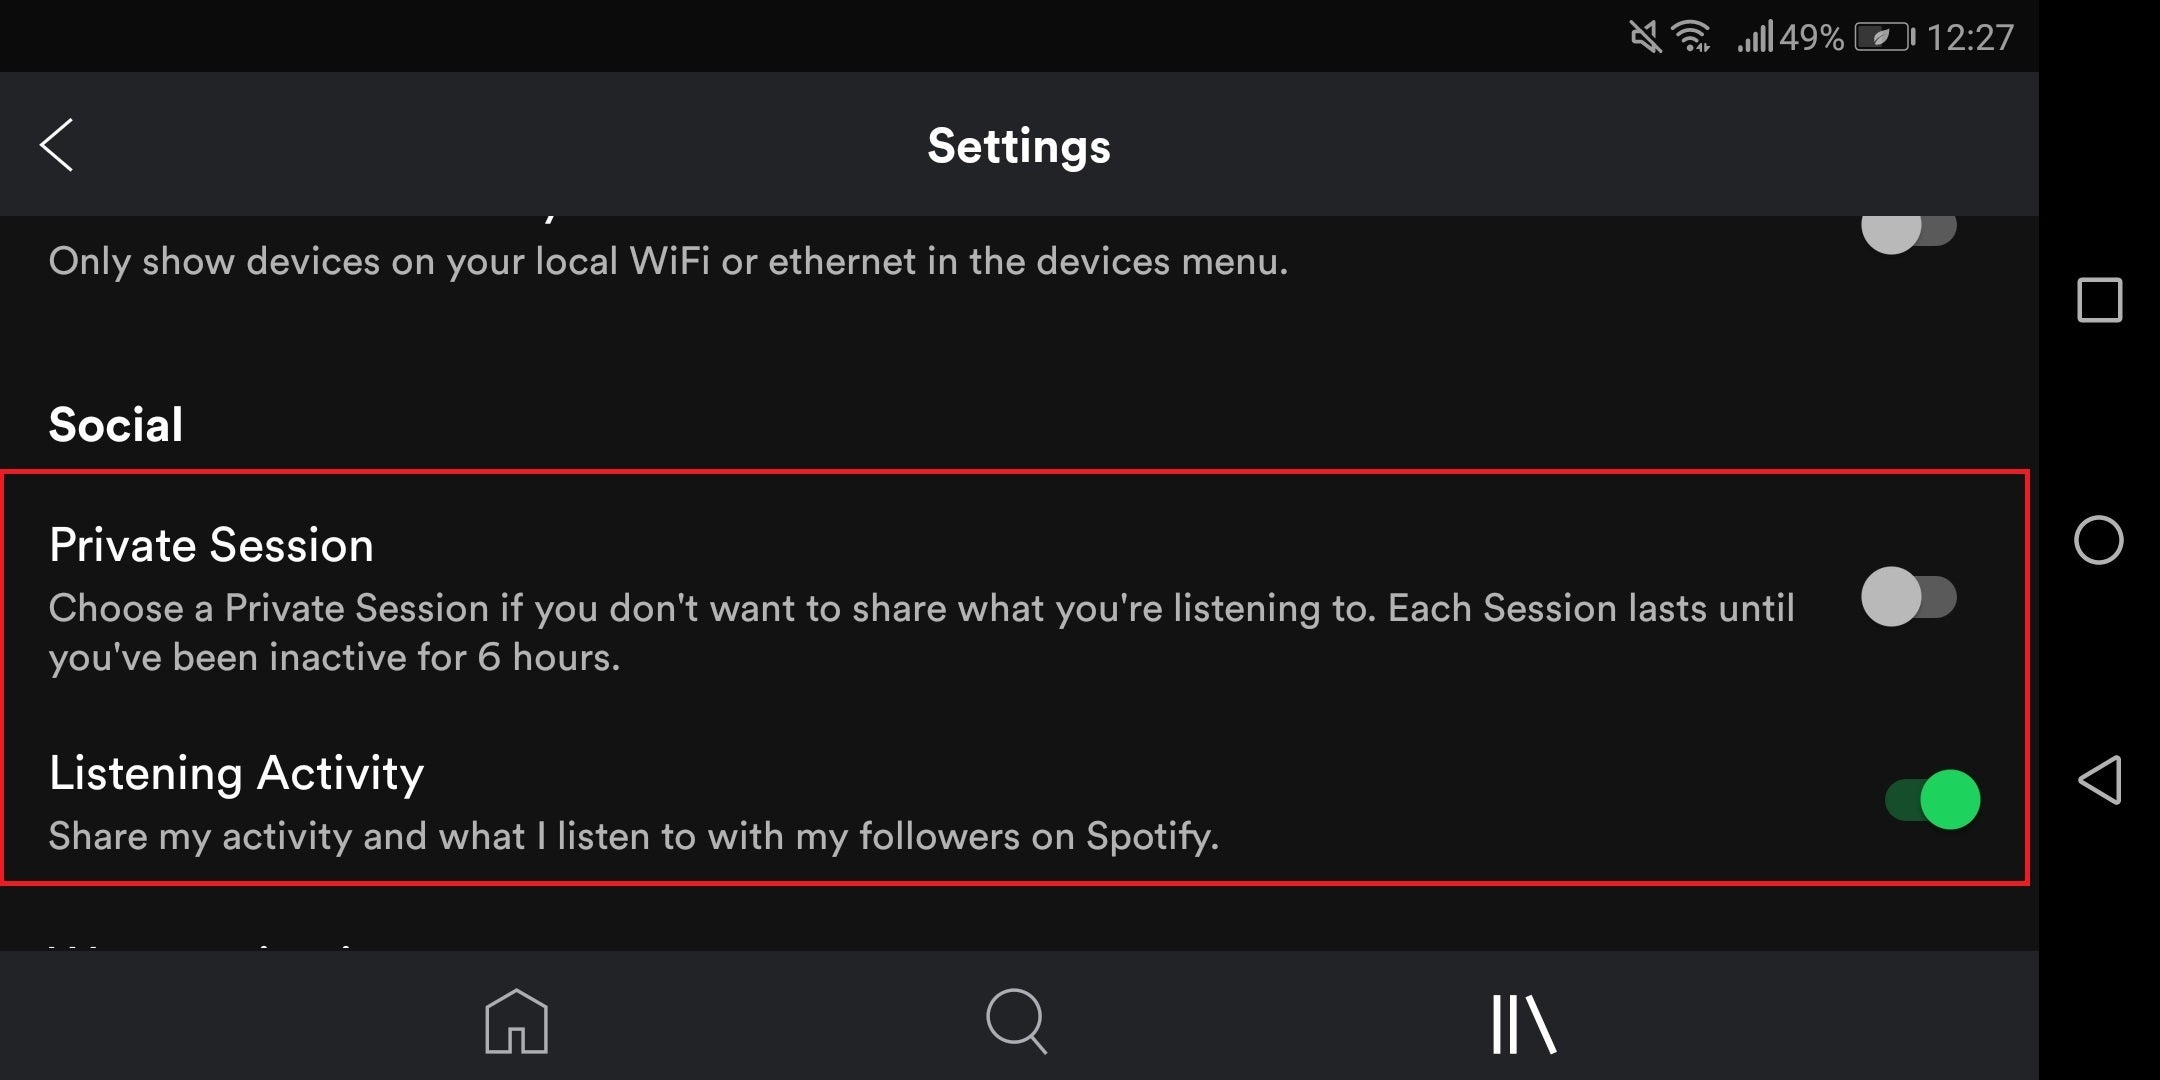
Listen to your tunes in private
As you might be aware, Spotify shares your current listening activity with friends and people who follow you. If you have a guilty pleasure or aren’t too keen on sharing said info, there are a couple of things you can do – you can either enter a private session that allows you to listen without your followers knowing (it automatically disables after 30 mins of inactivity) or disable the sharing of your listening activity altogether.
To do so, you need to go to Your Library -> Social -> Private session. That’s all there’s to it.
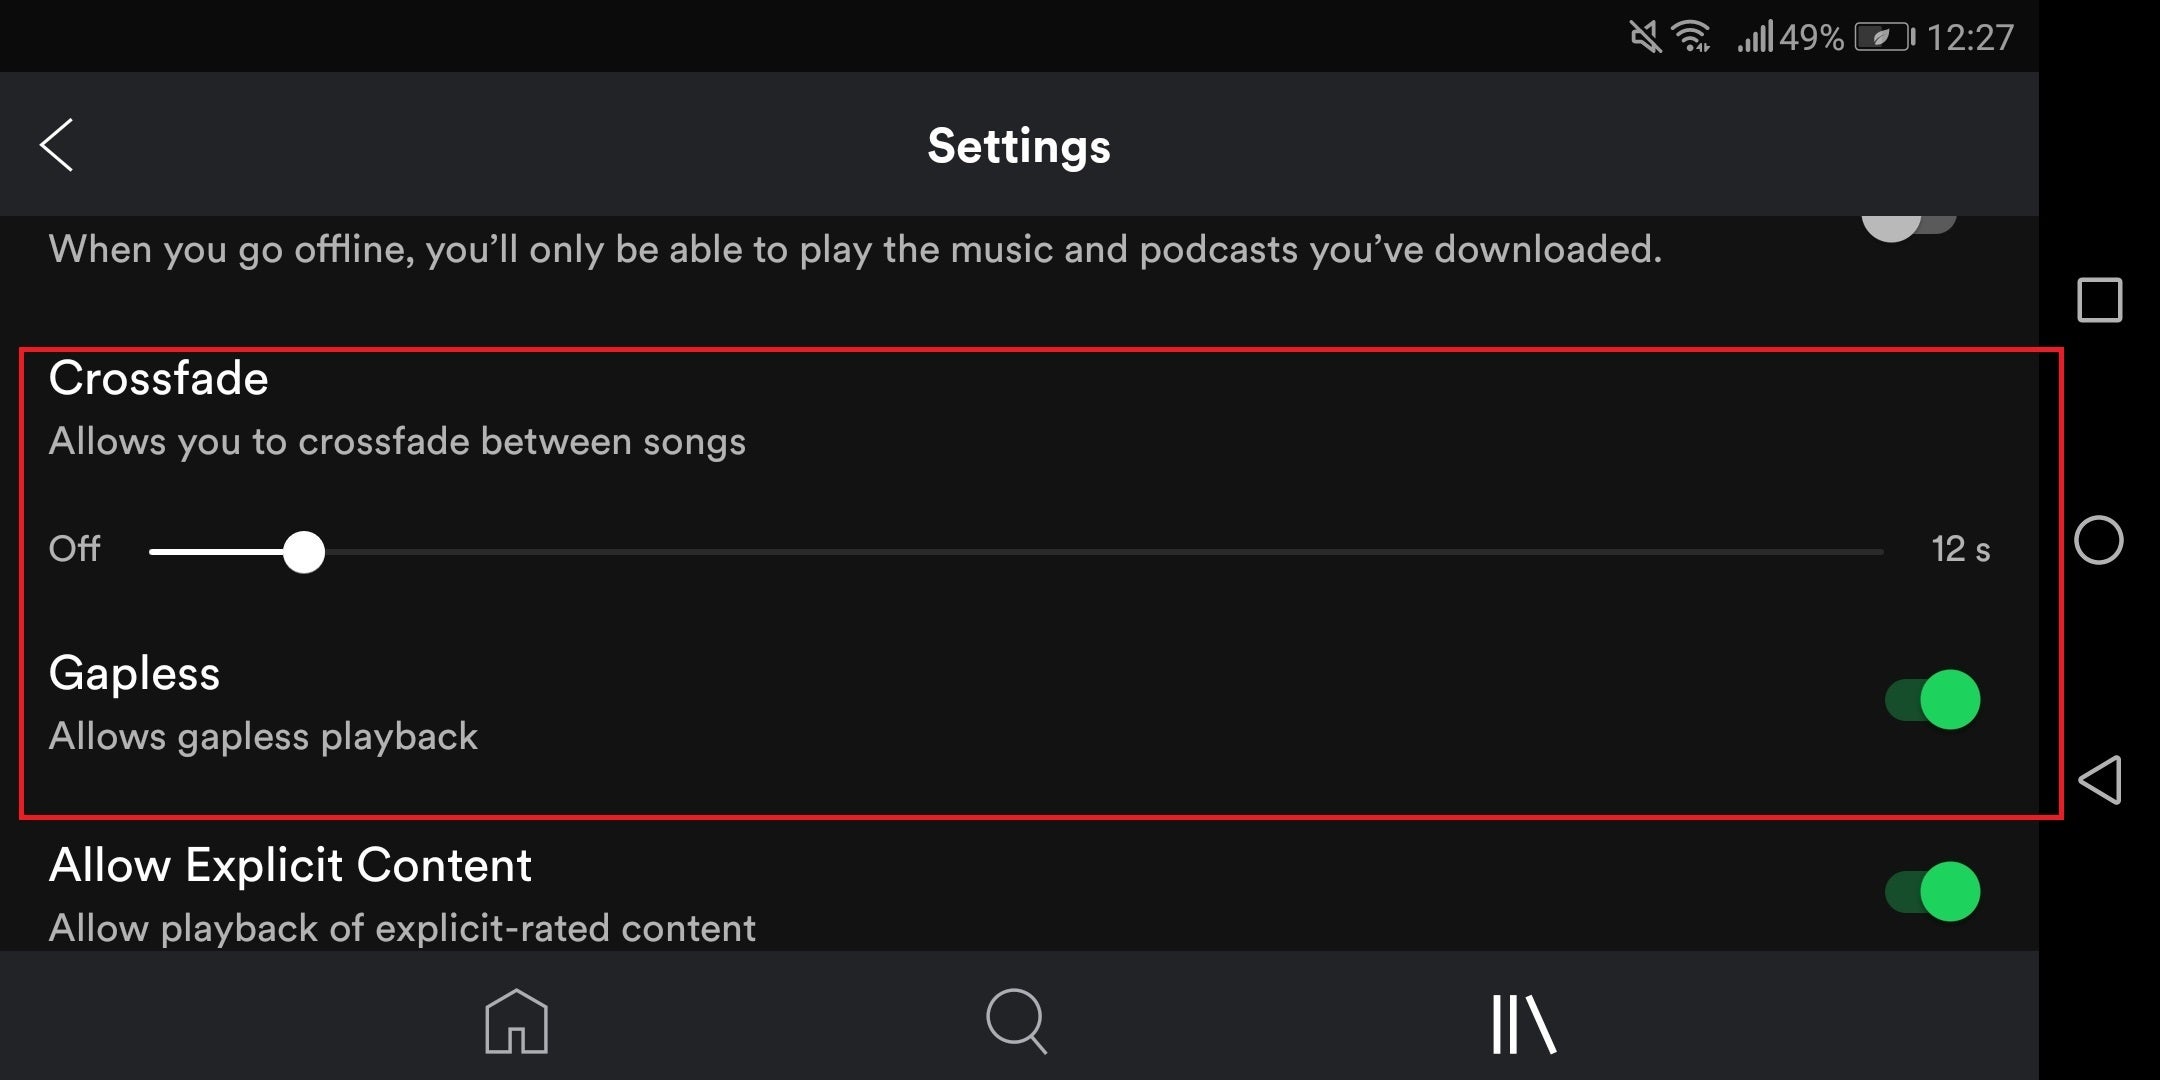
Transition seamlessly between songs with the Crossfade and Remove gaps features
The “Settings” menu of Spotify contains two other options that are suitable for those of you who don’t enjoy the silence between songs. In the “Playback” section, you can locate the Crossfade and Gapless features.
The first one automatically mixes the current track with the next one and can be adjusted up to 12 seconds. If you don’t want your songs to mix into each other, but also don’t want any gaps between songs, simply switch Gapless on.
And there you have it, 11 tips for a better time with Spotify on Android and iOS! Did you find them useful? Do you have a super tip that we haven't mentioned? Let us know in the comments below!
Six-month unlimited plan is now 57% off
$90
$210
$120 off (57%)
Mint Mobile is now allowing you to get whichever plan you like for either three, six, or 12 months for just $15/mo. If you go for the six-month unlimited service, for instance, you'll now have to pay just $90 upfront instead of $210.
A discussion is a place, where people can voice their opinion, no matter if it
is positive, neutral or negative. However, when posting, one must stay true to the topic, and not just share some
random thoughts, which are not directly related to the matter.
Things that are NOT allowed:
Off-topic talk - you must stick to the subject of discussion
Offensive, hate speech - if you want to say something, say it politely
Spam/Advertisements - these posts are deleted
Multiple accounts - one person can have only one account
Impersonations and offensive nicknames - these accounts get banned
To help keep our community safe and free from spam, we apply temporary limits to newly created accounts:
New accounts created within the last 24 hours may experience restrictions on how frequently they can
post or comment.
These limits are in place as a precaution and will automatically lift.
Moderation is done by humans. We try to be as objective as possible and moderate with zero bias. If you think a
post should be moderated - please, report it.
Have a question about the rules or why you have been moderated/limited/banned? Please,
contact us.


Things that are NOT allowed:
To help keep our community safe and free from spam, we apply temporary limits to newly created accounts: