This is a short how-to article that details the process of installing the Google Photos desktop uploader and have it upload your photo/video collection to the platform.
You've probably heard that Google Photos recently evolved past a photo collection app for Android devices into a separate Google product. You can now use Google Photos across iOS, Android, as well as in the browser. For more details on the capabilities of the platform, check out our previous post here.
There's no doubt that Google Photos has become overnight a fierce competitor in the photo platform market. Unfortunately, if you didn't previously have an Android smartphone with Google+ automatically backing up your photos, chances are that your current photo collection is currently nonexistent. Fortunately, Google offers a neat desktop app that can upload all the photos and videos you have stored locally to the service.
This process works in the same way on both Windows and Mac OS X. The screenshots are taken on a Windows 8.1 laptop, but the same basic steps will apply independent of your operating system.
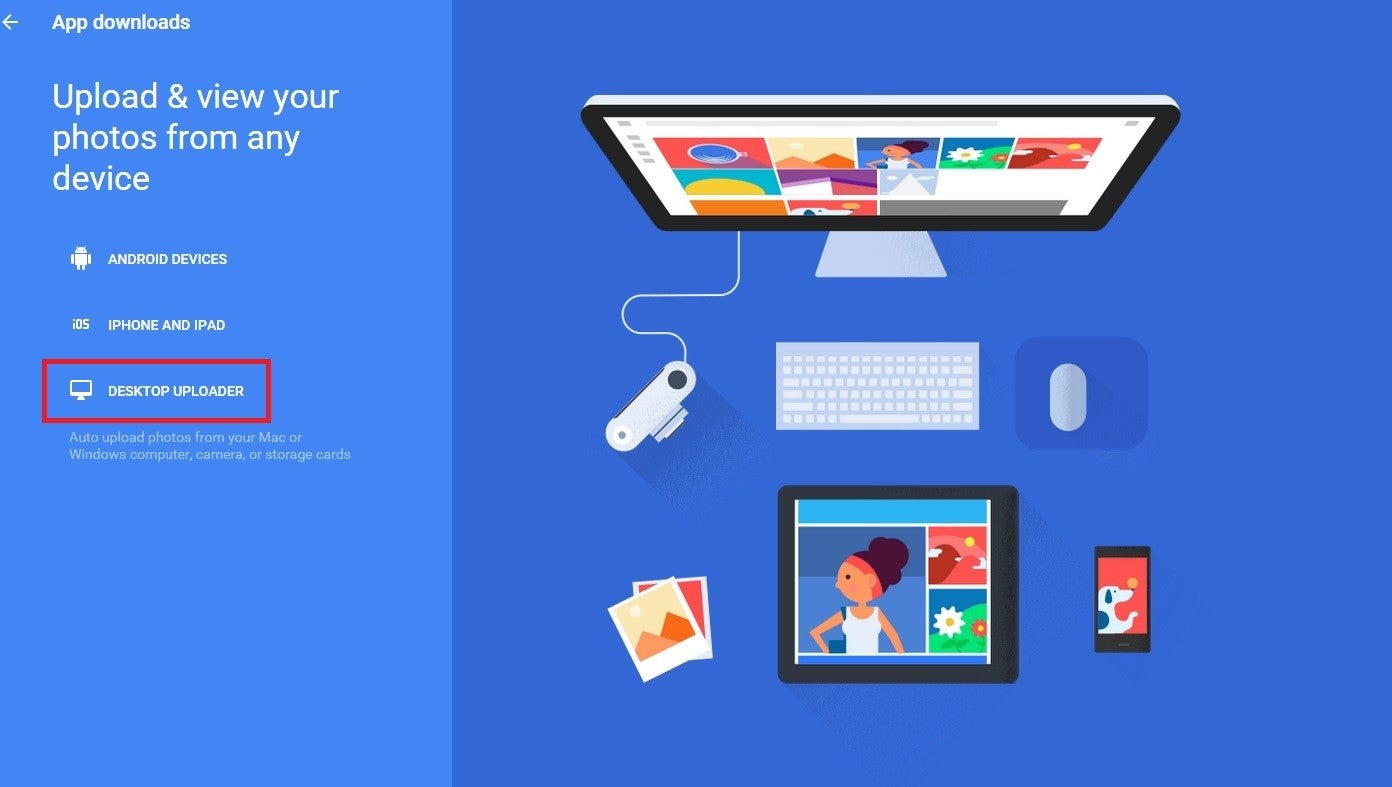
Step 1. Go to the Google Photos desktop app download page. The first time you visit the website, you'll be taken through a short introduction of the service. Once that's done, click the "Desktop Uploader" button in the left-hand side of the page. The website will detect your OS and download the appropriate installer.
Recommended For You
Step 2. Launch the installer that you've previously downloaded, agree to the terms of service, and log into Google Photos using your Google account credentials.
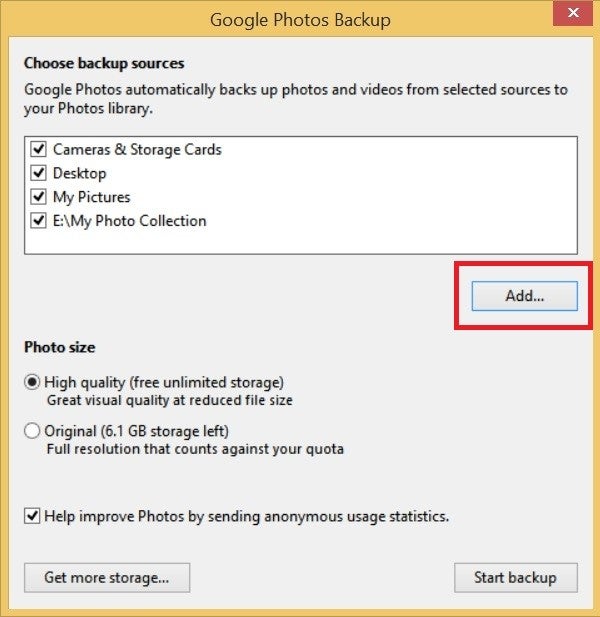
Step 3. The desktop uploader will now ask for what directories to upload to Google Photos. It will automatically select a few folders as well as any potential cameras or storage cards, but you can choose to add other folders as well.
This is also where you'll have to select the resolution. You can upload unlimited photos using the high-quality setting, which resizes the image to 13MP and also compresses it a bit. If you're not paying Google for Drive space, this is the only option for large collections.
If you want to upload photos in their original quality, the size of your photo collection will drain from your Google Drive quota.
Step 4. Now wait for Google Photos to upload the files. Depending on the size of the photo collection and the upload speed of your network, this may take from a few minutes to a few hours.
If you ever want to stop backing up a folder or your storage devices, click on the Google Photos icon in the tray, go to options, and uncheck folders as needed.
There you go, now your photos and videos are safely backed in Google Photos. Your data will remain private until you decide to share it with other people, so don't worry if you've accidentally uploaded an embarassing photo.
Get Visible as low as $20/mo for 1 year. Limited time offer with code: FRESHSTART
$20
/mo
$25
$5 off (20%)
Offer Ends 6.1.2026 at 11.59pm ET. New members get $5/mo off the $25/mg Visible plan, $35/mo Visible+ plan, or $45/mo Visible+ Pro plan for the first 12 months. Promo code FRESHSTART required at checkout.
Mihai Andrici is a former news writer at PhoneArena. He's produced a large body of content during his PhoneArena run, drawing on years of experience in the field. Mihai's coverage touched on various topics, from Android phones to Apple ecosystem products. In addition, he was quite active in bringing the latest mobile tech deals to PhoneArena readers.
Recommended For You
COMMENTS (5)
COMMENTS (5)
All comments need to comply with our
Community Guidelines
PhoneArena Community Rules
A discussion is a place, where people can voice their opinion, no matter if it
is positive, neutral or negative. However, when posting, one must stay true to the topic, and not just share some
random thoughts, which are not directly related to the matter.
Things that are NOT allowed:
Off-topic talk - you must stick to the subject of discussion
Offensive, hate speech - if you want to say something, say it politely
Spam/Advertisements - these posts are deleted
Multiple accounts - one person can have only one account
Impersonations and offensive nicknames - these accounts get banned
To help keep our community safe and free from spam, we apply temporary limits to newly created accounts:
New accounts created within the last 24 hours may experience restrictions on how frequently they can
post or comment.
These limits are in place as a precaution and will automatically lift.
Moderation is done by humans. We try to be as objective as possible and moderate with zero bias. If you think a
post should be moderated - please, report it.
Have a question about the rules or why you have been moderated/limited/banned? Please,
contact us.


Things that are NOT allowed:
To help keep our community safe and free from spam, we apply temporary limits to newly created accounts: