How to rip DVDs to your mobile device

With carriers switching to data limits these days you might start thinking twice before streaming endless videos to your mobile device, the good news is with increasing onboard storage and lower prices on larger capacity microSD cards, the lowly DVD can get a second life by being ripped to a mobile friendly format.
So before you head out on that next family vacation with a stack of DVDs for the kids or get stuck on an airplane with no way to stream your favorite videos, take some time to read through this tutorial and start ripping DVDs for your next mobile adventure.
There are several software packages available out there that can easily and efficiently rip DVDs while keeping the file size in check so that you can cram a bunch of movies on your favorite smartphone or tablet. For this tutorial we are going to use HandBrake. HandBrake is an “open source, GPL-licensed, multiplatform, multithreaded video transcoder, available for Mac OS X Linux, and Windows.” In short, it’s free and works on all platforms. It also has presets for iOS and Android devices making it super simple for beginners.
With that being said, first things first, head on over to http://handbrake.fr/ and download and install the correct version of HandBrake for your operating system. Because HandBrake doesn’t include decoding libraries anymore, you will also need to grab a copy of VLC Media Player so that HandBrake can use the VLC libraries. VLC is also free and can be obtained at http://www.videolan.org/.
Because HandBrake can’t handle copy protected DVDs, we need one more file in order to rip our DVDs properly. Skipping this step will cause OS X users to get an error that says, “HandBrake could not find a compatible version of libdvdcss.” Windows users will go through the entire ripping process only to get garbled video and audio.
Follow the correct link based on the copy of HandBrake you downloaded:
- Mac OS X: http://download.videolan.org/libdvdcss/last/macosx/
- Windows (32-bit): http://download.videolan.org/libdvdcss/last/win32/
- Windows (64-bit): http://download.videolan.org/libdvdcss/last/win64/
OS X users can either download the libdvdcss.2.dylib file and place it in /usr/lib/ or download the libdvdcss.pkg and run the package installer, which will put it in the correct location for you. The second method is recommended for ease of installation.
Windows users need to download the correct libdvdcss-2.dll file. Make sure you download the same –bit version of the file as the version of HandBrake you downloaded otherwise you will end up with unplayable files. Copy that file into your HandBrake’s installation folder. The default location is c:\Program Files\HandBrake\. Finally, rename the file, removing the "-2", to "libdvdcss.dll" (without quotes).
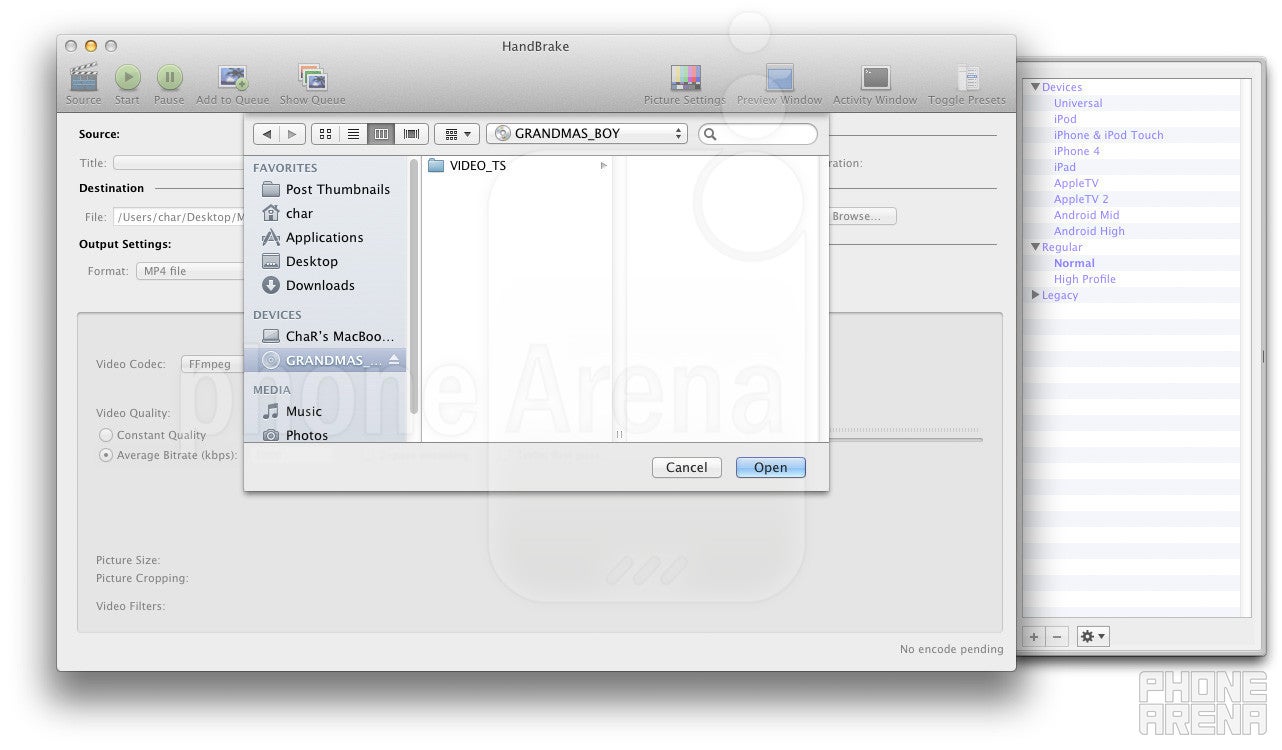
Select Source
Once you select your source HandBrake will spend a few minutes or so scanning the source drive. The speed of this step basically depends on the speed of your optical drive; so if it doesn’t finish right away, don’t panic. Just grab a cup of coffee or something and it’ll finish soon enough.
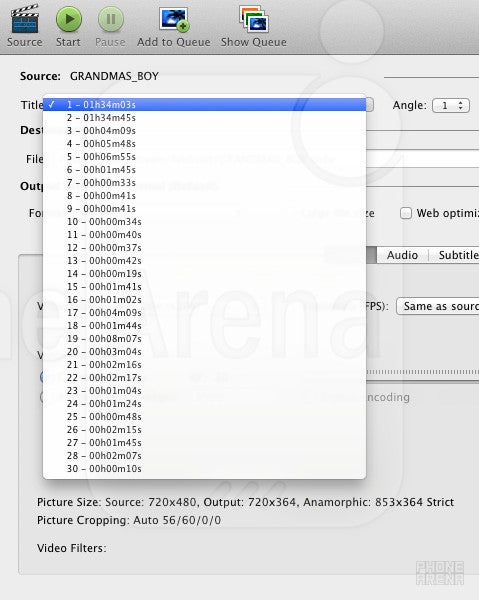
Select Title

Title 2 of 31
Once you select the correct title, you have the option to chose the angle and specific chapters. You can leave this set to the default settings unless for some reason you don’t want the entire movie or your disc supports different angles that you want to capture instead.
Underneath Source, you will see a section labeled “Destination.” At this point you can simply select where you want to save your video file. We highly recommend you output it to your computer’s hard drive and copy it to your mobile device after the rip is complete rather than going directly to your device.
Next we move on to the meat and potatoes of HandBrake – the Output Settings.
Those of you that have worked with video before will be very familiar with these settings. You can really dive in deep here and create a very high level of customization that is way outside the scope of this tutorial. For the sake of this How To, we are going to keep it relatively simple and work with the presets.
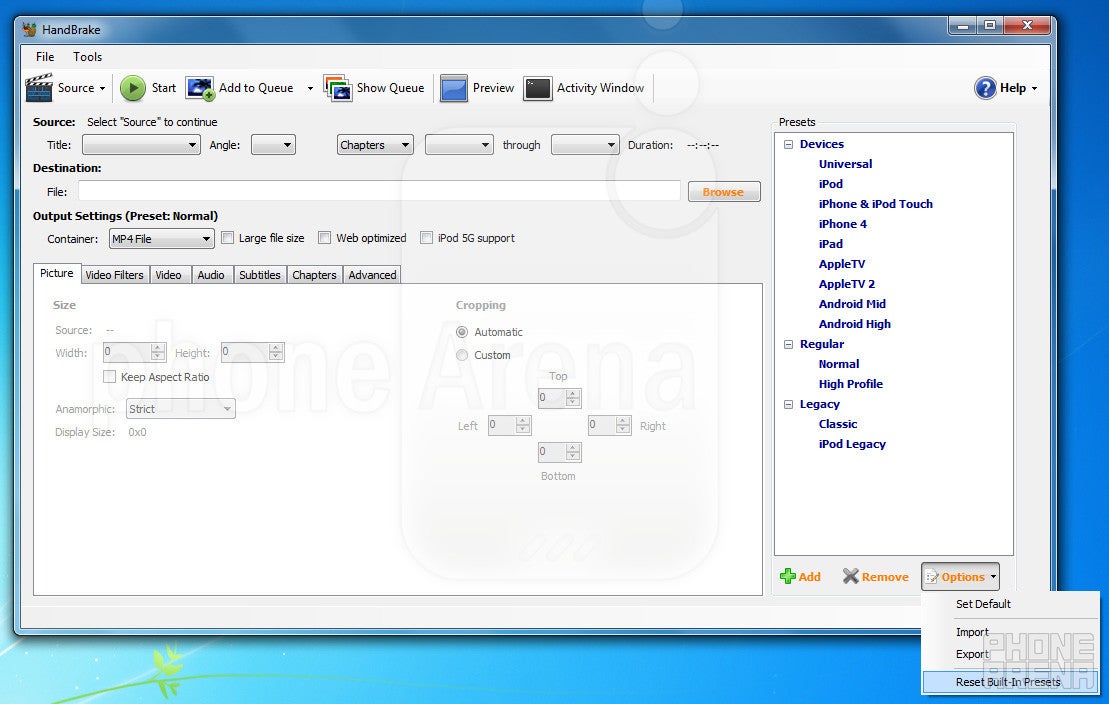
Available Presets
At this point you want to select the preset that most closely resembles your device. For iOS devices, this should be the easiest. iPad users, select “iPad”, iPhone 4 and 4S users select “iPhone 4”, and iPod Touch and pre-iPhone 4 users should select “iPhone & iPod Touch.” Using the correct preset will optimize the resolution for your device. iOS device owners should also keep in mind that Apple has strict video encoding guidelines for its devices. Wandering outside these parameters will render you unplayable video.
Android users have the choice of two presets – Mid and High. If you are unsure of your device’s resolution you can search for your device at PhoneArena.com to find the your display’s resolution. Most full touch screen devices released in the last few years will be best suited by the Android High setting. If you have a QWERTY device with a lower resolution screen or want a smaller file and don’t mind sacrificing image quality, you can use Android Mid.
Both the iOS and Android presets output a .mp4 file using the H.264 codec. That type of file should play fine on other mobile platforms such as Windows Phone and BlackBerry. BlackBerry owners might find it helpful to drop the Picture Size down to match their device. Make sure you select “Keep Aspect Ratio” and then just change the Width to match the width of your BlackBerry's display resolution. This will save you from having unnecessarily large files. Also, many BlackBerry users, especially PlayBook owners, have reported better success changing the Video Quality from “Constant Quality” to “Average Bitrate (kbps)” and entering a value of around 1500. Ultimately, no matter what device you have, it is best to play around with the various settings and save your own preset when you find the combination that works best for you.
Just a quick note to tablet owners – a standard DVD is 720 x 480 so using the iPad or Android High setting will work fine. If you are converting your own HD videos that you made or acquired elsewhere, you can mess with higher output resolutions or just use “High Profile” to take advantage of your higher resolution display.
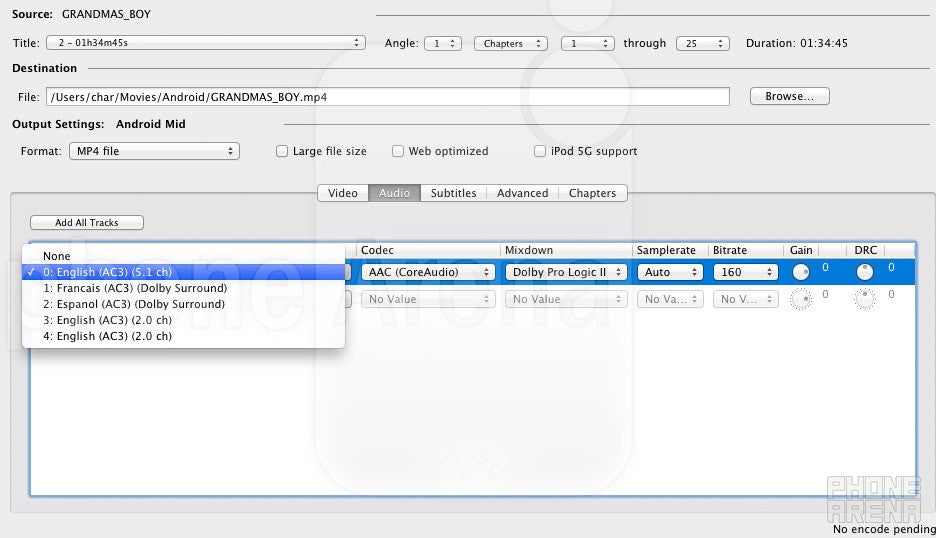
Audio Options
Unsurprisingly, the subtitles tab allows you render the subtitles onto your ripped video and the Chapters tab allows you to embed chapter markers into your file.
Once you have everything all set up the way you want, you’re ready to rip. If you are just ripping one title off of your DVD, you can simply click “Start” and the process will begin. If you want additional titles, for instance you want multiple episodes from a TV show season on DVD, click “Add to Queue” and work on your next title. Once you have all your titles from that disc in your queue, you can click start and HandBrake will encode all of the files.
When HandBrake starts going to work, you should go do something else. The speed will be greatly dependent on the length of the video and your computer’s specs, but most modern day computers with decent specs will take anywhere from 30 minutes to an hour to rip a standard movie on DVD. Again, that estimate can go way up depending on the source, the computer, and the settings you chose in HandBrake.
When it’s all said and done, you should see this:
At this point you can move your video onto your device and test it out. Congratulations! You just ripped your DVD to your mobile device. Now go out and enjoy.
Follow us on Google News


Things that are NOT allowed:
To help keep our community safe and free from spam, we apply temporary limits to newly created accounts: