Apple’s earbuds took the world by storm and have become very popular among iPhone users. While the AirPods 2 offer a great sound experience, the AirPods Pro take it one step further, with rubber ear tips and active noise cancellation. The newest Apple headphones are the AirPods Max. These are premium wireless headphones made to offer the best audio experience.
In order to get the latest features on the AirPods, like the new Find My location support introduced with iOS 15, you need to make sure your AirPods have the latest firmware version. In this article, I will show you how to do exactly that.
All AirPods, including the AirPods Max, receive new firmware updates
How to update AirPods firmware
Firmware updates are a rare occurrence when it comes to AirPods, but when one comes you should make sure you have it. How to update your AirPods Pro firmware or your AirPods firmware is a question that many users might ask themselves, and the answer isn’t very straightforward.
There are three steps you need to take to update your AirPods firmware with the latest version. Keep in mind that there is no manual way to update these, but for AirPods to get updates you need to make sure you’ve taken the next steps. For me, it took around 10 minutes of the AirPods being on the charger and in close proximity to my iPhone in order to update.
Here are the three steps you need to follow:
First, you need to make sure your AirPods or AirPods Pro are in their case. The AirPods Max do not have a charging case, so just plug them in via Lightning cable.
After you’ve made sure your AirPods are in their charging case, you need to connect the charging case itself to a wired or wireless charger. This could either be wired charging via Lightning cable or wireless charging, whichever is more convenient to you at the moment.
The final step is to move your iPhone or iPad near your AirPods with Bluetooth and Wi-Fi turned on and paired, and the smartphone or tablet itself connected to the internet. Unfortunately, there is no manual way to install the new AirPods firmware on your earbuds, so the accessory must stay close to your iPhone or iPad. Then you will need to wait for the firmware version to change in Settings in order to make sure you have the latest one. But how do you do that exactly?
Recommended Stories
Make sure your AirPods are inside with the case charging
How to check the firmware version of your AirPods
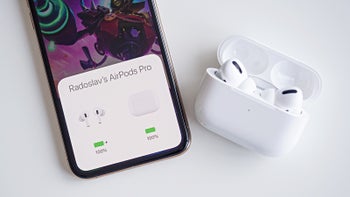
The latest firmware version for the AirPods 2, AirPods Pro, and the AirPods Max as of October 7 is called ‘4A400’. For example, my AirPods Pro were at firmware version 3E751. Like I mentioned earlier, it took around 10 minutes on the charger for my earbuds to get the updated firmware. Here is what you should do to check which version you’re at:
The first thing you should do is go into Settings on your iPhone or iPad. After that, you should go into the ‘About’ tab.
When you’re in the ‘About’ tab, an AirPods option appears under the Carrier Lock (iPhone) or EID (Wi-Fi only iPads) section. But this option is there only when your iPhone is connected to your AirPods. If you don’t see the option, open the lid of your AirPods’ charging case while the earbuds are in there and the option will appear.
After the AirPods option appears, you should tap on it. The AirPods menu includes information about their model number, serial number, hardware, and firmware version. Check the firmware version and see if it is the latest one. If not you should follow the previous steps for updating the AirPods’ firmware.
Iskren, a tech journalist at PhoneArena, has been passionate about technology since his childhood, sparked by his early experiences with phones like the Ericsson T28 and Sony Ericsson P910i. After earning a bachelor's degree in Media and Journalism, he turned his fascination with smartphones into a career, with a particular interest in Apple and Motorola. Outside of his tech pursuits, Iskren enjoys watching TV series, movies, driving, and has a deep passion for cars and Formula 1. He looks forward to the future of mobile tech, particularly the potential of rollable smartphones.
Recommended Stories
Loading Comments...
COMMENT
All comments need to comply with our
Community Guidelines
Phonearena comments rules
A discussion is a place, where people can voice their opinion, no matter if it
is positive, neutral or negative. However, when posting, one must stay true to the topic, and not just share some
random thoughts, which are not directly related to the matter.
Things that are NOT allowed:
Off-topic talk - you must stick to the subject of discussion
Offensive, hate speech - if you want to say something, say it politely
Spam/Advertisements - these posts are deleted
Multiple accounts - one person can have only one account
Impersonations and offensive nicknames - these accounts get banned
Moderation is done by humans. We try to be as objective as possible and moderate with zero bias. If you think a
post should be moderated - please, report it.
Have a question about the rules or why you have been moderated/limited/banned? Please,
contact us.


Things that are NOT allowed: