Hey there, up-and-coming shutter bugs! Remember the smartphone camera race rules of yesteryear? Back then, it was all about who will pump out the biggest resolution sensor – it was a megapixel race, throwing numbers in the faces of consumers as proof that one's camera is better than the other. Nowadays, it has become clear that it's hardly all about the resolution of a camera – its aperture size, general build technology, and the software that tweaks the images as you take them are just as, if not more, important. Manufacturers now see that there is a greater benefit to be had in teaching consumers about these differences, as well as granting them more access to manual camera settings, such as shutter speed and ISO.
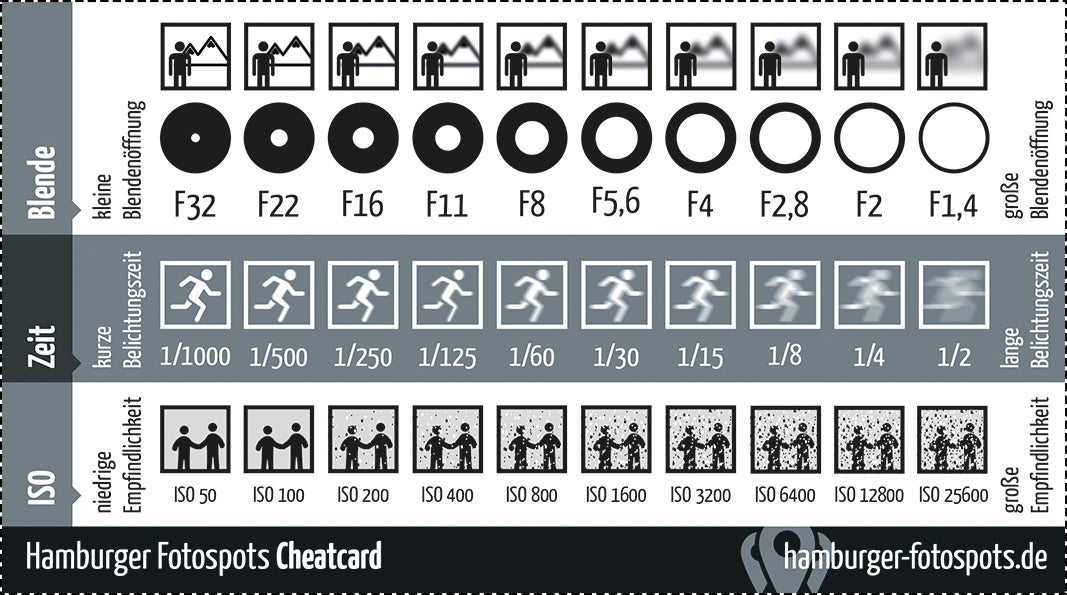
But what exactly do these settings change, and what's this aperture size (F/”something-something?”) everyone keeps talking about? Well, the bloggers at Photoblog Hamburg were kind enough to create this quick-reference graph that you see above. From top to bottom, it shows the various effects of the aperture size, shutter speed, and ISO setting.
So, the aperture size has two effects on a photo. Firstly, the larger it is (counterintuitively, a larger aperture is marked with a lower number, as can be see in the graph), the more light it lets in and the better it represents a depth field in the image – that's when you want to focus on a specific object and have stuff in the background / foreground be naturally blurred, bringing more attention to the actual subject of the photograph. In other words, in most cases – especially for our mobile, casual photography needs, a bigger aperture is almost always a good thing. Of course, professional photographers will like to have a choice and use smaller apertures – for example, when they wish to shoot a large landscape with differently placed objects.
Shutter speed is, of course, the amount of time for which the camera is actually capturing what the sensor "sees". If you are out on a nice sunny day, keeping shutter speed to the minimum will result in great, non-blurry pics, as the sensor will only capture a fraction of a second, not allowing you to spoil the image by shaking your hand, or the objects to move around too much. On the other hand, setting shutter speed too low will result in overexposed pictures, as too much light will get to the image. In darker environments, you will want to lower the speed to allow that light to get in, but not too much as to avoid excessive blur. How do you achieve that? This is where ISO comes in.
ISO is another setting that has to do with how much light ends up on the image. A low ISO will introduce the least amount of light, whereas a higher one will give you more of it. The downside is, as can be seen on the graph, that high ISO numbers introduce noise into the photo. So, when in a dark environment, one must play with the balance between ISO and shutter speed, in order to achieve a photo that is not too noisy and not too blurry. Another example of using the ISO / shutter speed combo to help you achieve better results are sports shots – one is advised to set the shutter speed as high as possible, allowing them to capture the athletes in motion without blurring them too much, and compensate for any lack of exposure by raising the ISO accordingly.
So, if you find yourself often forgetting these guidelines, download the image above and use it for reference whenever needed.
source:
Fotoblog Hamburg via
Lifehacker


Things that are NOT allowed: