How to download and install iOS 9 beta 1 on your iPhone or iPad without a dev account
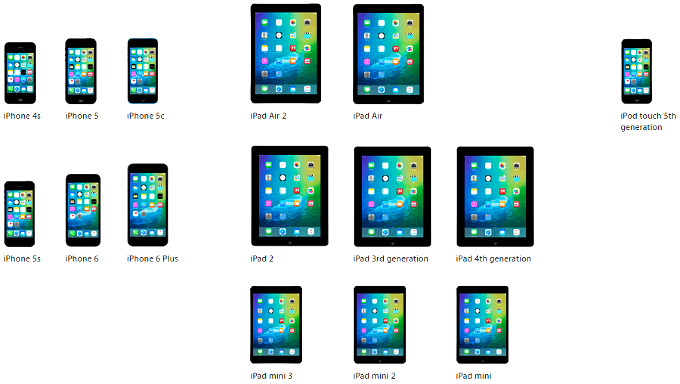
Apple devices compatible with iOS 9
Apple's newest iOS 9 edition focuses more on performance than a snazzy new interface, and yet there is plenty to look forward to, like split-screen multitasking on the iPad, a fresh News app, intelligent virtual butler and vastly improved Siri, plus a new Notes app and on-screen keyboard.
Since the main improvements are under the hood, you can expect a diminished app and OS footprint, sped-up system, and, above all, better standby times resulting in an hour to three hours extra running time on a charge. Here's how to get the goods on your iPhone 6, iPhone 6 Plus, iPhone 5s, iPhone 5c, iPhone 5, iPhone 4s, iPad Air 1 and 2, iPad mini 1-3, third- and fourth-gen iPad, and the fifth-gen iPod touch right now.
First method - install with an official Apple Developer account
- First, do a full backup of your iPhone, iPad or iPod touch, using the latest version of iTunes;
- Go to the iOS developer site, and sign up for an account (that's $99 for an annual membership);
- Tap on the iOS 9 beta link below the main menu, and choose your device from the list from the ones you see in the snapshot above;
- Once the file downloads, unarchive it on the desktop, choose your device in iTunes, and hold the option (alt) key on a Mac or the shift key on a Windows, while you click on “Check for update.”
- Pick the iOS 9 beta file from your desktop, and then restore your data from the backup.
Second method - install without an Apple UDID
If you want to install the iOS 9 Beta 1 without shelling money for a developer account, the process becomes a tad more convoluted and risky, but certainly doable, if you absolutely can't wait for the public beta version to hit your device next month:
1. Back your stuff to iCloud, and download the software corresponding to your device to your desktop:
2. From here, simply repeat step four from the previous guide, namely choose your device in iTunes, and hold the option (alt) key on a Mac or the shift key on a Windows, while you click on “Check for update,” then point to the iOS 9 file on the desktop, and wait for the update to finish.
Bear in mind that with the second option none of the personal stuff you have on your phone will be restorable once you downgrade back to iOS 8.3, so you'd have to restore your stuff from the iCloud backup you did in step 1.

source: CydiaPie
Popular stories


Latest News


Things that are NOT allowed: