So, you've just bought that shiny, new Apple iPhone 4S, and you're loving every aspect of it... but you just can't figure out one thing – how are you supposed to create a custom ringtone out of your favorite song, and import it into that beautiful but sometimes seemingly stubborn as hell glass-and-steel body. Or, here's another example (this time a bit more tragic) – you've been having the iPhone for the last few years, and you are loving every aspect of it, but you just can't figure out one thing - how are you supposed to create a custom ringtone out of your favorite song and actually use it?! Well, the time has come to put an end to this misery, for there is a way to do this! Below you'll find our step-by-step guide, which includes all the details that you need for that doable, but, dare we say, slightly more complicated that usual process. Of course, this guide is for those users who want to create a ringtone from a DRM-free file, which in our case means a music file, which they have obtained from a place other than iTunes.
1. Alright, first things first – be sure to get yourself a nice cup of coffee. You'll need it in order to stay awake while executing all of the steps. Hey, you want this custom ringtone or what?
2. Now you need to pick a DRM-free song, which you want to make a ringtone of. Drag that file to your iTunes music library. Once you've selected the track in your iTunes library, you'd want to choose the exact part that you'll want as a ringtone. Feel free to listen to your song, and write down your desired start and stop times for the ringtone. Keep in mind that the passage shouldn't be longer than 40 seconds.
Recommended Stories
3. Once you're ready with that, please right-click on the song, and choose “Get Info”. In this pop-up, you need to navigate to the “Options” tab, and right there you'll see options to set a “Start Time” and a “Stop Time”. You guessed it – this is where you'll have to input the times that you wrote down a minute ago.
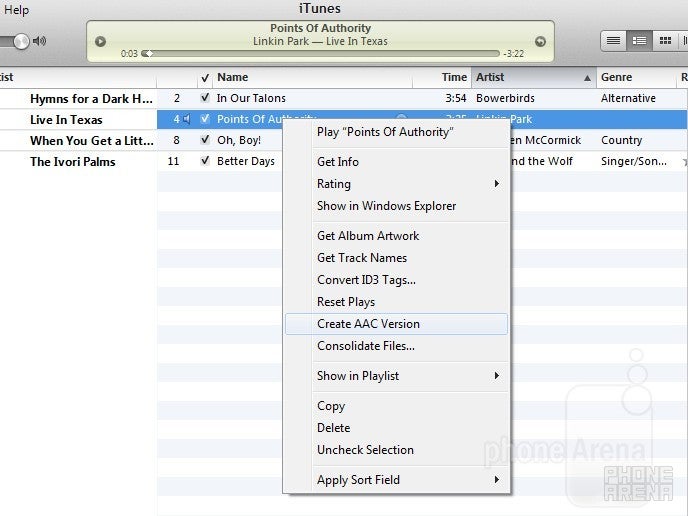
4. Now that you've done this, simply click the “OK” button to close the pop-up. From this position, you should again right-click on your track, and this time you'll have to choose “Create AAC version”. As you've noticed, the new, AAC version of your track has appeared in addition to your old track.
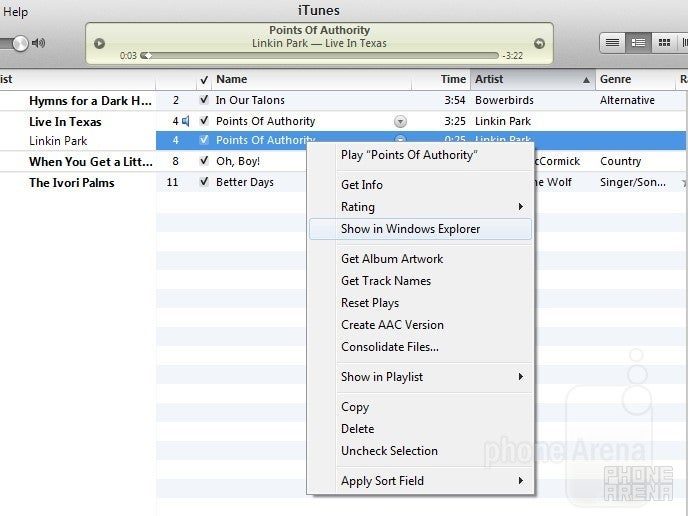
5. Okay, so now you have a nice new AAC file, right? Right-click on it and choose “Show in Windows Explorer” for PC users or “Show in Finder” for Mac users. A new window will pop up, with the song selected, but let's first go back to the iTunes library and delete the AAC song from there. When prompted, you should choose “Keep File”.
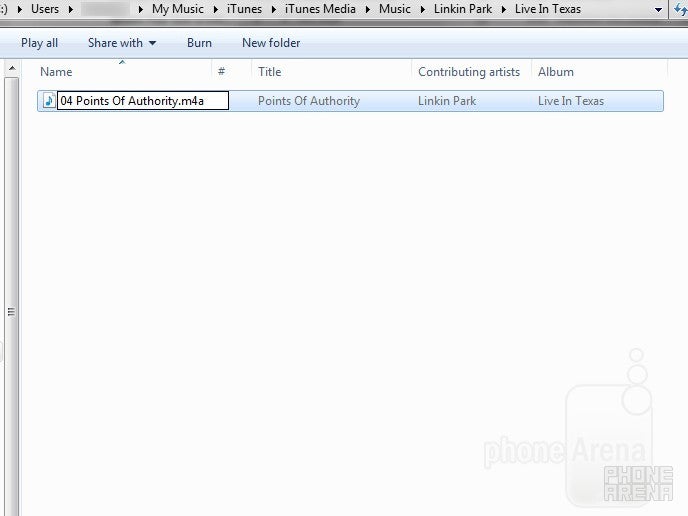
6. We're now left with an AAC file selected in Windows Explorer, or Finder, and this same file actually missing from the iTunes library. What we have to do now is to change the extension of this file. For those who don't know what a file extension is, we'll just quickly mention that it can be looked at as a part of the file's name, which defines the type of file. For Windows users, file extensions might be, or might not be visible. If you see the part “.m4a” written after the name of your AAC file in Windows Explorer, then you should just right-click on the file and choose “Rename”, after which you have to replace “m4a” with “m4r”, which is obviously the file extension for iTunes ringtones. However, if file extensions aren't visible on your system, do the following: while in Windows Explorer, hit the “Alt” key on your keyboard, and choose “Tools->Folder Options” from the menu that just appeared. Then, you need to move to the “View” tab, and from there, you should uncheck “Hide extensions for known file types” and hit “OK”. This will make the file extension of your AAC file appear on screen, allowing you to change it following our instructions from the beginning of this step. Mac users simply have to right-click on the AAC file in Finder, choose “Get Info” and then change the file's extension.
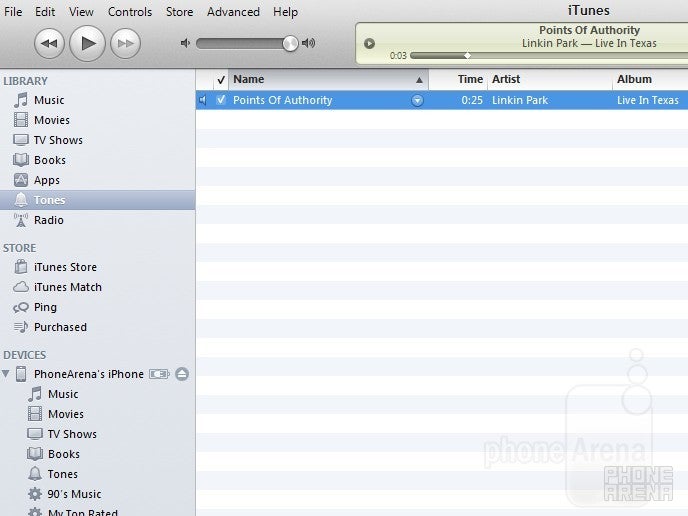
7. Now that we've dealt with this tricky part, all we need to do is double-click on our file and, surprise – it automatically opens in iTunes, neatly nested within the “Tones” section. However, if by some chance the ringtone doesn't show up, it is probably because your “Tones” section isn't set to be active in iTunes. To make it appear, you have to go to “Edit->Preferences” in iTunes, and there you'll need to check “Tones” from the list of “Sources”.
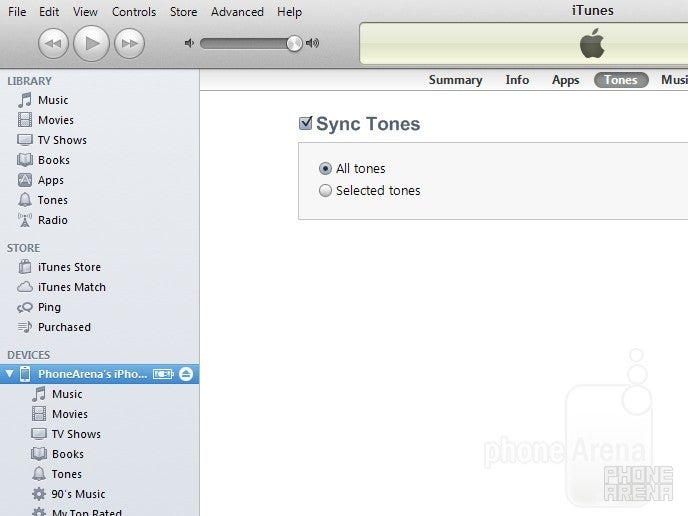
8. The only thing left to do is to sync iTunes with your iPhone, and your brand new, custom ringtone will appear as an option in your iOS device's Settings->Sounds->Ringtone menu. If it doesn't sync, that means you'll have to click on your iPhone in iTunes, go to the “Tones” tab and choose “Sync Tones”. This should do it.
Well, we told you it's not among the simplest of processes, but it's certainly doable! And now, you have your favorite song set as a ringtone on your iPhone – we don't know why this should sound like such a big deal, but nothing is perfect, you know, including the world of the ubiquitous iTunes sync.
Recommended Stories
Loading Comments...
COMMENT
All comments need to comply with our
Community Guidelines
Phonearena comments rules
A discussion is a place, where people can voice their opinion, no matter if it
is positive, neutral or negative. However, when posting, one must stay true to the topic, and not just share some
random thoughts, which are not directly related to the matter.
Things that are NOT allowed:
Off-topic talk - you must stick to the subject of discussion
Offensive, hate speech - if you want to say something, say it politely
Spam/Advertisements - these posts are deleted
Multiple accounts - one person can have only one account
Impersonations and offensive nicknames - these accounts get banned
Moderation is done by humans. We try to be as objective as possible and moderate with zero bias. If you think a
post should be moderated - please, report it.
Have a question about the rules or why you have been moderated/limited/banned? Please,
contact us.


Things that are NOT allowed: